Posted on

How to Add Homebrew Club Affiliation to Your AHA Member Profile

With the rollout of the new club insurance premium reimbursement plan, it is important that all AHA members who are in good financial standing with their local homebrew clubs update their account on HomebrewersAssociation.org. This will allow us to accurately track the number of members in your club and your club’s eligibility to have the AHA pay for your liquor liability insurance.

Updating your club affiliation is easy. Just follow these simple steps:

  1. Click “MY ACCOUNT” on the AHA homepage. Note: If you are not already signed in, you will need to click “Member Login” and enter your credentials.update club affiliation
  2. Click “Yes” when asked if you belong to a homebrew club.update club affiliation
  3. Type the name of your club in the search box. Clubs registered with the AHA will populate in a drop-down box based on your search terms. Be sure to choose the correct club. You can select up to five (5) different clubs if you are a dues-paying member in all five. update club affiliation
  4. Click “Save.”
    update club affiliation

That’s it! If you have any questions about updating your profile, or if you need to have your username and/or password reset, please contact us at info@brewersassociation.org or call us at 303-447-0816 ext. 0.

The post How to Add Homebrew Club Affiliation to Your AHA Member Profile appeared first on American Homebrewers Association.

Posted on

Heart of the Valley Homebrewers Named 2017 Radegast Club of the Year

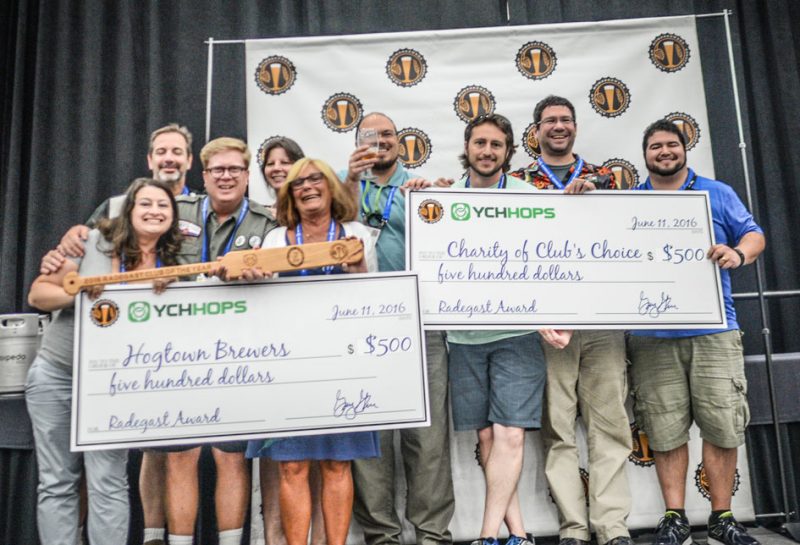
This article was written by Heart of the Valley (HOTV) homebrew club member Barry Cooper as part of the 2017 Radegast Club of the Year Award application. HOTV was awarded the 2017 Radegast Club of the Year Award.

Find out how your homebrew club can be the next Radegast Club of the Year.

* * *

Heart of the Valley Homebrewers (HOTV) serves homebrewers from Oregon’s central Willamette Valley, drawing its members from Corvallis, nearby Albany, and the surrounding areas. The club’s main focuses are on beer and brewing education; hosting one of Oregon’s oldest homebrew competitions; providing community service; and charitable giving. The last of these is driven by the club’s fall beer festival, Septembeerfest.

Our membership varies because we are based in a college town, but HOTV has about 30 to 35 active members at any one time. While there is little ethnic diversity in the Willamette Valley of Oregon, the club strives for inclusivity through gender diversity and occupational diversity—all interested members of our community are welcome to join the club.

Women take an active part in running the club, and in recent years, women have served as president, competition chair, and secretary. Corvallis, which is home to Oregon State University (OSU) and its strong Fermentation Sciences program, contributes members, resources, and inspiration to the club. Our membership reflects the community: students (including some studying fermentation sciences), staff and faculty; homebrew storeowners; commercial brewers; professional workers and tradesmen; all contribute ideas and to the club’s success.

HOTV has a long and glorious history. It was founded as Corvallis Homebrewers in 1982, with the inaugural meeting held on June 6 of that year. As homebrewers from surrounding communities became interested in participating, the name was later changed to the more inclusive Heart of the Valley Homebrewers. The club has a history of recruiting members for the AHA. For example, one of our members, (the late Lee Smith) was profiled in Zymurgy (March/April 1999), where he was recognized as the AHA Recruiter of the Year.

HOTV meets monthly, usually at the home of a member, where members sample one another’s beers, as well as those of local brewpubs and unusual commercial brews. We occasionally arrange comparative tastings of commercial examples of different beer styles, with members voting according to their preferences. This is a great way to experience brews that one hasn’t tried before and to find new favorites and new brewing challenges. Occasionally, meetings are held at our local brewing supply shop, Corvallis Brewing Supply, or at local craft breweries.

“Women take an active part in running the club, and in recent years, women have served as president, competition chair, and secretary.”

HOTV is formally organized and governed by its bylaws. A board of directors meets regularly to discuss club business, and we publish minutes of both club meetings and board meetings.

The club produces a newsletter that is distributed to members electronically. We also maintain a website at hotv.org. The club is also on Facebook, which has become one of our primary means of communication. We maintain a special page for our Septembeerfest event. The newsletter keeps members informed of club educational matters, club activities, deliberations, and decisions of the board of directors.

HOTV is strongly committed to the education of our members and to the general public in the art of brewing in general and homebrewing in particular. To that end, we promote the following activities.

Brewery Education Tour

This is a day tour of Oregon breweries and brewpubs held in the spring and the fall. In the spirit of responsible drinking, the club hires a bus and driver to avoid the temptation to drink and drive. The educational purpose of the event is to provide insight into how breweries, especially small breweries, operate and to give members behind-the-scenes access not usually available to the public.

For example, in November 2015, the club’s Fall Brewery Educational tour traveled east to Bend, home to more than 30 breweries. The highlight of the trip was visiting a small brewery, the Ale Apothecary, which focuses on barrel-aged sour beers; this brewery is known for lautering out of a tree trunk, over a bed of pine brush. This incredibly rewarding brewery visit really expanded members’ views of what is possible with brewing. In late October 2016, we visited Hood River, Oregon, and enjoyed a personalized tour of Logsdon Farmhouse Ales.

Brew Judge Certification Program (BJCP)

HOTV

The club provides beer judge training, with the aim of taking judging exams. These activities are held according to need, whenever there are sufficient numbers of prospective participants. They are important in exposing prospective judges to many different beer styles, with an appreciation of their desired characteristics. HOTV currently has 16 members who are BJCP certified. That amounts to almost 50 percent of our membership. This year, we are proud to say that two more of our members passed both the online and tasting exams.

Cooperative Brewing with the Oregon State University Fermentation Science

Program: These are highly educational sessions in which members participate in brewing on the equipment and facilities at OSU. The purpose of this event is to teach members the fundamental biochemical and biological principles underlying mashing, fermentation, and other aspects of brewing. We learn a lot and have a heck of a fun time doing it!

Sensory Training: As part of our educational mission, the club periodically organizes sensory tastings to help participants recognize off flavors. These sessions, open to the public, are also held at OSU and are taught by faculty members in the Fermentation Sciences program.

Public Outreach Club Brew Days

These events are held periodically in the “brewhouses” of club members or, occasionally, at microbreweries. Their purpose is help homebrewers learn from one another and to educate members and newcomers about different brewing techniques, different equipment setups, etc. Attendees are encouraged to bring friends who are interested in becoming brewers.

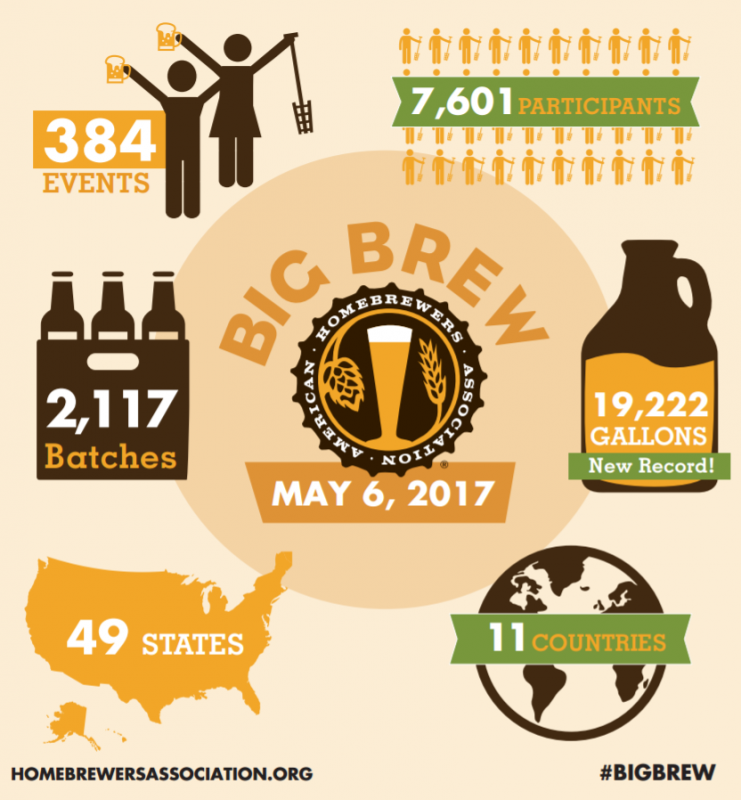
Members of the club participate in other educational events such as the AHA Big Brew day. These events are held in locations where members of the public are likely to stop by, ask questions, and, hopefully, join the hobby. We take any opportunity that we can to educate the public. In 2015, out of the many brew clubs in Oregon, HOTV was asked to put on a demonstration of homebrewing at the Oregon State Fair. This year we plan to hold a Big Brew day in downtown Corvallis, in a parking lot next door to our local homebrew store (LHBS), Corvallis Brewing Supply. This should attract a lot of attention.

HOTV Homebrewers

Homebrew Competitions

Competitions add variety for club members and allow the club to give back to the homebrewing community. One of the longest continuously running homebrew competitions in the nation, HOTV is hosting its 35th annual Oregon Homebrew Festival. This competition is held in Corvallis or Albany on the third weekend in May each year. It is an AHA and MCAB (http://mcabchampionship.com) recognized event.

“One of the longest continuously running homebrew competitions in the nation, HOTV is hosting its 35th Oregon Homebrew Festival.”

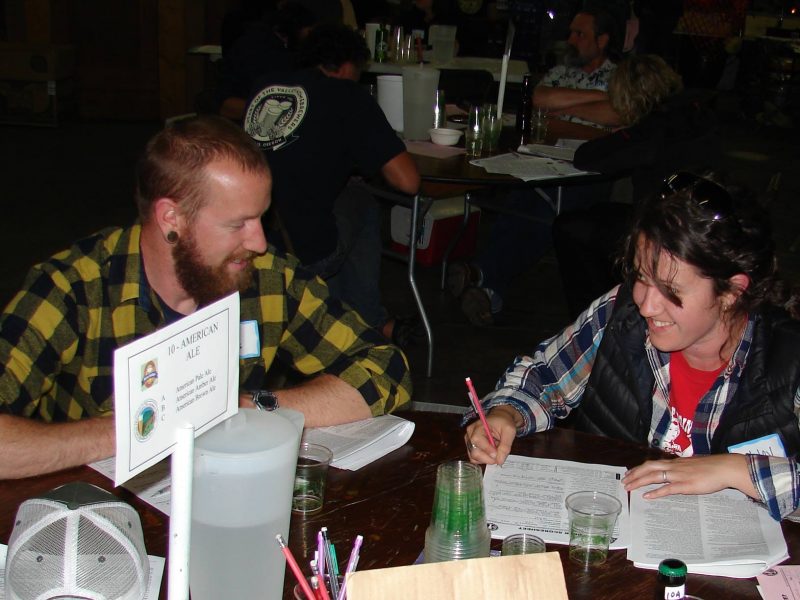
Homebrewers from all over the country enter the competition, from our own members to the public. BJCP judges from the club and surrounding area evaluate the entries, and we involve both novice judges and newcomers. The Friday before the event, we hold new judge training for all new judges wishing to participate, which is designed to promote beer literacy and education. Prizes and ribbons are awarded to the winners.

This event serves two major educational purposes. First, it allows judges to develop their tasting and evaluation skills, often leading to their participation in the BJCP. The second purpose of the event is to provide brewers with critical evaluations of their beers. Entrants are provided with a written evaluation of their entries using standard BJCP forms, helping to educate them as to ways they can improve their brews.

Other Educational Activities

We support brewing education in additional ways. We regularly donate to the Glen Hay Falconer Foundation, an organization dedicated to brewing education. Although its focus tends to be on education of brewing professionals, we feel that it helps with the well-established tradition of experienced homebrewers becoming professionals.

This year HOTV began a new program of financial support for members to attend the Pacific Northwest Homebrew Conference, an educational program that includes a series of lectures by experts, as well as tastings of commercial beer and homebrew.

One of our members owns Corvallis Brewing Supply, our LHBS. He holds regular classes introducing people to homebrewing, which benefits both his business and the hobby at large.

Finally, as pointed out elsewhere, we provide a booth at Septembeerfest at which we serve beers brewed by our members. Our goal is to convince members of the public attending the festival that homebrewers can make beers rivalling the best commercial brews.

Charitable Giving

HOTV

Charitable giving is a significant aspect of the club’s activities. Despite HOTV’s relatively small club size, it makes a huge impact benefiting local community charities. Because all of our profits are donated to charitable causes, the IRS has granted HOTV tax-exempt status under Section 501(c)(4). Members participate in several activities to educate homebrewers and benefit the local community.

Last year marked a fantastic Septembeerfest with more than 3,200 participants attending. We boasted an awesome beer, cider, and mead selection (72 varieties on more than 50 taps), great music, and food. This is the club’s annual signature event, and in recent years, we have raised $25–30,000 in annual donations for charities that include the Linn-Benton Food Share, the Heart of the Valley Homebrewers’ Endowment at Oregon State University supporting scholarships in Fermentation Science, the Glen Hay Falconer Foundation, and other local charities.

“Since 2006, HOTV has donated more than $140,000 to local charities.”

Held annually, the Heart of Valley Homebrewers’ Septembeerfest will mark its 10th anniversary in September 2017. This fall festival has grown steadily since its inception and become an expected tradition of the Corvallis beer scene as we endeavor to highlight the best and most interesting beers, ciders, and meads produced. This year, we expect even greater attendance, and it serves as the showcase event and kickoff of Corvallis Beer Week.

Septembeerfest is not just about serving commercially produced beverages. True to our educational mission, HOTV hosts a popular tent in which we serve free tastings of members’ brews in order to educate attendees about our passion, to show that homebrewers can produce excellent beer, and to try to get them involved in the hobby.

With the success of Septembeerfest and the Oregon Homebrew Festival, HOTV is able to support a number of worthy local charities and organizations including Linn Benton Food Share, Heart of the Valley Homebrewers Endowment at Oregon State University supporting scholarships in Fermentation Science, and the Glen Hay Falconer Foundation. Since 2006, more than $140,000 has been donated to local charities, the equivalent of almost $1,000 per member in recent years.

Donations to these groups have been as follows:

Linn-Benton Food Share

  • Total donated since 2006: $94,825
  • For more than 30 years, Linn-Benton Food Share has been feeding Linn and Benton counties, because they are committed to the idea that no one goes hungry in the two county area they serve.

Heart of the Valley Homebrewers Endowment at Oregon State University

  • Total donated since 2006: $34,250
  • The Lee Smith Scholarship has been established to honor the late Lee Smith, a past club treasurer and an activist for the homebrewing hobby. As mentioned previously, Lee was recognized for his efforts in Zymurgy in 1999.

Glen Hay Falconer Foundation (http://www.glenfalconerfoundation.org)

  • Total donated since 2006: $7,250
  • The Glen Hay Falconer Foundation is a nonprofit organization created to commemorate and celebrate the life, interests, and good works of a well-loved and leading Northwest brewer. The mission of the Foundation is to contribute to the Northwest craft brewing community by providing opportunities for professional and aspiring brewers to further their knowledge and expertise.

Other donations:

  • We have contributed $3,750 to Kiwanis & $675 to other smaller charities.

Distribution of donations graph:

heart-of-the-valley

Adopt-A-Highway program

Not all volunteer activities of HOTV are geared towards monetary donations. The club also donates its time to keeping the area’s highways litter-free. The club has adopted a two-mile section of Oregon Highway 20 between Corvallis and Albany, the two communities from which most of our members come. Club members organize and perform litter pickups four times a year on this section of road. Although not strictly speaking a charitable activity, this is a significant public service aimed at helping to keep this beautiful part of the country—well—beautiful. At last count over 2,370 bags of trash have been picked up since 1995.

HOTV is a brewclub that celebrates the wonder of beer and the challenge of making the best beer possible. More than that, we are involved in numerous activities designed to attract people to the hobby and we are committed to being good neighbors, supporting our community, our local brewers and, especially, our local educational programs. We believe that this club is more than a brew club; despite its small size, how awesome is it that it can accomplish so much and donate so much to local charities and the local community?

“We believe that this club is more than a brew club; despite its small size, how awesome is it that it can accomplish so much?”

The post Heart of the Valley Homebrewers Named 2017 Radegast Club of the Year appeared first on American Homebrewers Association.

Posted on

Wet Hopped Beer: Showcasing Fresh Hops

Fresh is best, they say, and beer is no exception. Fresh ingredients are important for flavor and quality, and hops are among the most celebrated. The hop harvest is like Christmas for brewers, though the harvest happens a bit earlier, sometime in late summer to early fall. But that doesn’t stop hop growers and hop heads from celebrating.

I certainly wasn’t the first person to add freshly picked hops to a batch of homebrew—I must concede that title to those who preceded me hundreds of years ago. However, countless beers across the United States owe their existence to the addition of fresh hops, also called wet hops.

The two terms aren’t necessarily mutually exclusive. While brewers and beer drinkers tend to mean the same thing when they interchange them, fresh hops can mean hops used right out of the oast house, while wet hops are never dried (well, duh). The difference between the two matters just as much in the kettle as it does when you drink the beer. For this article, we’ll be focusing on wet hops.

Vinnie Cilurzo at Russian River Brewing described the difference in For the Love of Hops by Stan Hieronymus: “They both do a great job, but you get more fresh aromas and flavors when the product is wet, and it takes more, as you have to compensate for the water that is still in the hops… I find more melon and grassy notes in wet hops, grassy almost like a Sauvignon Blanc.”

The late Michael Jackson described one of the most influential commercial wet-hopped beers in the United States circa 1996, Sierra Nevada’s Northern Hemisphere Harvest Ale, as having “the lightest touch of malty sweetness to start; then a surge of cleansing, refreshing, resiny, almost orange-zest flavors; and finally, an astonishingly late, long finish of fresh, appetite-arousing bitterness.”

Not only do wet hops impart different flavors and aromas, but they are delicious when used correctly. There are a few keys to brewing great wet-hopped beers and a few more things you should understand about hops to keep that wet-hopped goodness in your homebrew.

Wet Hops Are Wet

Wet hops contain about 80 percent water, so you’ll need to use more than you would when using dry hops. In general, four to six times as many wet hops are needed by weight as dry hops. For example, one ounce of pelleted dry hops would be the equivalent of four to six ounces of wet hops. You get the idea.

Wet hops take up more room in the kettle, enough to consider reducing batch size depending on the overall hop amount and the size of your system. They’ll also add water that needs to be considered when calculating original and final gravities.

Freshness Is Everything

When Ken Grossman, Founder and CEO of Sierra Nevada Brewing, first started homebrewing, he had difficulty finding quality hops because “the homebrew trade consumed an insignificant amount of hops and, apparently, in the eyes of hop growers and merchants, wasn’t worth pursuing.” Oh, how times have changed.

There’s been a resurgence in hop growing since the 2008 “hop crisis,” making it easier for commercial brewers and homebrewers to source locally grown hops or simply supply their own.

Once harvested, wet hops literally begin to rot because the cones contain a high percentage of water, which is why farmers transport them directly from the field to breweries—or in your case from your backyard to your brew setup. It’s important to use wet hops within a matter of days of picking, preferably within one day, lest you risk spoiling and ruining your hops.

wet_hopping_internal

Hops in Moderation

Like all enjoyable things, wet hops should be used in moderation. You can quickly reach a breaking point at which desirable “grassy” aromas and flavors remind you of chewing on a salad. Other undesirables include notes of tobacco and chlorophyll to name a few.

Remember: you’re adding a huge amount of green matter to your homebrew, the result of which can be green flavors. These are acceptable in wet-hopped beers to an extent. Brewing requires balance and an awareness of the style. It’s a good reason to use dried hops for the bittering portion of your boil and wet hops for the aroma and flavor. If you try to drive up bitterness with wet hops, you risk losing their nuances.

Using dry hops for bitterness also reduces hop matter in the kettle and lets you work with hops of known alpha acids. You don’t really know how much bitterness the hops from your backyard may hold, and using them near the beginning of the boil can yield unpredictable IBUs and an even more unpredictable beer.

Life Cycle of Hops

Hops Before the Kettle

Hops’ desirability lies in the essential oils they produce, which constitute up to 4 percent of the hop cone. These oils increase during the weeks before harvest and continue to change after the hops are dried and stored.

In Stan Hieronymus’s book For the Love of Hops, he points to recent research that tracks how dramatically essential oils change in the days before hops are picked, and he implies that wet hops may produce different odor compounds than do dried hops. However, there haven’t been any similar studies about wet hops. “This is not a scientific exploration of brewing,” said Ninkasi Brewing co-found Jamie Floyd. “Were’s the economic benefit of analyzing a beer made once a year?”

Hops in the Boil

Hops are used during the boil because the high temperatures activate many components, but a side effect is that the same phenomenon removes some of those essential oils we crave. Thus, brewers wanting to know how much bitterness they’re adding may choose to use dried hops with known, measured alpha acids. Those concerned with preserving oils, such as linalool and gernaniol, should add wet hops towards the end of boil, at flameout, or during the whirlpool.

Hops in the Fermenter

The effect of adding hops during fermentation is somewhat inconclusive. However, we know something happens because we’ve tasted the differences before, the results of bio-transformations of hop compounds that occurs in the presence of yeast. There’s another reason to believe wet-hopped beers will taste different. All you need to do is taste it over time. When I taste beer about 24 hours into fermentation, I get a very green taste. Over time, the beer starts to open up, and the oils come through in the aroma and flavor. Again, in the words of Jamie Flyod, “this is not a scientific exploration of brewing.” Right on, Jamie.

Hops in the Bottle

Most of my homebrewed beer contains residual bits of hops because I cannot—and never will be able to—afford a centrifuge, which is why the taste changes over time after packaging. Another source of diminishing quality can be poor oxygen control in the bottling process that will hurt any hoppy beer. However, I’ve made wet-hopped beers before, and they’ve held up well when kegged or bottled. But that might just because they tasted so fresh that I drank them quickly.


Sources:

  • For The Love of Hops by Stan Hieronymus
  • Oxford Companion to Beer by Garrett Oliver
  • Beyond the Pale by Ken Grossman
  • “Getting the Most From Your Hops” by Stan Hieronymus

The post Wet Hopped Beer: Showcasing Fresh Hops appeared first on American Homebrewers Association.

Posted on

2017 Best Beers in America Results

Each year we ask Zymurgy magazine readers to share a list of their 20 favorite beers that are commercially available in the United States.

We’ve tallied the votes, and here are the results for the 2017 Best Beers in America survey including Top Ranked Beers, Top Breweries, Best Porfolio and Top Imports. You can also check out the Best Beers in America results broken down by individual state.

Note: ‘T’ indicates a tie, and hyperlinked beers include a clone homebrew recipe.

Top-Ranked Beers

  • 1. Bell’s Two Hearted Ale
  • 2. Russian River Pliny the Elder
  • 3. Founders Breakfast Stout
  • 4. Three Floyds Zombie Dust
  • 5. Bell’s Hopslam
  • T6. Founders KBS (Kentucky Breakfast Stout)
  • T6. The Alchemist Heady Topper
  • T8. Deschutes Fresh Squeezed IPA
  • T8. Sierra Nevada Celebration
  • 10. Ballast Point Sculpin IPA
  • T11. Boulevard Tank 7 Farmhouse Ale
  • T11. Sierra Nevada Pale Ale
  • T13. Founders All Day IPA
  • T13. Lawson’s Finest Liquids Sip of Sunshine
  • 15. Cigar City Jai Alai IPA
  • 16. Deschutes Black Butte Porter
  • 17. Goose Island Bourbon County Brand Stout
  • 18. Left Hand Milk Stout Nitro
  • T19. Lagunitas IPA
  • T19. Dogfish Head 90 Minute IPA
  • T19. Stone IPA
  • T22. Tree House Julius
  • T22. Odell IPA
  • T22. Russian River Blind Pig IPA
  • T22. Toppling Goliath pseudoSue
  • 26. Fat Head’s Hop Juju
  • T27. Fat Head’s Head Hunter IPA
  • T27. Firestone Walker Double Jack
  • T27. Melvin 2×4 DIPA
  • T27. New Belgium La Folie
  • T27. Odell 90 Shilling
  • T27. Russian River Pliny the Younger
  • T27. Sierra Nevada Torpedo Extra IPA
  • T27. The Alchemist Focal Banger
  • T27. Tröegs Nugget Nectar
  • T27. Founders Backwoods Bastard
  • T27. Oskar Blues Ten FIDY
  • T38. Great Lakes Edmund Fitzgerald Porter
  • T38. Deschutes The Abyss
  • T38. North Coast Old Rasputin
  • T38. Arrogant Bastard Ale
  • T38. Stone Enjoy By IPA
  • T43. Dogfish Head 120 Minute IPA
  • T43. New Glarus Wisconsin Belgian Red
  • T43. Oskar Blues Dale’s Pale Ale
  • T43. Russian River Consecration
  • T47. Wicked Weed Pernicious
  • T47. Firestone Walker Union Jack
  • T47. New Holland Dragon’s Milk
  • T47. Oskar Blues Old Chub
  • T47. Three Floyds Alpha King

Top Breweries

  • 1. Bell’s Brewery, Inc., Comstock, Mich.
  • 2. Founders Brewing Co., Grand Rapids, Mich.
  • 3. Russian River Brewing Co., Santa Rosa, Calif.
  • 4. Sierra Nevada Brewing Co., Chico, Calif. and Mills River, N.C.
  • 5. Stone Brewing, Escondido, Calif., Richmond, Va., and Berlin, Germany
  • 6. Firestone Walker Brewing Company, Paso Robles, Calif.
  • 7. Deschutes Brewery, Bend, Ore.
  • 8. Dogfish Head Craft Brewery, Milton, Del.
  • 9. Lagunitas Brewing Company, Petaluma, Calif. and Chicago, Ill.
  • 10. Ballast Point Brewing, San Diego, Calif.
  • 11. Odell Brewing Co., Fort Collins, Colo.
  • 12. Three Floyds Brewing Co., Munster, Ind.
  • 13. Boulevard Brewing Co., Kansas City, Mo.
  • 14. Oskar Blues Brewery, Longmont, Colo., Brevard, N.C., and Austin, Texas
  • 15. New Glarus Brewing Co., New Glarus, Wis.
  • T16. New Belgium Brewing, Fort Collins, Colo. and Asheville, N.C.
  • T16. The Alchemist, Waterbury and Stowe, Vt.
  • 18. Avery Brewing Co., Boulder, Colo.
  • 19. Great Lakes Brewing Company, Cleveland, Ohio
  • T20. Cigar City Brewing, Tampa, Fla.
  • T20. Great Divide Brewing Co., Denver, Colo.
  • T20. Left Hand Brewing Co., Longmont, Colo.
  • 23. Victory Brewing Co., Downingtown, Pa.
  • 24. Surly Brewing Co., Minneapolis, Minn.
  • T25. Fat Head’s Brewery, Cleveland, Ohio, and Portland, Ore.
  • T25. Goose Island Beer Co., Chicago, Ill.

Top Imports

  • 1. Unibroue La Fin Du Monde (Canada)
  • 2. Duvel (Belgium)
  • T3. Orval (Belgium)
  • T3. Saison Dupont (Belgium)
  • T3. Rodenbach Grand Cru (Belgium)
  • T3. St. Bernardus Abt 12 (Belgium)
  • T7. Chimay Cinq Cents (White) (Belgium)
  • T7. Duchesse De Bourgogne (Belgium)
  • T7. Westvleteren 12 (Belgium)
  • T7. Paulaner Oktoberfest (Germany)
  • T7. Schneider Aventinus (Germany)
  • T7. Mikkeller Beer Geek Breakfast (Denmark)
  • T7. Epic Hop Zombie (New Zealand)

Best Portfolio

  • 1. Stone Brewing (31 beers)
  • 2. Bell’s Brewery, Inc. (27 beers)
  • 3. Firestone Walker Brewing Co. (25 beers)
  • 4. Sierra Nevada Brewing Co. (24 beers)
  • T5. Dogfish Head Craft Brewery (22 beers)
  • T5. Lagunitas Brewing Company (22 beers)
  • T7. Boulevard Brewing Co. (21 beers)
  • T7. Founders Brewing Co. (21 beers)
  • 9. Avery Brewing Co. (19 beers)
  • T10. New Glarus Brewing Co. (18 beers)
  • T10. Odell Brewing Co. (18 beers)

Share your favorite commercial beers in the comments below!

The post 2017 Best Beers in America Results appeared first on American Homebrewers Association.

Posted on

Building a Mash Tun has Never Been So Easy

Unless you’re using the brew in a bag technique, a mash tun is an essential piece of equipment when advancing to all-grain brewing. Mash tuns come in all shapes, sizes and materials, and the ideal vessel for you will depend on your current procedures and future goals as a homebrewer. Mash tuns can be purchased from a homebrew shop, or easily made at home with limited skill and tools.

In this tutorial, we’ll cover how to build a mash tun for batch sparge brewing (~5 gallon batches), an approachable means of all-grain brewing. For additional instructions, follow along with AHA Director Gary Glass in part three of the Introduction to All-Grain Video Series, as he walks viewers through the steps to building this mash tun.

How it Works

Simply put, a mash tun is a vessel for conducting the mashing process, while allowing for easy lautering—the process of removing the liquid wort from grain solids.

This specific build uses a stainless steel supply line as the filter to allow the liquid to move to the boil kettle, while leaving the grains and as much sediment as possible behind in the mash tun. The supply line is prepared so that there is basically a cylindrical screen of stainless steel that is fine enough to prevent most solids from being transferred, without too much worry of clogging.

Materials

  • Build a Mash Tun48 quart picnic cooler
  • Rubber mini-keg bung
  • (2) 1/4″ hose clamps
  • 1/2″ hose clamp
  • 3/8″ inline nylon valve
  • 7/16″ vinyl tubing*
  • 16″ stainless steel supply line**
  • Food-grade sealer

*Enough length to reach your boil kettle.

**Shorter or longer lengths should work fine.

Tools

  • Scissors, to cut tubing
  • Screw driver, for tightening hose clamps
  • Needle-nosed pliers, for preparing the stainless steel braid
  • Paper towel or rag, to clean up sealer
  • Saw, or other means of cutting through stainless steel supply line

Construction

Putting together a mash tun out of a rectangular picnic cooler is actually quite easy. Review the following steps, gather the materials and tools, and you’ll have yourself a homemade mash tun in no time.

  1. Remove the spigot from the picnic cooler. Typically it can be unscrewed by hand, but you may need to use pliers or some other tool if it is screwed on tight.
  2. Remove the plastic plug from the rubber mini-keg bung. You will not need this.
  3. From the inside of the cooler, place the rubber mini-keg bung in the whole where the spigot was.
  4. Optional: If the mini-keg bung is not fitting snug, food-grade sealer can be used to create a water-tight seal.
  5. Run 6″ of the vinyl tubing through the mini-keg bung so that there are a few inches hanging out of each side of the cooler.
  6. Prepare the stainless steel braid:
    1. Cut off both ends of the stainless steel supply line with snips or a saw.
    2. Remove the plastic tubing from the inside of the stainless steel braid.
    3. Using needle-nosed pliers, clamp one end of the supply line shut.
  7. Attach the prepared stainless steel braid to the end of vinyl tubing on the inside of the cooler using the 1/2″ hose clamp.
  8. Attach the nylon valve to the end of the tubing on the outside of the cooler using a 1/4″ hose clamp.
  9. On the other end of the nylon valve, attach a piece of tubing long enough to reach your boil kettle (typically ~2-4 feet) using a 1/4″ hose clamp.

[vimeo 63918361 w=500 h=281]

Additional All-Grain Resources

We offer all the resources you need to become an accomplished all-grain brewer!

Other resources:

The post Building a Mash Tun has Never Been So Easy appeared first on American Homebrewers Association.

Posted on

A Big Year for Big Brew: After 20 Years, More Beer than Ever

May 6, 2017 marked the 20th annual celebration of Big Brew for National Homebrew Day. Homebrewers from 11 different countries and territories and 49 states fired up their brew kettles and brewed more than 2,000 batches of beer at 384 Big Brew events around the globe. The American Homebrewers Association (AHA) estimates that over 7,500 people participated in this year’s celebration, brewing a record 19,222 gallons (72,763 liters) of beer.

Craft breweries, homebrew shops and clubs, and a number of individuals hosted Big Brew events in their own backyards. Of the 384 Big Brew sites,

  • 134 were hosted by a homebrew retail business,
  • 85 were hosted by breweries,
  • 81 were hosted by individual homebrewers,
  • 52 were hosted by homebrew clubs, and
  • 32 were hosted by other businesses.

Those other businesses included craft beer–centric restaurants and hop farms, and one Big Brew event even mashed in at John Smith’s Bay Beach in Smith’s Parish, Bermuda!

2017-Infographic big brew

The Glass City Mashers in Toledo, Ohio claimed 46 batches, the most brewed for Big Brew 2017, and Great South Bay Brewery in Bay Shore, N.Y. reported the largest volume of beer, a whopping 1,310 gallons (4,959 liters) of homebrew.

The states reporting the highest totals were New York (1,980 gallons/7,495 liters), Michigan (1,242 gallons/4,701 liters), and Ohio (1,049 gallons/3,971 liters).

For the first time in 20 years of celebrating Big Brew, the AHA is excited to announce that the largest reported attendance for a single site was not from a Big Brew event in the United States. With 200 reported attendees, the Hovevey Zion Homebrew Club’s 8th Brew Party in Tel Aviv, Israel is the first international Big Brew site to host more homebrewers than any other event in the US!

Other countries and territories that celebrated Big Brew in 2017 included Argentina, Australia, Canada, Chile, Germany, New Zealand, Russia, and Singapore. Of the 19,222 estimated gallons brewed for Big Brew this year, 3,467 gallons (13,124 liters)—18 percent of the total—was reported by international Big Brew sites.

Big Brew 2017 attendees were encouraged to brew one of three recipes: Rushmore American IPA, Battre L’oie Saison, and Klang Fredenfest Oktoberfest Lager. All recipes were taken from the newly released version fourth edition of How to Brew by John Palmer, a book that has taught thousands of homebrewers to craft their own beer since it was first published in 1999.

Big Brew for National Homebrew Day finally turns 21 next year on May 5, 2018.

The post A Big Year for Big Brew: After 20 Years, More Beer than Ever appeared first on American Homebrewers Association.

Posted on

Club Connection: Your Homebrew Club’s Home Base

In November 2016, the American Homebrewers Association (AHA) relaunched the formerly discontinued clubs newsletter. To complement the newsletter, the AHA is proud to announce a new section of the website called Club Connection.

Club Connection offers valuable resources to your homebrew club and its members. We regularly add articles focused on managing a homebrew club, suggest resources and topics for your next club meeting, and deliver news from homebrew clubs around the country who bring the collaborative spirit of homebrewing into their local communities.

Club Connection also features the AHA’s homebrew club database and resources for your organization. The homebrew club insurance program, revenue-generating web banners for your club’s website, the Radegast Club of the Year homepage, and the media contact list request form are just a few of the resources you’ll find at the new site.

Everything you need to start, grow, maintain, and promote a homebrew club can be found in the Club Connection archives. We encourage you to ensure that your club’s contact information is up to date with the AHA. The AHA will automatically announce new content through our newsletter to the email address linked to your club’s record, but we encourage any of your interested club members to sign up for the Club Connection newsletter so that they, too, can benefit from these resources.

radegast club of the year award

2016 Radegast Club of the Year Award recipients, the Hogtown Brewers, at the 2016 National Homebrewers Conference Grand Banquet.

The post Club Connection: Your Homebrew Club’s Home Base appeared first on American Homebrewers Association.

Posted on

How to Build a Temperature Controller

This dual-stage temperature controller is perfect for managing temperatures of your kegerator, fermentation chamber or keezer. It allows for a hot and a cool trigger to be individually controlled, so you could have your fermentation refrigerator hooked up to the cold trigger and a heat source to the hot trigger. If the temperature falls below the target value, the heating device will be turned on, and vice versa.

Note: this project deals with electrical current and DIY’ers should pursue the build at their own discretion. Read through the directions entirely to have a full understanding of the build before diving in. If you are unsure of your abilities, consult with someone well versed in electrical wiring.

The Build

Materials

Shop around for the best deals. I managed to get everything listed below for under $45. For this project, you’ll need to following materials:
Homemade Temperature Control Materials - Homebrewing

  • STC-1000 Digital temperature controller with sensor (110v): This can be purchased from Amazon.com for around $18. Find a friend with Amazon Prime for free shipping!
  • Project box: This will house the components and wiring of the project. I purchased a large, plastic project box from Radio Shack for $10, but any container that can safely hold electrical components will work.
  • Power Outlet: One three-pronged, dual wall outlet. Don’t forget the wall plate!
  • 8+ feet grounded power Cord: A three-pronged power cord is needed to supply power and provide the wires needed for the project. If you have an old extension cord, chop it up for this project. If not, I recommend purchasing a cord from a hardware store that comes with bare wires on one end. You will end up cutting out segments of this cord to strip to use the internal wires for this project, so make sure you get a long enough cable.
  • Wire connectors: These are plastic, cone-shaped devices used to safely join wires together.
  • Electrical tape: Tape is needed in conjunction with wire connectors to join wires.

Tools

The following tools will make for the quickest and easiest build, though all are not necessarily required. Try borrowing from friends and family to keep the cost down!

  • Screwdrivers: You will likely need a few different sized screwdrivers, including one fairly small flat-head for manipulating the STC-1000 inputs, and a philips head for the outlet connects.
  • Wire strippers: Wire strippers will take a lot of work out of the harvesting of wires. If you don’t have a pair, carefully use scissors to remove plastic covering from wires.
  • Needle-nose pliers: These are used to break the tab on one side of the wall outlet.
  • Voltage meter or multimeter: This is a tool used to safely test wall outlets. Not necessary, but highly recommended.
  • Dremel: The project box needs to have slots cut to hold the STC-1000 and outlet. A dremel fitted with a cutting bit will make a quick job of the process. If you don’t have a dremel, an X-Acto knife can be used. Be sure to buy a few blades, since they will likely break or dull during the process.

Preparation

Before jumping into the construction, take time to do some prep that will help speed up the overall process.

  1. Homemade Temperature Control HomebrewingUnpackage the project box, STC-1000 and wall outlet. Place the STC-1000 and power outlet where you want them on the box and trace with a pencil. Cut along the outline with the dremel. It may take a few rounds to get the fit just right. Test to make sure the STC-1000 (remove the orange tabs, they will be used later) and wall outlet fit snuggly into the holes cut in the project box. You will also want to cut a hole for the power cable and temperature probe to run out, and the location will depend on how you plan to mount the temperature controller. I cut mine at the bottom side of the project box so the wires would be aiming down when the temperature controller is mounted to the wall.
  2. Homemade Temperature Control - Breaking Outlet Tab - HomebrewingPrepare the wires. For this build you will need eight 5-inch pieces of wire. Cut off a piece of the power cord and strip to reveal the internal wires. To keep things from getting too confusing, plan to cut three pieces of black wire, four pieces of white wire and one piece of green wire. The green wire is used for grounding and is not supposed to be used for anything other than the ground, so we recommend you do not use these for any of the hardwiring besides tying the outlet’s ground to the power cord’s ground. On either end of the wire segments, strip a half-inch of the insulation to reveal the inner wires.
  3. Break the bridge on one side of the power outlet to allow separate control of heating and cooling. If looking at the outlet from the front, this would be on the right side with only two screws, not the side with three screws. To break the tab, take a pair of pliers, grab the tab connecting the metal pieces beneath each screw, and bend back and forth until it snaps. It takes a bit of force.

Wiring

STC-1000 Wiring Diagram - Homemade Temperature Control Homebrewing

Follow the directions below carefully and reference the wiring diagram. If you have never wired anything before, seek a friend experienced in working with electrical current. It is also important to point out the the wiring process must be done as if the box is already constructed. If you do the entire wiring of the components outside the box, you wont be able to run the cords. The directions are intended to make this as little as an inconvenience as possible.

  1. In the 1, 5 and 7 slots of the STC-1000, secure a piece of black wire.
  2. In the 2, 6 and 9 slots of the STC-1000, secure a piece of white wire. Somehow mark the wire going into slot 6 as “hot” and the wire going into slot 9 as “cold”. This will prevent confusion later on.
  3. In the 3 and 4 slots of the STC-1000, secure the temperature probe, which comes with the STC-1000.
  4. Slide the STC-1000 into the project box until secure.
  5. IMPORTANT: All wires that will be connected to the power outlet should be run through the back of the hole for the outlet, but don’t mount the outlet at this point since you will need access to the screws on the side.
  6. Take all the black wires coming from the STC-1000 and the black wire coming from the power cord and twist the exposed wires together and cap with a wire connector. Use electrical tape to wrap the wire connector securely.
  7. Take the white wire coming from slot 2 and secure to the power outlet at the top screw on the side in which the tab WASN’T broken. This will be the side that has three screws. (Remember to run these wires through the hole that the outlet will be mounted).
  8. Take the white wire coming from slot 6 that you labeled “hot” and connect to the outlet at the top screw of the side with the broken bridge. This is the side that only has two screws. This means the top outlet will control whatever device you will use for heating.
  9. Take the white wire coming from slot 9 that you labeled “cool” and connect to the outlet at the bottom screw of the side with the broken bridge. This is the side that only has two screws. This means the bottom outlet will control whatever device you use for cooling.
  10. Connect a piece of white wire to the middle screw of the side of the outlet with three screws. Using a wire connector and electrical tape, connect this wire with the white wire coming from the power cord.
  11. Connect a green piece of wire to the bottom screw of the side of the outlet with three screws. Using a wire connector and electrical tape, connecting this wire with the green wire coming from the power cord.

Final Touches

You are almost ready to test your DIY temperature controller!

  1. With the STC-1000 in place, slide the orange clips back onto the STC-1000 to hold it securely to the project box.
  2. Mount the wall outlet to the project box with screws. It may be easiest to start the holes with a drill.
  3. Run the power cord and temperature probe through the hole you cut for this purpose. I recommend using a piece of electrical tape to secure the power cord and probe to the inside of the project box so if they get pulled on by accident, it won’t directly pull on the connections to the STC-1000.
  4. Place the back cover on the project box and screw closed.
  5. You can also add some sort of device to the back of the project box to mount it where you please. For now, I put magnets on mine and it hangs on the side of my keezer.

Testing

Before putting the temperature controller to work, take a moment to test that the device is working and triggering the outlets appropriately. For this, you will need the voltage reader mentioned under the tools above.

  1. Plug the completed temperature controller into the wall. The STC-1000 should power on immediately and show the current temperature the probe is picking up.
  2. Hold the up arrow on the STC-1000 to see what the current temperature is set at.
  3. On the left side of the STC-1000 you will see the labels “Cool” and “Heat”. When a red dot appears next to one or the other, this means the corresponding outlet should be issuing power (remember the directions above wired the cold trigger to the bottom and the hot to the top). Let’s assume there is a red dot next to heat.
  4. Take the voltage reader and test the top outlet. If the light comes on the voltage reader, all is good.
  5. Next, change the temperature so that the cool function will be triggered. To do this, hold the “S” button until “F1” shows up, then release. Then, while holding the “S” button, use the down arrows to set the temperature below the current ambient temperature. Once you’ve found a temperature you want, push the power button to accept. Now there should be a red dot next to the “Cool” label.
  6. Again, use the voltage reader and test the bottom outlet. If the light comes on the voltage reader, everything is working!
  7. If the STC-1000 doesn’t power on, or the voltage reader doesn’t light up when testing the appropriate outlet, open up the project box and make sure the wiring is correct and all the wire connectors are effective.

How to Use

Using this temperature controller is fairly easy. The overarching functionality is that a cooling device will be triggered when temperatures exceed the target value and a heating device will be triggered when temperatures drop below the target value.

We will walk through a few of the basics, but the download (pdf) the full STC-1000 manual for more complete instructions.

On/off: When the temperature controller is plugged in, it will automatically power on. The number displayed is the current ambient temperature in Celsius being read by the temperature probe. To shut off, hold the power button until the display turns black.

Checking parameters: To see what the ambient temperature the controller is currently set to maintain, push the up arrow. Push the down arrow to see the “Difference Value”, explained below.

Editing parameters: The STC-1000 has four programmable parameters, explained below. To access these, hold the “S” button until “F1” appears in the display and then release the button. Use the up/down arrows to cycle through F1, F2, F3 and F4. To edit one of the parameters, cycle to the menu item in question, hold the “S” button and use the up/down arrows to change the value. Once the value you want is selected, push the power button to save.

Parameters Explained:

  • F1 – temperature set value: This is the temperature that the controller is set to maintain.
  • F2 – difference set value: This value determines the degree of allowable variation in Celsius before the controller kicks in. For example, if the F1 is set at 20°C with a F2 value of 0.3°C, the controller won’t kick in until the temperature raises to 20.3°C or drops to 19.7°C.
  • F3 – compressor delay time: This value is in minutes and determines how long the controller will wait before kicking in when the temperature exceeds the difference set value.
  • F4 – temperature calibration value: This can be used to calibrate the controller when inaccuracies occur.

Duncan Bryant is the Web Coordinator for the American Homebrewers Association.

The post How to Build a Temperature Controller appeared first on American Homebrewers Association.

Posted on

How To Make Kombucha

Simply put, kombucha is fermented tea. A culture of bacteria called SCOBY (Symbiotic Culture oBacteria and Yeast), sometimes called “the mother,” consumes the sugar in a fermentation process just like yeast does in beer. The result is a tangy, semi-sweet fermented tea with a very low level of alcohol–typically below 1% ABV. It can be carbonated, making for a bubbly elixir, and combined with other ingredients like fruit or spices to open up even more flavor possibilities.

While kombucha is hailed as a beneficial probiotic beverage, the jury is still out on whether or not it actually has such profound health effects. We’re not here to clear up that debate, but learning how to make kombucha at home is a fun way to explore other fermented beverages in addition to your beer, mead, and cider adventures.

Just like making beer, fermenting tea can be done in a number ways, and in this article we’ll show you one of these techniques for making kombucha at home.

Materials:

  • organic cheesecloth
  • bottles
  • pH meter (optional)
  • ppm meter (optional)
  • 2-3 gallon kettle
  • Starsan
  • kitchen thermometer
  • 1 gallon wide-mouthed jar
  • funnel
  • strainer
  • tongs

Ingredients:

  • organic black tea (8 tea bags makes 1 gallon)
  • organic sugar
  • SCOBY (Symbiotic Culture of Bacteria and Yeast)
  • filtered water

Step 1: Brewing the Tea

I start with filtered water. Your home water filter should be sufficient, but it is important not to use water that is too mineral-rich because it will alter the flavor of the kombucha.

Place 1 gallon (3.8 liters) of filtered water into your kettle and bring to a boil. Once the water is boiling, remove the kettle from the heat, add the tea bags, and let steep for 4 minutes. Note: It’s very important not to over-steep the tea because you will end up with very bitter kombucha.

Step 2: Adding Sugar

After steeping the tea, add 1 cup (200 g) of sugar and stir until it dissolves. Cover your sweetened tea with cheesecloth until it cools to room temperature. This can take several hours, but you can fill your sink with ice and place the kettle in there to help speed up the process.

As the tea is chilling, thoroughly sanitize your 1-gallon jar with Star San in preparation for the tea.

Step 3: Pitching the SCOBY


Whether you get your SCOBY mother (bacteria culture) from a friend or you purchase it from your local homebrew shop, you’ll need to make sure it stays at room temperature and never exceeds 90° F (32° C) or goes below 32° F (0° C). That is why pitching your SCOBY in room temperature tea is crucial; otherwise, you could potentially harm the bacteria and hinder fermentation. The SCOBY should also come submerged in a starter tea. This starter tea keeps the SCOBY comfortable in its environment so that you don’t shock it when you move it to another tea.

Test the temperature of your sweetened tea with a sanitized kitchen thermometer. Remember: the temperature should be no higher than 90° F (32° C). When it has cooled sufficiently, pour the sweetened tea into the sanitized wide-mouth jar.

Wash your hands thoroughly with soap and water. Take your SCOBY out of the vessel it came in and place into the sweetened tea in the jar. Pour in the remainder of the starter tea as well. Cover the jar with a piece of organic cheese cloth and affix it so that it stays in place. Place the concoction in a dark place for 1 to 2 weeks. Note: Don’t stress if your SCOBY falls to the bottom of the jar at first—it will eventually rise to the top to create a new SCOBY.

Step 4: Removing the SCOBY

After 7 to 14 days, you’ll want to give the kombucha a good look and a good smell. The fermented tea should actually have a sour/sweet smell, and the SCOBY should have formed a bigger “mother” SCOBY that covers the entire surface area of the liquid at the top of the jar. With thoroughly clean hands, remove the SCOBY and put it in a jar submerged in kombucha for your next use.

Step 5: Bottling your kombucha

For bottling, you’ll need about 4 liter-sized bottles or 8 to 10 22 oz. bottles. I prefer Grolsch-style flip-top bottles, but any of your various stocked up bottles should do. Sanitize the bottles, caps, funnel, and strainer. I bought a funnel with a built-in strainer, but if you don’t have that, place your strainer over the funnel and begin filling your bottles.

By bottling your kombucha, you have moved it to the secondary fermentation. Allow the kombucha to ferment another week to ten days in the bottles in the refrigerator. Allowing your kombucha to ferment in secondary will increase carbonation. Note: If you like your kombucha less bubbly and carbonated, you may not want to let it ferment in secondary as long.

Optional: Check the pH of your kombucha

Kombucha pH should lie somewhere between 2.5 and 3.5.* Test your kombucha to see if it falls in the right range. If the pH is too high, you might consider letting it ferment some more before bottling. If it is too low, go ahead and move it to bottles.

*pH range taken from Kombucha Kamp

* * *

Hailing from the South, Millie has developed an affinity for the beer industry and all the shiny things that come with it. When not exploring beer, Millie is in the kitchen, enjoying the outdoors, and wearing out her dancing shoes. Millie is the American Homebrewers Association administrative assistant. 

The post How To Make Kombucha appeared first on American Homebrewers Association.

Posted on

Brewing Brewers: Beer in College is Not What You Think

Today’s college kids are not the same.  I see them as freshmen, and again as seniors, and the evolution is stark.  Most freshmen have never lived away from home or had a job.  They’ve been shuttled from sports to lessons, and are truly dependents.  By the time they’re seniors, they’re driven to succeed, aware of the debts they owe, and the hard work ahead.  Most seniors work at least one job, even full time, to keep up with their bills while in school.  They know how to build networks and actively seek opportunities.  When they come to my Brewing Arts class, they’re already planning their careers.  And then they discover brewing.

For generations, American culture has demonized beverage alcohol to the realm of ‘evil toxic weapon’ rather than a complex food.  (It’s regulated by the Bureau of Alcohol, Tobacco, Firearms and Explosives, not the Food and Drug Administration.)  And home brewing was only legalized in all 50 states as of 2013.  But WE know brewing is culinary arts, with the chemistry of molecular gastronomy and the microbiology of baking.  And it’s a rapidly expanding market.

So I ask Brewing Arts students why they’re taking the class.  Some students say they don’t even like beer, but know it’s an important part of the business.  Others say they just had a free elective to fill, and thought it would be fun.  Some are taking it as part of their Sommelier minor, or Food and Beverage Management degree.  One or two may have brewed with their Uncle Bob in the past.  Then I warn them all – “You will learn way more than you thought there was to know about beer.  You will learn how to write a recipe for and home-brew an all-grain batch of beer.  This will become an addictive hobby, and a great way to connect with others.  All of the beer you drink will taste better.  And best of all, in the event of an apocalypse, you will be the LAST one kicked off the island.”

After the 11 weeks are through, they are totally hooked, and most keep in touch after they leave.  Their course review comments have a consistent thread.  “I wish I knew about this class as a sophomore.”  “Why didn’t my high school guidance counselor even mention brewing?  I would have started earlier.”  “I am so happy – this is my dream job.” “I can’t wait to learn more!”  But that’s the issue – how?

When students ask, “How do I get a job at a brewery?” I say, “Knock on the door.  Offer to help out for free.  If they like you, they’ll hire you.  Most small breweries are built by people just like you, who wanted to take their passion to the next level.  Brewers also have to wear many other hats, and do a variety of tasks.  Skills can be taught, but it’s a small team, so team chemistry is most important.”  More often than not, this job-seeking tactic has actually worked out, as attested to many alumni who have gone on to work in the industry, as beer sommeliers, managers, brewers and assistant brewers, brasserie and brewpub chefs, and more, but most only learning on the job.

Until recently, the avenues for brewing and beer education were limited to either very expensive advanced degree programs and specialized formal education, or the very informal back-yard turkey-fryer classroom.  Both of the above are an excellent means of learning, but the demand for skilled labor at all levels in the craft beer industry, including sales and service, cannot be met by either of these alone.  So the education middle ground is blossoming, and homebrew clubs and organizations can maximize this opportunity for recruitment by getting involved.

Not that long ago, perceived legal, ethical and socio-moral barriers made it awkward at best to discuss beer in college.  But most students today have never seen or even heard of the movie, Animal House, and very few think of beer as an ‘alcohol delivery system’, as hard as it is for us ‘old folks’ to believe.  Instead, most millennials think of craft beer as a means of connoisseurship, supporting the local economy, community involvement, a means of exploring global flavors, and (most importantly) a cool expression of personal taste.  The boom in community colleges offering beer appreciation and home brewing classes is not a fad, it’s a response.  Because craft beer is food, many culinary schools are also on board.

A confession – I was once a wine person.  I still like wine, drink wine, even make wine at home, but I’ve proudly “crossed to the dark side” for beer, as my department chair says.  When I started the JbreW club 12 years ago, it wasn’t because I was an avid beer enthusiast – far from it.  What I saw was an unmet need amongst our students.  They were hungry to learn about craft beer, but the courses didn’t exist yet.  So we organized, met on the weekends, and fired up the ½ barrel pilot plant, learning as we went along.

Fast forward to now, the JbreW club has won awards for our beers and meads in competition, and we host our own Ocean State Homebrew Competition.   JWU now has brewing courses taught on all four campuses across the country –Providence, Charlotte, North Miami and Denver.  We also now have a Study Abroad Craft Brewing program (with Brewlab UK), and Beer Sommelier and Beer Judge Certification courses.  By next year, we’ll have both a Craft Brewing Minor and Beer Sommelier Minor, and another Study Abroad for Beer Culture and Cuisine in Europe.  An advanced Mead and Honey course, and a Ciders and Fruit Wines course are also on the menu.  In the very near future, JWU will also be offering Certificate Programs to the public for both Craft Brewing and Beer Sommelier Certificates, and one-day and weekend courses for continuing education for professionals.

And NONE of this would have been possible without the help of our local home brewing community, for their mentorship and support through the years. ‘Uncle Frank’ Fermino took our club under his wing and taught us how to use the system, build recipes, enter competitions, and so much more.  Paul ‘Zok’ Zocco showed us how to build and run our own competition.  Other shops and breweries and homebrew clubs helped as well, sponsoring our competition and student club over the years. And I KNOW we are not alone – the home brewing community is chock full of generous, open-minded folks who love to ‘pay it forward.’

I love beer and love brewing, but I REALLY love my job – I make brewers!  Here at JWU, I encourage all of my students to join the AHA.  I give each student a current copy of the “Introduction to Homebrewing” issue of Zymurgy, and the local “Yankee Brew News” to keep them up-to-date on local breweries, brewpubs, events and more.  I send them to our local homebrew shops, competitions and events, and also show them how to find shops and clubs when they leave school, wherever their travels take them.  So, do you know who your local college students are?  More importantly, do they know about you?  Become guest speakers, offer on-campus demos, support school clubs and organizations, and brew up some more brewers in your town. Cheers!

* * *

Jennifer Pereira is an Associate Professor of Beverage and Dining Service at Johnson and Wales University, College of Culinary Arts in Providence, RI. She is the Lead Beer Educator for the Johnson and Wales University system, promoting university relationships within the brewing industry.

The post Brewing Brewers: Beer in College is Not What You Think appeared first on American Homebrewers Association.