Posted on

Wet Hopped Beer: Showcasing Fresh Hops

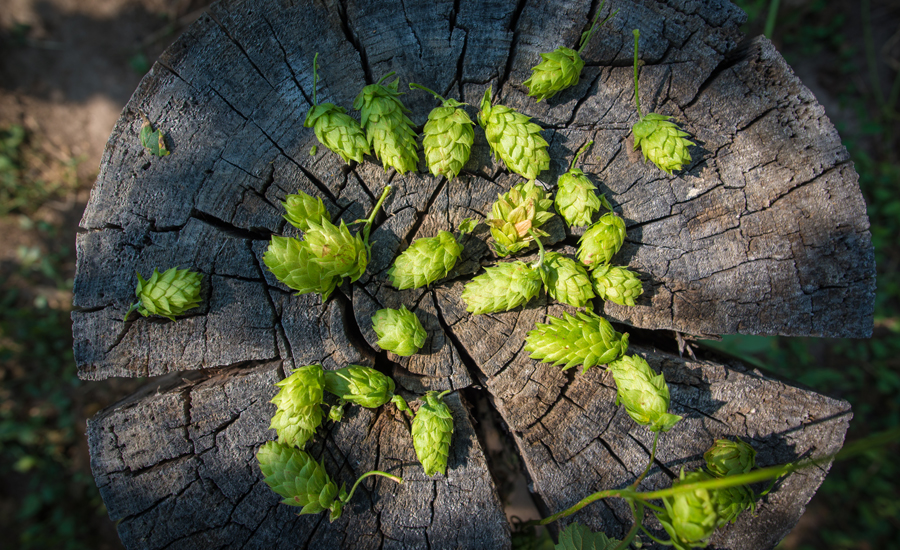
Fresh is best, they say, and beer is no exception. Fresh ingredients are important for flavor and quality, and hops are among the most celebrated. The hop harvest is like Christmas for brewers, though the harvest happens a bit earlier, sometime in late summer to early fall. But that doesn’t stop hop growers and hop heads from celebrating.

I certainly wasn’t the first person to add freshly picked hops to a batch of homebrew—I must concede that title to those who preceded me hundreds of years ago. However, countless beers across the United States owe their existence to the addition of fresh hops, also called wet hops.

The two terms aren’t necessarily mutually exclusive. While brewers and beer drinkers tend to mean the same thing when they interchange them, fresh hops can mean hops used right out of the oast house, while wet hops are never dried (well, duh). The difference between the two matters just as much in the kettle as it does when you drink the beer. For this article, we’ll be focusing on wet hops.

Vinnie Cilurzo at Russian River Brewing described the difference in For the Love of Hops by Stan Hieronymus: “They both do a great job, but you get more fresh aromas and flavors when the product is wet, and it takes more, as you have to compensate for the water that is still in the hops… I find more melon and grassy notes in wet hops, grassy almost like a Sauvignon Blanc.”

The late Michael Jackson described one of the most influential commercial wet-hopped beers in the United States circa 1996, Sierra Nevada’s Northern Hemisphere Harvest Ale, as having “the lightest touch of malty sweetness to start; then a surge of cleansing, refreshing, resiny, almost orange-zest flavors; and finally, an astonishingly late, long finish of fresh, appetite-arousing bitterness.”

Not only do wet hops impart different flavors and aromas, but they are delicious when used correctly. There are a few keys to brewing great wet-hopped beers and a few more things you should understand about hops to keep that wet-hopped goodness in your homebrew.

Wet Hops Are Wet

Wet hops contain about 80 percent water, so you’ll need to use more than you would when using dry hops. In general, four to six times as many wet hops are needed by weight as dry hops. For example, one ounce of pelleted dry hops would be the equivalent of four to six ounces of wet hops. You get the idea.

Wet hops take up more room in the kettle, enough to consider reducing batch size depending on the overall hop amount and the size of your system. They’ll also add water that needs to be considered when calculating original and final gravities.

Freshness Is Everything

When Ken Grossman, Founder and CEO of Sierra Nevada Brewing, first started homebrewing, he had difficulty finding quality hops because “the homebrew trade consumed an insignificant amount of hops and, apparently, in the eyes of hop growers and merchants, wasn’t worth pursuing.” Oh, how times have changed.

There’s been a resurgence in hop growing since the 2008 “hop crisis,” making it easier for commercial brewers and homebrewers to source locally grown hops or simply supply their own.

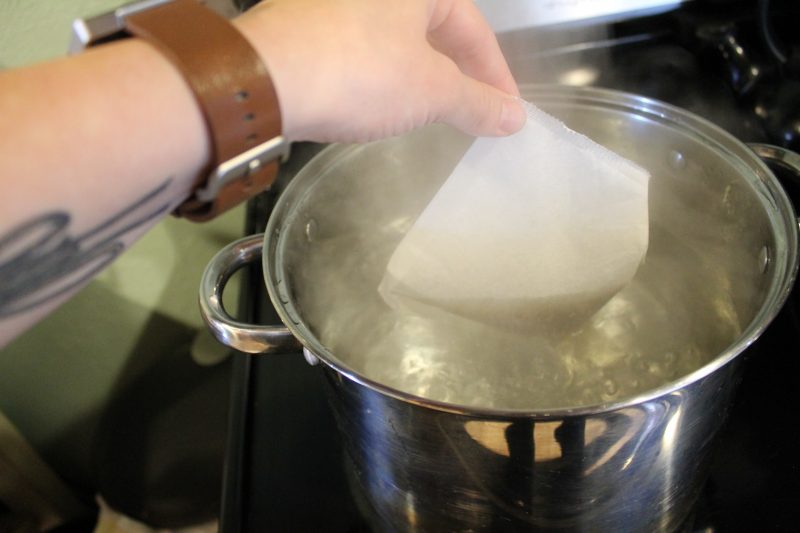
Once harvested, wet hops literally begin to rot because the cones contain a high percentage of water, which is why farmers transport them directly from the field to breweries—or in your case from your backyard to your brew setup. It’s important to use wet hops within a matter of days of picking, preferably within one day, lest you risk spoiling and ruining your hops.

wet_hopping_internal

Hops in Moderation

Like all enjoyable things, wet hops should be used in moderation. You can quickly reach a breaking point at which desirable “grassy” aromas and flavors remind you of chewing on a salad. Other undesirables include notes of tobacco and chlorophyll to name a few.

Remember: you’re adding a huge amount of green matter to your homebrew, the result of which can be green flavors. These are acceptable in wet-hopped beers to an extent. Brewing requires balance and an awareness of the style. It’s a good reason to use dried hops for the bittering portion of your boil and wet hops for the aroma and flavor. If you try to drive up bitterness with wet hops, you risk losing their nuances.

Using dry hops for bitterness also reduces hop matter in the kettle and lets you work with hops of known alpha acids. You don’t really know how much bitterness the hops from your backyard may hold, and using them near the beginning of the boil can yield unpredictable IBUs and an even more unpredictable beer.

Life Cycle of Hops

Hops Before the Kettle

Hops’ desirability lies in the essential oils they produce, which constitute up to 4 percent of the hop cone. These oils increase during the weeks before harvest and continue to change after the hops are dried and stored.

In Stan Hieronymus’s book For the Love of Hops, he points to recent research that tracks how dramatically essential oils change in the days before hops are picked, and he implies that wet hops may produce different odor compounds than do dried hops. However, there haven’t been any similar studies about wet hops. “This is not a scientific exploration of brewing,” said Ninkasi Brewing co-found Jamie Floyd. “Were’s the economic benefit of analyzing a beer made once a year?”

Hops in the Boil

Hops are used during the boil because the high temperatures activate many components, but a side effect is that the same phenomenon removes some of those essential oils we crave. Thus, brewers wanting to know how much bitterness they’re adding may choose to use dried hops with known, measured alpha acids. Those concerned with preserving oils, such as linalool and gernaniol, should add wet hops towards the end of boil, at flameout, or during the whirlpool.

Hops in the Fermenter

The effect of adding hops during fermentation is somewhat inconclusive. However, we know something happens because we’ve tasted the differences before, the results of bio-transformations of hop compounds that occurs in the presence of yeast. There’s another reason to believe wet-hopped beers will taste different. All you need to do is taste it over time. When I taste beer about 24 hours into fermentation, I get a very green taste. Over time, the beer starts to open up, and the oils come through in the aroma and flavor. Again, in the words of Jamie Flyod, “this is not a scientific exploration of brewing.” Right on, Jamie.

Hops in the Bottle

Most of my homebrewed beer contains residual bits of hops because I cannot—and never will be able to—afford a centrifuge, which is why the taste changes over time after packaging. Another source of diminishing quality can be poor oxygen control in the bottling process that will hurt any hoppy beer. However, I’ve made wet-hopped beers before, and they’ve held up well when kegged or bottled. But that might just because they tasted so fresh that I drank them quickly.


Sources:

  • For The Love of Hops by Stan Hieronymus
  • Oxford Companion to Beer by Garrett Oliver
  • Beyond the Pale by Ken Grossman
  • “Getting the Most From Your Hops” by Stan Hieronymus

The post Wet Hopped Beer: Showcasing Fresh Hops appeared first on American Homebrewers Association.

Posted on

2017 Best Beers in America Results

Each year we ask Zymurgy magazine readers to share a list of their 20 favorite beers that are commercially available in the United States.

We’ve tallied the votes, and here are the results for the 2017 Best Beers in America survey including Top Ranked Beers, Top Breweries, Best Porfolio and Top Imports. You can also check out the Best Beers in America results broken down by individual state.

Note: ‘T’ indicates a tie, and hyperlinked beers include a clone homebrew recipe.

Top-Ranked Beers

  • 1. Bell’s Two Hearted Ale
  • 2. Russian River Pliny the Elder
  • 3. Founders Breakfast Stout
  • 4. Three Floyds Zombie Dust
  • 5. Bell’s Hopslam
  • T6. Founders KBS (Kentucky Breakfast Stout)
  • T6. The Alchemist Heady Topper
  • T8. Deschutes Fresh Squeezed IPA
  • T8. Sierra Nevada Celebration
  • 10. Ballast Point Sculpin IPA
  • T11. Boulevard Tank 7 Farmhouse Ale
  • T11. Sierra Nevada Pale Ale
  • T13. Founders All Day IPA
  • T13. Lawson’s Finest Liquids Sip of Sunshine
  • 15. Cigar City Jai Alai IPA
  • 16. Deschutes Black Butte Porter
  • 17. Goose Island Bourbon County Brand Stout
  • 18. Left Hand Milk Stout Nitro
  • T19. Lagunitas IPA
  • T19. Dogfish Head 90 Minute IPA
  • T19. Stone IPA
  • T22. Tree House Julius
  • T22. Odell IPA
  • T22. Russian River Blind Pig IPA
  • T22. Toppling Goliath pseudoSue
  • 26. Fat Head’s Hop Juju
  • T27. Fat Head’s Head Hunter IPA
  • T27. Firestone Walker Double Jack
  • T27. Melvin 2×4 DIPA
  • T27. New Belgium La Folie
  • T27. Odell 90 Shilling
  • T27. Russian River Pliny the Younger
  • T27. Sierra Nevada Torpedo Extra IPA
  • T27. The Alchemist Focal Banger
  • T27. Tröegs Nugget Nectar
  • T27. Founders Backwoods Bastard
  • T27. Oskar Blues Ten FIDY
  • T38. Great Lakes Edmund Fitzgerald Porter
  • T38. Deschutes The Abyss
  • T38. North Coast Old Rasputin
  • T38. Arrogant Bastard Ale
  • T38. Stone Enjoy By IPA
  • T43. Dogfish Head 120 Minute IPA
  • T43. New Glarus Wisconsin Belgian Red
  • T43. Oskar Blues Dale’s Pale Ale
  • T43. Russian River Consecration
  • T47. Wicked Weed Pernicious
  • T47. Firestone Walker Union Jack
  • T47. New Holland Dragon’s Milk
  • T47. Oskar Blues Old Chub
  • T47. Three Floyds Alpha King

Top Breweries

  • 1. Bell’s Brewery, Inc., Comstock, Mich.
  • 2. Founders Brewing Co., Grand Rapids, Mich.
  • 3. Russian River Brewing Co., Santa Rosa, Calif.
  • 4. Sierra Nevada Brewing Co., Chico, Calif. and Mills River, N.C.
  • 5. Stone Brewing, Escondido, Calif., Richmond, Va., and Berlin, Germany
  • 6. Firestone Walker Brewing Company, Paso Robles, Calif.
  • 7. Deschutes Brewery, Bend, Ore.
  • 8. Dogfish Head Craft Brewery, Milton, Del.
  • 9. Lagunitas Brewing Company, Petaluma, Calif. and Chicago, Ill.
  • 10. Ballast Point Brewing, San Diego, Calif.
  • 11. Odell Brewing Co., Fort Collins, Colo.
  • 12. Three Floyds Brewing Co., Munster, Ind.
  • 13. Boulevard Brewing Co., Kansas City, Mo.
  • 14. Oskar Blues Brewery, Longmont, Colo., Brevard, N.C., and Austin, Texas
  • 15. New Glarus Brewing Co., New Glarus, Wis.
  • T16. New Belgium Brewing, Fort Collins, Colo. and Asheville, N.C.
  • T16. The Alchemist, Waterbury and Stowe, Vt.
  • 18. Avery Brewing Co., Boulder, Colo.
  • 19. Great Lakes Brewing Company, Cleveland, Ohio
  • T20. Cigar City Brewing, Tampa, Fla.
  • T20. Great Divide Brewing Co., Denver, Colo.
  • T20. Left Hand Brewing Co., Longmont, Colo.
  • 23. Victory Brewing Co., Downingtown, Pa.
  • 24. Surly Brewing Co., Minneapolis, Minn.
  • T25. Fat Head’s Brewery, Cleveland, Ohio, and Portland, Ore.
  • T25. Goose Island Beer Co., Chicago, Ill.

Top Imports

  • 1. Unibroue La Fin Du Monde (Canada)
  • 2. Duvel (Belgium)
  • T3. Orval (Belgium)
  • T3. Saison Dupont (Belgium)
  • T3. Rodenbach Grand Cru (Belgium)
  • T3. St. Bernardus Abt 12 (Belgium)
  • T7. Chimay Cinq Cents (White) (Belgium)
  • T7. Duchesse De Bourgogne (Belgium)
  • T7. Westvleteren 12 (Belgium)
  • T7. Paulaner Oktoberfest (Germany)
  • T7. Schneider Aventinus (Germany)
  • T7. Mikkeller Beer Geek Breakfast (Denmark)
  • T7. Epic Hop Zombie (New Zealand)

Best Portfolio

  • 1. Stone Brewing (31 beers)
  • 2. Bell’s Brewery, Inc. (27 beers)
  • 3. Firestone Walker Brewing Co. (25 beers)
  • 4. Sierra Nevada Brewing Co. (24 beers)
  • T5. Dogfish Head Craft Brewery (22 beers)
  • T5. Lagunitas Brewing Company (22 beers)
  • T7. Boulevard Brewing Co. (21 beers)
  • T7. Founders Brewing Co. (21 beers)
  • 9. Avery Brewing Co. (19 beers)
  • T10. New Glarus Brewing Co. (18 beers)
  • T10. Odell Brewing Co. (18 beers)

Share your favorite commercial beers in the comments below!

The post 2017 Best Beers in America Results appeared first on American Homebrewers Association.

Posted on

Building a Mash Tun has Never Been So Easy

Unless you’re using the brew in a bag technique, a mash tun is an essential piece of equipment when advancing to all-grain brewing. Mash tuns come in all shapes, sizes and materials, and the ideal vessel for you will depend on your current procedures and future goals as a homebrewer. Mash tuns can be purchased from a homebrew shop, or easily made at home with limited skill and tools.

In this tutorial, we’ll cover how to build a mash tun for batch sparge brewing (~5 gallon batches), an approachable means of all-grain brewing. For additional instructions, follow along with AHA Director Gary Glass in part three of the Introduction to All-Grain Video Series, as he walks viewers through the steps to building this mash tun.

How it Works

Simply put, a mash tun is a vessel for conducting the mashing process, while allowing for easy lautering—the process of removing the liquid wort from grain solids.

This specific build uses a stainless steel supply line as the filter to allow the liquid to move to the boil kettle, while leaving the grains and as much sediment as possible behind in the mash tun. The supply line is prepared so that there is basically a cylindrical screen of stainless steel that is fine enough to prevent most solids from being transferred, without too much worry of clogging.

Materials

  • Build a Mash Tun48 quart picnic cooler
  • Rubber mini-keg bung
  • (2) 1/4″ hose clamps
  • 1/2″ hose clamp
  • 3/8″ inline nylon valve
  • 7/16″ vinyl tubing*
  • 16″ stainless steel supply line**
  • Food-grade sealer

*Enough length to reach your boil kettle.

**Shorter or longer lengths should work fine.

Tools

  • Scissors, to cut tubing
  • Screw driver, for tightening hose clamps
  • Needle-nosed pliers, for preparing the stainless steel braid
  • Paper towel or rag, to clean up sealer
  • Saw, or other means of cutting through stainless steel supply line

Construction

Putting together a mash tun out of a rectangular picnic cooler is actually quite easy. Review the following steps, gather the materials and tools, and you’ll have yourself a homemade mash tun in no time.

  1. Remove the spigot from the picnic cooler. Typically it can be unscrewed by hand, but you may need to use pliers or some other tool if it is screwed on tight.
  2. Remove the plastic plug from the rubber mini-keg bung. You will not need this.
  3. From the inside of the cooler, place the rubber mini-keg bung in the whole where the spigot was.
  4. Optional: If the mini-keg bung is not fitting snug, food-grade sealer can be used to create a water-tight seal.
  5. Run 6″ of the vinyl tubing through the mini-keg bung so that there are a few inches hanging out of each side of the cooler.
  6. Prepare the stainless steel braid:
    1. Cut off both ends of the stainless steel supply line with snips or a saw.
    2. Remove the plastic tubing from the inside of the stainless steel braid.
    3. Using needle-nosed pliers, clamp one end of the supply line shut.
  7. Attach the prepared stainless steel braid to the end of vinyl tubing on the inside of the cooler using the 1/2″ hose clamp.
  8. Attach the nylon valve to the end of the tubing on the outside of the cooler using a 1/4″ hose clamp.
  9. On the other end of the nylon valve, attach a piece of tubing long enough to reach your boil kettle (typically ~2-4 feet) using a 1/4″ hose clamp.

[vimeo 63918361 w=500 h=281]

Additional All-Grain Resources

We offer all the resources you need to become an accomplished all-grain brewer!

Other resources:

The post Building a Mash Tun has Never Been So Easy appeared first on American Homebrewers Association.

Posted on

A Big Year for Big Brew: After 20 Years, More Beer than Ever

May 6, 2017 marked the 20th annual celebration of Big Brew for National Homebrew Day. Homebrewers from 11 different countries and territories and 49 states fired up their brew kettles and brewed more than 2,000 batches of beer at 384 Big Brew events around the globe. The American Homebrewers Association (AHA) estimates that over 7,500 people participated in this year’s celebration, brewing a record 19,222 gallons (72,763 liters) of beer.

Craft breweries, homebrew shops and clubs, and a number of individuals hosted Big Brew events in their own backyards. Of the 384 Big Brew sites,

  • 134 were hosted by a homebrew retail business,
  • 85 were hosted by breweries,
  • 81 were hosted by individual homebrewers,
  • 52 were hosted by homebrew clubs, and
  • 32 were hosted by other businesses.

Those other businesses included craft beer–centric restaurants and hop farms, and one Big Brew event even mashed in at John Smith’s Bay Beach in Smith’s Parish, Bermuda!

2017-Infographic big brew

The Glass City Mashers in Toledo, Ohio claimed 46 batches, the most brewed for Big Brew 2017, and Great South Bay Brewery in Bay Shore, N.Y. reported the largest volume of beer, a whopping 1,310 gallons (4,959 liters) of homebrew.

The states reporting the highest totals were New York (1,980 gallons/7,495 liters), Michigan (1,242 gallons/4,701 liters), and Ohio (1,049 gallons/3,971 liters).

For the first time in 20 years of celebrating Big Brew, the AHA is excited to announce that the largest reported attendance for a single site was not from a Big Brew event in the United States. With 200 reported attendees, the Hovevey Zion Homebrew Club’s 8th Brew Party in Tel Aviv, Israel is the first international Big Brew site to host more homebrewers than any other event in the US!

Other countries and territories that celebrated Big Brew in 2017 included Argentina, Australia, Canada, Chile, Germany, New Zealand, Russia, and Singapore. Of the 19,222 estimated gallons brewed for Big Brew this year, 3,467 gallons (13,124 liters)—18 percent of the total—was reported by international Big Brew sites.

Big Brew 2017 attendees were encouraged to brew one of three recipes: Rushmore American IPA, Battre L’oie Saison, and Klang Fredenfest Oktoberfest Lager. All recipes were taken from the newly released version fourth edition of How to Brew by John Palmer, a book that has taught thousands of homebrewers to craft their own beer since it was first published in 1999.

Big Brew for National Homebrew Day finally turns 21 next year on May 5, 2018.

The post A Big Year for Big Brew: After 20 Years, More Beer than Ever appeared first on American Homebrewers Association.

Posted on

Club Connection: Your Homebrew Club’s Home Base

In November 2016, the American Homebrewers Association (AHA) relaunched the formerly discontinued clubs newsletter. To complement the newsletter, the AHA is proud to announce a new section of the website called Club Connection.

Club Connection offers valuable resources to your homebrew club and its members. We regularly add articles focused on managing a homebrew club, suggest resources and topics for your next club meeting, and deliver news from homebrew clubs around the country who bring the collaborative spirit of homebrewing into their local communities.

Club Connection also features the AHA’s homebrew club database and resources for your organization. The homebrew club insurance program, revenue-generating web banners for your club’s website, the Radegast Club of the Year homepage, and the media contact list request form are just a few of the resources you’ll find at the new site.

Everything you need to start, grow, maintain, and promote a homebrew club can be found in the Club Connection archives. We encourage you to ensure that your club’s contact information is up to date with the AHA. The AHA will automatically announce new content through our newsletter to the email address linked to your club’s record, but we encourage any of your interested club members to sign up for the Club Connection newsletter so that they, too, can benefit from these resources.

radegast club of the year award

2016 Radegast Club of the Year Award recipients, the Hogtown Brewers, at the 2016 National Homebrewers Conference Grand Banquet.

The post Club Connection: Your Homebrew Club’s Home Base appeared first on American Homebrewers Association.

Posted on

How to Build a Temperature Controller

This dual-stage temperature controller is perfect for managing temperatures of your kegerator, fermentation chamber or keezer. It allows for a hot and a cool trigger to be individually controlled, so you could have your fermentation refrigerator hooked up to the cold trigger and a heat source to the hot trigger. If the temperature falls below the target value, the heating device will be turned on, and vice versa.

Note: this project deals with electrical current and DIY’ers should pursue the build at their own discretion. Read through the directions entirely to have a full understanding of the build before diving in. If you are unsure of your abilities, consult with someone well versed in electrical wiring.

The Build

Materials

Shop around for the best deals. I managed to get everything listed below for under $45. For this project, you’ll need to following materials:
Homemade Temperature Control Materials - Homebrewing

  • STC-1000 Digital temperature controller with sensor (110v): This can be purchased from Amazon.com for around $18. Find a friend with Amazon Prime for free shipping!
  • Project box: This will house the components and wiring of the project. I purchased a large, plastic project box from Radio Shack for $10, but any container that can safely hold electrical components will work.
  • Power Outlet: One three-pronged, dual wall outlet. Don’t forget the wall plate!
  • 8+ feet grounded power Cord: A three-pronged power cord is needed to supply power and provide the wires needed for the project. If you have an old extension cord, chop it up for this project. If not, I recommend purchasing a cord from a hardware store that comes with bare wires on one end. You will end up cutting out segments of this cord to strip to use the internal wires for this project, so make sure you get a long enough cable.
  • Wire connectors: These are plastic, cone-shaped devices used to safely join wires together.
  • Electrical tape: Tape is needed in conjunction with wire connectors to join wires.

Tools

The following tools will make for the quickest and easiest build, though all are not necessarily required. Try borrowing from friends and family to keep the cost down!

  • Screwdrivers: You will likely need a few different sized screwdrivers, including one fairly small flat-head for manipulating the STC-1000 inputs, and a philips head for the outlet connects.
  • Wire strippers: Wire strippers will take a lot of work out of the harvesting of wires. If you don’t have a pair, carefully use scissors to remove plastic covering from wires.
  • Needle-nose pliers: These are used to break the tab on one side of the wall outlet.
  • Voltage meter or multimeter: This is a tool used to safely test wall outlets. Not necessary, but highly recommended.
  • Dremel: The project box needs to have slots cut to hold the STC-1000 and outlet. A dremel fitted with a cutting bit will make a quick job of the process. If you don’t have a dremel, an X-Acto knife can be used. Be sure to buy a few blades, since they will likely break or dull during the process.

Preparation

Before jumping into the construction, take time to do some prep that will help speed up the overall process.

  1. Homemade Temperature Control Homebrewing
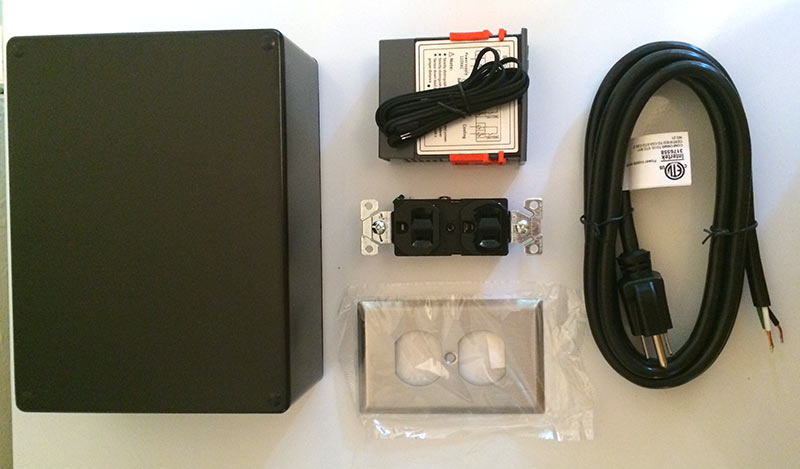
Unpackage the project box, STC-1000 and wall outlet. Place the STC-1000 and power outlet where you want them on the box and trace with a pencil. Cut along the outline with the dremel. It may take a few rounds to get the fit just right. Test to make sure the STC-1000 (remove the orange tabs, they will be used later) and wall outlet fit snuggly into the holes cut in the project box. You will also want to cut a hole for the power cable and temperature probe to run out, and the location will depend on how you plan to mount the temperature controller. I cut mine at the bottom side of the project box so the wires would be aiming down when the temperature controller is mounted to the wall.
  2. Homemade Temperature Control - Breaking Outlet Tab - HomebrewingPrepare the wires. For this build you will need eight 5-inch pieces of wire. Cut off a piece of the power cord and strip to reveal the internal wires. To keep things from getting too confusing, plan to cut three pieces of black wire, four pieces of white wire and one piece of green wire. The green wire is used for grounding and is not supposed to be used for anything other than the ground, so we recommend you do not use these for any of the hardwiring besides tying the outlet’s ground to the power cord’s ground. On either end of the wire segments, strip a half-inch of the insulation to reveal the inner wires.
  3. Break the bridge on one side of the power outlet to allow separate control of heating and cooling. If looking at the outlet from the front, this would be on the right side with only two screws, not the side with three screws. To break the tab, take a pair of pliers, grab the tab connecting the metal pieces beneath each screw, and bend back and forth until it snaps. It takes a bit of force.

Wiring

STC-1000 Wiring Diagram - Homemade Temperature Control Homebrewing

Follow the directions below carefully and reference the wiring diagram. If you have never wired anything before, seek a friend experienced in working with electrical current. It is also important to point out the the wiring process must be done as if the box is already constructed. If you do the entire wiring of the components outside the box, you wont be able to run the cords. The directions are intended to make this as little as an inconvenience as possible.

  1. In the 1, 5 and 7 slots of the STC-1000, secure a piece of black wire.
  2. In the 2, 6 and 9 slots of the STC-1000, secure a piece of white wire. Somehow mark the wire going into slot 6 as “hot” and the wire going into slot 9 as “cold”. This will prevent confusion later on.
  3. In the 3 and 4 slots of the STC-1000, secure the temperature probe, which comes with the STC-1000.
  4. Slide the STC-1000 into the project box until secure.
  5. IMPORTANT: All wires that will be connected to the power outlet should be run through the back of the hole for the outlet, but don’t mount the outlet at this point since you will need access to the screws on the side.
  6. Take all the black wires coming from the STC-1000 and the black wire coming from the power cord and twist the exposed wires together and cap with a wire connector. Use electrical tape to wrap the wire connector securely.
  7. Take the white wire coming from slot 2 and secure to the power outlet at the top screw on the side in which the tab WASN’T broken. This will be the side that has three screws. (Remember to run these wires through the hole that the outlet will be mounted).
  8. Take the white wire coming from slot 6 that you labeled “hot” and connect to the outlet at the top screw of the side with the broken bridge. This is the side that only has two screws. This means the top outlet will control whatever device you will use for heating.
  9. Take the white wire coming from slot 9 that you labeled “cool” and connect to the outlet at the bottom screw of the side with the broken bridge. This is the side that only has two screws. This means the bottom outlet will control whatever device you use for cooling.
  10. Connect a piece of white wire to the middle screw of the side of the outlet with three screws. Using a wire connector and electrical tape, connect this wire with the white wire coming from the power cord.
  11. Connect a green piece of wire to the bottom screw of the side of the outlet with three screws. Using a wire connector and electrical tape, connecting this wire with the green wire coming from the power cord.

Final Touches

You are almost ready to test your DIY temperature controller!

  1. With the STC-1000 in place, slide the orange clips back onto the STC-1000 to hold it securely to the project box.
  2. Mount the wall outlet to the project box with screws. It may be easiest to start the holes with a drill.
  3. Run the power cord and temperature probe through the hole you cut for this purpose. I recommend using a piece of electrical tape to secure the power cord and probe to the inside of the project box so if they get pulled on by accident, it won’t directly pull on the connections to the STC-1000.
  4. Place the back cover on the project box and screw closed.
  5. You can also add some sort of device to the back of the project box to mount it where you please. For now, I put magnets on mine and it hangs on the side of my keezer.

Testing

Before putting the temperature controller to work, take a moment to test that the device is working and triggering the outlets appropriately. For this, you will need the voltage reader mentioned under the tools above.

  1. Plug the completed temperature controller into the wall. The STC-1000 should power on immediately and show the current temperature the probe is picking up.
  2. Hold the up arrow on the STC-1000 to see what the current temperature is set at.
  3. On the left side of the STC-1000 you will see the labels “Cool” and “Heat”. When a red dot appears next to one or the other, this means the corresponding outlet should be issuing power (remember the directions above wired the cold trigger to the bottom and the hot to the top). Let’s assume there is a red dot next to heat.
  4. Take the voltage reader and test the top outlet. If the light comes on the voltage reader, all is good.
  5. Next, change the temperature so that the cool function will be triggered. To do this, hold the “S” button until “F1” shows up, then release. Then, while holding the “S” button, use the down arrows to set the temperature below the current ambient temperature. Once you’ve found a temperature you want, push the power button to accept. Now there should be a red dot next to the “Cool” label.
  6. Again, use the voltage reader and test the bottom outlet. If the light comes on the voltage reader, everything is working!
  7. If the STC-1000 doesn’t power on, or the voltage reader doesn’t light up when testing the appropriate outlet, open up the project box and make sure the wiring is correct and all the wire connectors are effective.

How to Use

Using this temperature controller is fairly easy. The overarching functionality is that a cooling device will be triggered when temperatures exceed the target value and a heating device will be triggered when temperatures drop below the target value.

We will walk through a few of the basics, but the download (pdf) the full STC-1000 manual for more complete instructions.

On/off: When the temperature controller is plugged in, it will automatically power on. The number displayed is the current ambient temperature in Celsius being read by the temperature probe. To shut off, hold the power button until the display turns black.

Checking parameters: To see what the ambient temperature the controller is currently set to maintain, push the up arrow. Push the down arrow to see the “Difference Value”, explained below.

Editing parameters: The STC-1000 has four programmable parameters, explained below. To access these, hold the “S” button until “F1” appears in the display and then release the button. Use the up/down arrows to cycle through F1, F2, F3 and F4. To edit one of the parameters, cycle to the menu item in question, hold the “S” button and use the up/down arrows to change the value. Once the value you want is selected, push the power button to save.

Parameters Explained:

  • F1 – temperature set value: This is the temperature that the controller is set to maintain.
  • F2 – difference set value: This value determines the degree of allowable variation in Celsius before the controller kicks in. For example, if the F1 is set at 20°C with a F2 value of 0.3°C, the controller won’t kick in until the temperature raises to 20.3°C or drops to 19.7°C.
  • F3 – compressor delay time: This value is in minutes and determines how long the controller will wait before kicking in when the temperature exceeds the difference set value.
  • F4 – temperature calibration value: This can be used to calibrate the controller when inaccuracies occur.

Duncan Bryant is the Web Coordinator for the American Homebrewers Association.

The post How to Build a Temperature Controller appeared first on American Homebrewers Association.

Posted on

How To Make Kombucha

Simply put, kombucha is fermented tea. A culture of bacteria called SCOBY (Symbiotic Culture oBacteria and Yeast), sometimes called “the mother,” consumes the sugar in a fermentation process just like yeast does in beer. The result is a tangy, semi-sweet fermented tea with a very low level of alcohol–typically below 1% ABV. It can be carbonated, making for a bubbly elixir, and combined with other ingredients like fruit or spices to open up even more flavor possibilities.

While kombucha is hailed as a beneficial probiotic beverage, the jury is still out on whether or not it actually has such profound health effects. We’re not here to clear up that debate, but learning how to make kombucha at home is a fun way to explore other fermented beverages in addition to your beer, mead, and cider adventures.

Just like making beer, fermenting tea can be done in a number ways, and in this article we’ll show you one of these techniques for making kombucha at home.

Materials:

  • organic cheesecloth
  • bottles
  • pH meter (optional)
  • ppm meter (optional)
  • 2-3 gallon kettle
  • Starsan
  • kitchen thermometer
  • 1 gallon wide-mouthed jar
  • funnel
  • strainer
  • tongs

Ingredients:

  • organic black tea (8 tea bags makes 1 gallon)
  • organic sugar
  • SCOBY (Symbiotic Culture of Bacteria and Yeast)
  • filtered water

Step 1: Brewing the Tea

I start with filtered water. Your home water filter should be sufficient, but it is important not to use water that is too mineral-rich because it will alter the flavor of the kombucha.

Place 1 gallon (3.8 liters) of filtered water into your kettle and bring to a boil. Once the water is boiling, remove the kettle from the heat, add the tea bags, and let steep for 4 minutes. Note: It’s very important not to over-steep the tea because you will end up with very bitter kombucha.

Step 2: Adding Sugar

After steeping the tea, add 1 cup (200 g) of sugar and stir until it dissolves. Cover your sweetened tea with cheesecloth until it cools to room temperature. This can take several hours, but you can fill your sink with ice and place the kettle in there to help speed up the process.

As the tea is chilling, thoroughly sanitize your 1-gallon jar with Star San in preparation for the tea.

Step 3: Pitching the SCOBY


Whether you get your SCOBY mother (bacteria culture) from a friend or you purchase it from your local homebrew shop, you’ll need to make sure it stays at room temperature and never exceeds 90° F (32° C) or goes below 32° F (0° C). That is why pitching your SCOBY in room temperature tea is crucial; otherwise, you could potentially harm the bacteria and hinder fermentation. The SCOBY should also come submerged in a starter tea. This starter tea keeps the SCOBY comfortable in its environment so that you don’t shock it when you move it to another tea.

Test the temperature of your sweetened tea with a sanitized kitchen thermometer. Remember: the temperature should be no higher than 90° F (32° C). When it has cooled sufficiently, pour the sweetened tea into the sanitized wide-mouth jar.

Wash your hands thoroughly with soap and water. Take your SCOBY out of the vessel it came in and place into the sweetened tea in the jar. Pour in the remainder of the starter tea as well. Cover the jar with a piece of organic cheese cloth and affix it so that it stays in place. Place the concoction in a dark place for 1 to 2 weeks. Note: Don’t stress if your SCOBY falls to the bottom of the jar at first—it will eventually rise to the top to create a new SCOBY.

Step 4: Removing the SCOBY

After 7 to 14 days, you’ll want to give the kombucha a good look and a good smell. The fermented tea should actually have a sour/sweet smell, and the SCOBY should have formed a bigger “mother” SCOBY that covers the entire surface area of the liquid at the top of the jar. With thoroughly clean hands, remove the SCOBY and put it in a jar submerged in kombucha for your next use.

Step 5: Bottling your kombucha

For bottling, you’ll need about 4 liter-sized bottles or 8 to 10 22 oz. bottles. I prefer Grolsch-style flip-top bottles, but any of your various stocked up bottles should do. Sanitize the bottles, caps, funnel, and strainer. I bought a funnel with a built-in strainer, but if you don’t have that, place your strainer over the funnel and begin filling your bottles.

By bottling your kombucha, you have moved it to the secondary fermentation. Allow the kombucha to ferment another week to ten days in the bottles in the refrigerator. Allowing your kombucha to ferment in secondary will increase carbonation. Note: If you like your kombucha less bubbly and carbonated, you may not want to let it ferment in secondary as long.

Optional: Check the pH of your kombucha

Kombucha pH should lie somewhere between 2.5 and 3.5.* Test your kombucha to see if it falls in the right range. If the pH is too high, you might consider letting it ferment some more before bottling. If it is too low, go ahead and move it to bottles.

*pH range taken from Kombucha Kamp

* * *

Hailing from the South, Millie has developed an affinity for the beer industry and all the shiny things that come with it. When not exploring beer, Millie is in the kitchen, enjoying the outdoors, and wearing out her dancing shoes. Millie is the American Homebrewers Association administrative assistant. 

The post How To Make Kombucha appeared first on American Homebrewers Association.

Posted on

Brewing Brewers: Beer in College is Not What You Think

Today’s college kids are not the same.  I see them as freshmen, and again as seniors, and the evolution is stark.  Most freshmen have never lived away from home or had a job.  They’ve been shuttled from sports to lessons, and are truly dependents.  By the time they’re seniors, they’re driven to succeed, aware of the debts they owe, and the hard work ahead.  Most seniors work at least one job, even full time, to keep up with their bills while in school.  They know how to build networks and actively seek opportunities.  When they come to my Brewing Arts class, they’re already planning their careers.  And then they discover brewing.

For generations, American culture has demonized beverage alcohol to the realm of ‘evil toxic weapon’ rather than a complex food.  (It’s regulated by the Bureau of Alcohol, Tobacco, Firearms and Explosives, not the Food and Drug Administration.)  And home brewing was only legalized in all 50 states as of 2013.  But WE know brewing is culinary arts, with the chemistry of molecular gastronomy and the microbiology of baking.  And it’s a rapidly expanding market.

So I ask Brewing Arts students why they’re taking the class.  Some students say they don’t even like beer, but know it’s an important part of the business.  Others say they just had a free elective to fill, and thought it would be fun.  Some are taking it as part of their Sommelier minor, or Food and Beverage Management degree.  One or two may have brewed with their Uncle Bob in the past.  Then I warn them all – “You will learn way more than you thought there was to know about beer.  You will learn how to write a recipe for and home-brew an all-grain batch of beer.  This will become an addictive hobby, and a great way to connect with others.  All of the beer you drink will taste better.  And best of all, in the event of an apocalypse, you will be the LAST one kicked off the island.”

After the 11 weeks are through, they are totally hooked, and most keep in touch after they leave.  Their course review comments have a consistent thread.  “I wish I knew about this class as a sophomore.”  “Why didn’t my high school guidance counselor even mention brewing?  I would have started earlier.”  “I am so happy – this is my dream job.” “I can’t wait to learn more!”  But that’s the issue – how?

When students ask, “How do I get a job at a brewery?” I say, “Knock on the door.  Offer to help out for free.  If they like you, they’ll hire you.  Most small breweries are built by people just like you, who wanted to take their passion to the next level.  Brewers also have to wear many other hats, and do a variety of tasks.  Skills can be taught, but it’s a small team, so team chemistry is most important.”  More often than not, this job-seeking tactic has actually worked out, as attested to many alumni who have gone on to work in the industry, as beer sommeliers, managers, brewers and assistant brewers, brasserie and brewpub chefs, and more, but most only learning on the job.

Until recently, the avenues for brewing and beer education were limited to either very expensive advanced degree programs and specialized formal education, or the very informal back-yard turkey-fryer classroom.  Both of the above are an excellent means of learning, but the demand for skilled labor at all levels in the craft beer industry, including sales and service, cannot be met by either of these alone.  So the education middle ground is blossoming, and homebrew clubs and organizations can maximize this opportunity for recruitment by getting involved.

Not that long ago, perceived legal, ethical and socio-moral barriers made it awkward at best to discuss beer in college.  But most students today have never seen or even heard of the movie, Animal House, and very few think of beer as an ‘alcohol delivery system’, as hard as it is for us ‘old folks’ to believe.  Instead, most millennials think of craft beer as a means of connoisseurship, supporting the local economy, community involvement, a means of exploring global flavors, and (most importantly) a cool expression of personal taste.  The boom in community colleges offering beer appreciation and home brewing classes is not a fad, it’s a response.  Because craft beer is food, many culinary schools are also on board.

A confession – I was once a wine person.  I still like wine, drink wine, even make wine at home, but I’ve proudly “crossed to the dark side” for beer, as my department chair says.  When I started the JbreW club 12 years ago, it wasn’t because I was an avid beer enthusiast – far from it.  What I saw was an unmet need amongst our students.  They were hungry to learn about craft beer, but the courses didn’t exist yet.  So we organized, met on the weekends, and fired up the ½ barrel pilot plant, learning as we went along.

Fast forward to now, the JbreW club has won awards for our beers and meads in competition, and we host our own Ocean State Homebrew Competition.   JWU now has brewing courses taught on all four campuses across the country –Providence, Charlotte, North Miami and Denver.  We also now have a Study Abroad Craft Brewing program (with Brewlab UK), and Beer Sommelier and Beer Judge Certification courses.  By next year, we’ll have both a Craft Brewing Minor and Beer Sommelier Minor, and another Study Abroad for Beer Culture and Cuisine in Europe.  An advanced Mead and Honey course, and a Ciders and Fruit Wines course are also on the menu.  In the very near future, JWU will also be offering Certificate Programs to the public for both Craft Brewing and Beer Sommelier Certificates, and one-day and weekend courses for continuing education for professionals.

And NONE of this would have been possible without the help of our local home brewing community, for their mentorship and support through the years. ‘Uncle Frank’ Fermino took our club under his wing and taught us how to use the system, build recipes, enter competitions, and so much more.  Paul ‘Zok’ Zocco showed us how to build and run our own competition.  Other shops and breweries and homebrew clubs helped as well, sponsoring our competition and student club over the years. And I KNOW we are not alone – the home brewing community is chock full of generous, open-minded folks who love to ‘pay it forward.’

I love beer and love brewing, but I REALLY love my job – I make brewers!  Here at JWU, I encourage all of my students to join the AHA.  I give each student a current copy of the “Introduction to Homebrewing” issue of Zymurgy, and the local “Yankee Brew News” to keep them up-to-date on local breweries, brewpubs, events and more.  I send them to our local homebrew shops, competitions and events, and also show them how to find shops and clubs when they leave school, wherever their travels take them.  So, do you know who your local college students are?  More importantly, do they know about you?  Become guest speakers, offer on-campus demos, support school clubs and organizations, and brew up some more brewers in your town. Cheers!

* * *

Jennifer Pereira is an Associate Professor of Beverage and Dining Service at Johnson and Wales University, College of Culinary Arts in Providence, RI. She is the Lead Beer Educator for the Johnson and Wales University system, promoting university relationships within the brewing industry.

The post Brewing Brewers: Beer in College is Not What You Think appeared first on American Homebrewers Association.

Posted on

The Boil Experiment: Lid On vs Lid Off

This homebrew experiment was originally published on Brulosophy.com.

Of the numerous off-flavors that can be present in beer, dimethyl sulfide (DMS) is one of the most common, at least based on how often it gets cited during beer evaluations. Thanks to the hard work of those who came before us, brewers of today have a fairly decent understanding of what causes DMS in beer such that we’re able to employ certain methods to avoid it, most of which come into play during the boil.

While it is generally recommended to boil wort for at least an hour, prior xBmts have produced results suggesting that a Pale malt based beer and a Pilsner malt based beer boiled for 30 minutes were indistinguishable from the same beers boiled for 60 and 90 minutes, respectively. Since we know the S-methylmethionine (SMM) is abundant in malt and that it is rather easily converted to DMS during the mash, these findings were somewhat bewildering and got me wondering about another “rule” any homebrewer with more than a couple batches under their belt is well aware of. According to the book named after what it taught many of us,

Once you achieve a boil, only partially cover the pot, if at all. Why? Because in wort there are sulfur compounds that evolve and boil off. If they aren’t removed during the boil, they can form dimethyl sulfide which contributes a cooked cabbage or corn-like flavor to the beer. If the cover is left on the pot, or left on such that the condensate from the lid can drip back in, then these flavors will have a much greater chance of showing up in the finished beer. (How To Brew, Ch. 7 – 2)

Despite John’s equivocalness in stating that boiling with the lid on merely increases the chances of DMS being an issue, many of us accepted the practice as a beer death sentence. I know I did, it just made sense that DMS rich condensate being allowed to drip back into the boil would lead to a beer with noticeable levels of said off-flavor. While boiling without a lid is a no-brainer for most, I was inspired to test it out due to the rising popularity of counter-top brewing systems where the boil occurs in an enclosed space.

Purpose

To evaluate the differences between two beers of the same recipe where one was boiled with the lid on and the other was boiled with the lid off.

Methods

Considering the variable, I thought it’d be best to brew a clean and minimally hopped beer with a relatively high malt content, and with the recent release of Sierra Nevada’s delicious seasonal Oktoberfest, I was inspired to make my first ever Festbier.

Freaky Festbier Recipe

Details

BATCH SIZE BOIL TIME IBU SRM EST. OG EST. FG ABV
11 gal 60 min 22.0 IBUs 3.8 SRM 1.060 1.012 6.3 %
Actuals 1.06 1.006 7.1 %

Fermentables

NAME AMOUNT %
Pilsner (Weyermann) 17.5 lbs 77.78
Vienna Malt 5 lbs 22.22

Hops

NAME AMOUNT TIME USE FORM ALPHA %
Magnum 24 g 60 min Boil Pellet 11.2
Select Spalt 42 g 15 min Boil Pellet 3.1

Yeast

NAME LAB ATTENUATION TEMPERATURE
Saflager Lager (W-34/70) DCL/Fermentis 75% 48°F – 59°F

Notes

Water Profile: Ca 75 | Mg 1 | Na 10 | SO4 84 | Cl 70

Since I’d be kegging different xBmt beers while brewing this batch, I decided to use fresh yeast slurry, hence no starter necessary. After collecting my water and adjusting it to my target profile the night prior to brewing, I weighed out and milled the grain for a single 10 gallon batch.

The following morning, I awoke to the sweet sounds of Hall & Oats’ Sara Smile, flipped the switch on coffee maker, and hit the flame under my kettle of strike water.

It took about 15 minutes for the water to reach a few degrees warmer than the strike temperature suggested in BeerSmith, at which point I transferred it to my MLT for a brief preheat before mashing in to nail my target mash temperature.

I let the mash rest for an hour, stirring 3 times throughout, then began collecting the sweet wort.

Following a quick batch sparge, the full volume of sweet wort was stirred in a single kettle to ensure homogenization before I transferred an equal amount to a second kettle.

Refractomer measurements from both batches at this point showed they were at exactly the same pre-boil SG. To ensure a seamless brew day, I started the boil on the lid-off batch 20 minutes before the lid-on batch, leaving a lid on the kettle the entire time. Eventually, both batches were boiling at the same time.

I fully expected to see some steam escape between the seam of the lid and kettle, and that’s exactly what I observed throughout the entire boil.

I also expected the condensate dripping back into the wort to more than make up for most of volume lost through escaping steam. Imagine my surprise when I discovered the boiloff rate for the lid-on batch was exactly the same as the lid-off batch.

Over the course of the 1 hour boil, I removed the lid twice for no more than 3 seconds only to shake the condensate into the wort. Weird. I proceeded to quickly chill each batch to a few degrees above my groundwater temperature.

Refractomer readings from each wort revealed a very slight difference, which despite the post-boil volume similarity, made me wonder if the lid being on didn’t have some sort of impact.

Each wort was racked into a fermentor and placed in a cool chamber to finish chilling to my target fermentation temperature of 55°F/13°C. I returned a few hours later to find both worts had stabilized at my set temperature then proceeded to pitch equal amounts of yeast slurry into each fermentor. Both beers were observed fermenting with similar vigor the following morning. I raised the temperature of the chamber to 70°F/21°C after 4 days of activity. While both beers showed signs of diminished activity a couple days later, it seemed the lid-off batch developed a much larger kräusen.

I took an initial hydrometer measurement at 9 days post-pitch that matched a reading 3 days later showing a very slight difference between the beers.

Following an 18 hour cold crash, I fined the beers with gelatin and kegged them  a couple days later.

The filled kegs were placed in my cool keezer where they were burst carbonated overnight then left at serving pressure to condition for another week before data collection commenced, a point at which the beers shared a similar appearance.

Results

A total of 20 people of varying levels of experience participated in this xBmt. Each participant was served 2 samples of the lid-on beer and 1 sample of the lid-off beer then asked to identify the sample that was unique. Given the sample size, 11 tasters (p<0.05) would have had to correctly identify the lid-off beer as being different in order to reach statistical significance. A total of 8 tasters (p=0.34) accurately identified the unique sample, indicating panelists were unable to reliably distinguish a beer in which the wort was boiled with the lid on from the same beer in which the boil occurred with the lid off.

My Impressions: Biased by my performance on the DMS off-flavor xBmt where I was easily able to identify the intentionally dosed beer over many trials, I was convinced this was going to be a piece of cake. In fact, in a non-blind sampling of both beers the night prior to my first data collection session, I was pretty certain I perceived a difference, subtle though it was. The following day, after witnessing many people fail to distinguish the unique sample, I asked a taster to set me up with a triangle. Sure enough, when blind to which beer was in which cups, despite fully knowing what the variable was, I couldn’t tell the beers apart at all, they smelled and tasted exactly the same. I did this 5 more times over that weekend with similarly unreliable performance.

Discussion

It’s only natural to wonder why the results are the way they are, though based on the data collection methods we use, we’re unable to provide any conclusive explanations. But we can certainly speculate. I can’t help but wonder how much DMS is actually contained in the covered kettle during the boil compared to how much escapes through the opening between the lid and kettle rim. Throughout the 1 hour boil, it was quite clear rather massive amounts of steam were indeed leaving the kettle, and it’s probably safe to assume it carried some DMS with it. Another potential explanation is that the lid-on beer did in fact contain a higher level of DMS than the lid-off beer and tasters simply were unable to detect it. Considering the fact participants from the recent DMS off-flavor xBmt were unable to reliably distinguish a beer intentionally dosed with DMS to over triple the standard threshold, this theory doesn’t seem all too far-fetched.

Then again, it could simply be that both beers shared similar amounts of DMS, which would likely be very low based on prior lab data showing a Pilsner boiled for 30 minutes had none. Either way, I’ll continue with my standard practice of boiling without a lid, though my confidence in contained brewing systems has admittedly increased. If anything, it’s results like these that lead me to question the accuracy of beer evaluation.

The post The Boil Experiment: Lid On vs Lid Off appeared first on American Homebrewers Association.

Posted on

Meeting Topic: Cask Ale

Cask ale is unfiltered beer that is racked into casks, krausened, and sealed. It then undergoes a final fermentation in the cask from which it is then served. The result is a beer with lower carbonation and more complex flavor and aroma. It is also often called ‘real ale’, and is best served at cellar temperature (~55°F).

For your May 2017 club meeting, we encourage you to educate your club members on cask ales using the resources below.


Zymurgy Volume 36 No. 4 – July/August 2013

(Un)Real Ale: A Free Thinker’s Guide to Cask Conditioning – p. 32


National Homebrewers Conference 2015

Hosting Cask Ale Events | Slides (PDF) | Audio


HomebrewersAssociation.org

An Introduction to Cask Conditioning Homebrew


Research and Education Fund

Cask Conditioned Ale Experiment


Tuesday Beer Trivia

Tuesday Beer Trivia: Cask Ale

beer trivia


The post Meeting Topic: Cask Ale appeared first on American Homebrewers Association.