Posted on

What to Do with Your New Homebrew Kit

A homebrew kit is one of the best gifts you can ever receive (or give!). But it can also be overwhelming if you are brand new to the homebrew scene.

The following is a guide to figure out the quickest route to making extract beer with your new kit! If you are feeling ambitious and would like to jump straight to all-grain brewing, check out our Let’s Brew section for even more tutorials and equipment profiles.

Take Inventory

Much like the word “beer,” “homebrew kit” can mean many different things. Did you get an equipment kit or a recipe ingredient kit? Maybe you got both! Did it come with everything you need to get going on your first batch of beer at home, or do you need to get your hands on a few more things?

Many kits will come with a list of everything included, but it’s still never a bad idea to double check what you have on hand. Make note of all the equipment, from bottle caps to tubing, and any ingredients that may have been included in the kit.

Armed with your list of equipment, download the Zymurgy: An Introduction to Homebrewing magazine or head over to our Let’s Brew: Beginner section to see what other equipment you may (or may not) need to make your first batch of beer. Some of these things you’ll likely find in your kitchen, while the rest can be purchased at a local or online homebrew shop. Find a homebrew shop near you.

Pick a Recipe

If your kit came with a recipe that you are interested in making, then you can skip this section. Follow the directions that came with the ingredients and you’ll be well on your way to make beer! If you didn’t receive a recipe kit or are interested in making something different, start by browsing our extensive archive of tried-and-true homebrew recipes.

For a first time homebrewer, it’s recommended to stick with an extract ale recipe. Extract brewing takes out some of the more complicated steps involved in all-grain brewing, and ales allow you to ferment at standard room temperature whereas lagers require refrigeration for the signature lager cooling stage. It’s also not a bad idea to stick with a fairly simple recipe that doesn’t include to many adjunct ingredients outside the typical hops, malt and yeast, but if you’re feeling ambitious and want to brew a pumpkin vanilla coffee stout, we won’t stop you!

If you find an all-grain beer recipe you’d like to brew, use this guide to convert all-grain homebrew recipes to extract.

Brewing with Extract hero

Learn the Proccess

Many kits will come with a guide to walk you through your first batch of extract beer, and this is a great place to start. It’s important to familiarize yourself with the entire brewing process so you don’t run into any surprises that could hinder your brew day. It’s even better if you can put together a list of steps to follow on your brew day and check off steps as you go, so as not to forget anything.

Our free Zymurgy: An Introduction to Homebrewing magazine has everything you need to know about making beer, from start to finish. It will walk you through the extract brewing process step-by-step and arm you with all the knowledge you need for fermentation and bottling, as well. You can also check out our Let’s Brew: Beginner section for more tutorials on making great extract beer at home.

Brew Your Beer!

With all of your equipment compiled, a recipe’s worth of ingredients at the ready and a basic understanding of the homebrewing process, you’re ready to start brewing! Stick to your list of steps, keep notes if you’re feeling fancy, and most importantly…have a good time! After all, you’re making beer!

If anything does “go wrong,” whether you forget a hop addition or boiled for too long, don’t sweat it. Even the most seasoned brewers run into unexpected issues, but most of the time you’ll still end up with beer that you can drink and share with friends.

As the Charlie Papazian, the founder of the American Homebrewers Association, always says: Relax, Don’t Worry, Have a Homebrew!

Keep Going!

As your first beer is fermenting and getting close to being ready, start planning your next brew day! This is a great time to browse through different beer recipes, explore new homebrewing techniques and expand your homebrewing horizons. After taking your first sip of your first brew, even if not perfect to the tee, you’ll surely be hooked and ready for batch #2.


The post What to Do with Your New Homebrew Kit appeared first on American Homebrewers Association.

Posted on

An Introduction to Kegging Homebrew

Say goodbye to bottling and hello to the wonderful world of kegging! We’re here to walk you through the basics of kegging your homebrew. It’s easier than you may think!

Parts & Components

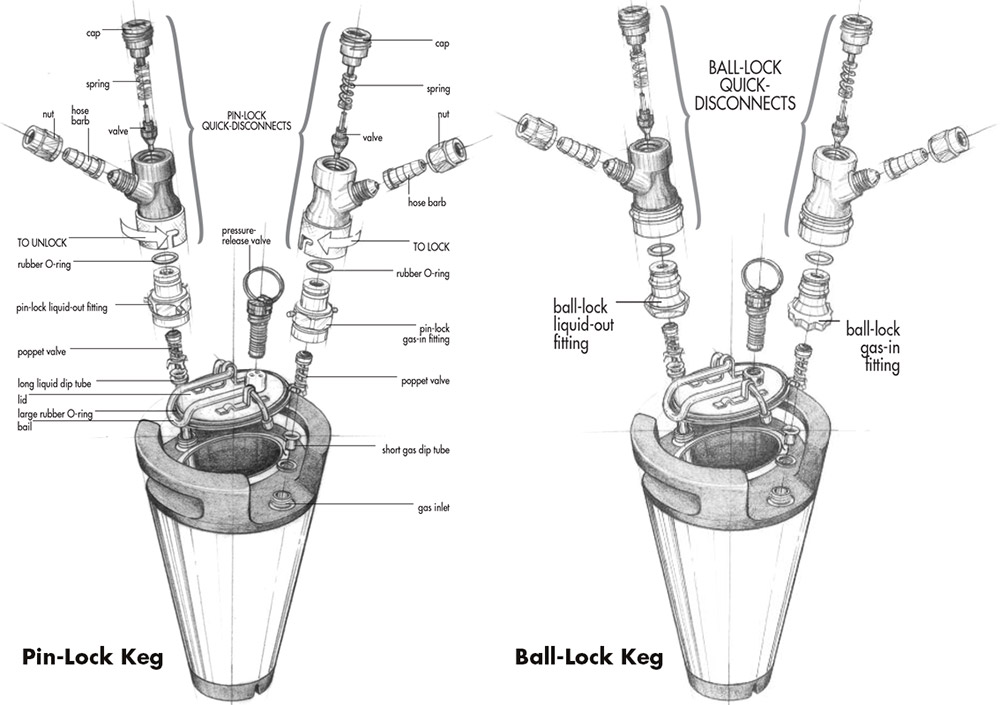
Kegs: Homebrewers tend to use five-gallon stainless steel Cornelius (“Corny”) kegs, which come in two types differentiated by their fittings: ball-lock or pin-lock. While people have reasons to favor one over the other, choose one and stick with it so you don’t need to worry about different connectors and fittings.

Connectors: Every keg has two connections, one for pushing in CO2 and the other for dispensing beer. Quick-disconnects are used for easy connection, which come in plastic or stainless steel. Pin lock gas and liquid connectors are noticeably different, but ball lock connectors can look nearly-identical, so consider buying different colors to quickly discern the gas connect from the beer connect.

CO2 Tank: CO2 is the gas used to carbonate and push out the beer into your glass. Homebrewers tend to use five-pound tanks, which are easier to transport, but if you dispense a lot of beer and aren’t worried about mobility a 20-gallon tank can be filled for only a few dollars more. If you choose to buy a tank, be sure it is certified.

Regulator: A full CO2 tank holds a pressure of 800 PSI, which is way more than necessary for carbonating and serving beer, so a regulator is used to provide safe levels of CO2. The regulator screws onto the CO2 tank and allows you to set the preferred PSI and monitor the pressure with a gauge.

Faucet: A faucet or tap is needed to control the flow of beer when serving. The cheapest option is to get a picnic tap, or you can build some sort of kegerator or jockeybox with a tap-handle for more attractive serving.

Tubing: Food-grade tubing is needed to connect the CO2 and faucet to the quick-disconnects.

O-Rings: O-rings are rubber circles used to create a tight seal in areas like the hatch of the keg. If you bought used kegs, it is wise to replace all the O-rings, especially if they have stains or an aroma.

Keg Diagrams

Click on image for a closer view.

Disassembly & Cleaning

If purchasing brand new kegs and components, it may not be necessary to clean before using—but it never hurts! The best way to ensure everything is thoroughly clean is to completely disassemble the keg.

Start by depressurizing the keg. If your keg has a pressure release valves, simply use this. If not, take a key or screwdriver and push down on the poppet of the gas-in fitting to allow gas to escape. Once this is done lift the bail of the hatch, lower it into the keg a few inches and remove. If the hatch doesn’t budge, that most likely means there is still pressure in the keg that needs to be released. Releasing all pressure is very important, and if ignored can cause injury.

After removing the hatch, you will notice a large O-ring around its top side. Remove the O-ring. Next, unscrew the gas and liquid fittings on the top of the keg and remove the dip tubes beneath them. Each fitting and each tube will have a small O-ring (four in total not counting the hatch O-ring). If you notice the O-rings are dirty or have an aroma, replace them. If the dip tubes are plastic and there are stainless steel options for your type of keg, it is strongly encouraged upgrade.

Once completely disassembled, the keg can be cleaned. First, rinse off any noticeable sediment inside the keg. Next, fill the keg with warm water and the appropriate amount of your preferred cleaner and throw in all the keg components. Allow the keg to soak for a few hours. If needed, use a carboy brush or something similar to get off any tedious stains or sediment.

Empty the keg of the cleaning solution and replace all the fittings along with the O-rings, taking care that the fittings and tubes are replaced correctly. Again, fill the keg with warm water and cleaner, seal with the hatch, and set the keg upside down for a few hours to cleanse the top of the keg’s inside. Rinse thoroughly multiple times with hot water.

Sanitation & Racking

Once your beer is ready for serving and you have a clean keg, it’s time to prepare the keg and transfer the beer.

First, sanitize the assembled keg thoroughly by filling it up with water and adding your preferred sanitizer. No-rinse sanitizer is recommended to avoid the need of an additional rinse step. Allow the keg to sit with the sanitizer solution for 10-20 minutes, then flip it upside down and let sit for 10-20 minutes to sanitize the top portion. Remove the hatch, empty the keg, and leave upside down to allow to drip-dry.

Once the keg is sanitized, it is time to prepare for racking by purging the keg of oxygen, which could cause oxidation. Connect the CO2 tank to the gas-in fitting and set the regulator to 5 PSI. Turn on the CO2, allow gas to flow for five seconds or so, and then turn off the CO2. Because CO2 is heavier than oxygen, it will fall to the bottom of the keg, forming a protective layer against oxygen as the beer is racked

After the initial purge, rack the beer into the keg and seal the hatch. Again, set the regulator to 5 PSI, turn on the CO2 to fill the keg’s head space, and turn off once you can no longer hear gas flowing. Open the pressure release valve to let the pressure out. Continue this process three or more times to purge remaining air from the headspace, and then shut off the CO2.

Carbonation & Serving

With the beer racked into the keg, it’s time to carbonate. Using the recipe or style guidelines, determine the ideal carbonation level, measured in volumes of CO2, for the style you are kegging. Generally speaking 2.0 volumes of CO2 will work if you are not sure where to start.

With a target carbonation level in mind, next take the temperature of the beer in the keg. The colder the beer, the more easily CO2 is dissolved, so it will effect the desired level of pressure. Download a complimentary copy of “A Bottler’s Guide to Kegging” and use Table 1 to determine the ideal level of pressure (PSI) to achieve the target carbonation level at the beer’s current temperature.

Now you’re ready to carbonate. Hook up the CO2 to the keg and set the regulator to the PSI determined using the table mentioned above. Turn on the CO2 tank and listen for the flow of gas. As the pressure reaches equilibrium the gas will begin to slow and eventually stop, and because the keg is upright there is only a small surface area of beer for the CO2 to dissolve.

While you can fully carbonate a keg with this method over the course of a few days, a little agitation will go a long way and carbonate the beer faster. Some will roll the keg on the ground as it’s connected to the CO2 to encourage more gas to dissolve into solution, though this is not recommended if your regulator does not have a check valve. You can also simply shake and slosh the keg around upright.

Now for the fun part, serving and enjoying! Attach the picnic faucet or tap handle to the beer-out connect. Then, simply depress the lever of the faucet and watch your beautifully carbonated beer flow. Proper dispensing will take into account variables like the length and diameter of the tubing, which is also discussed in “A Bottler’s Guide to Kegging.”


Source: “A Bottler’s Guide to Kegging” by Ed Westemeier (Summer 1995 Zymurgy)

The post An Introduction to Kegging Homebrew appeared first on American Homebrewers Association.

Posted on

Holiday Flip: 4 Modern Beer Cocktails to Spice Up the Holidays

Transforming a beer right in your glass through blending and ingredient infusion is a fun way to experiment with ingredients or add a twist to one pint out of the many in your homebrew keg. Today, we’re going to take a look at a few modern takes on the historical flip beer cocktail from America’s colonial era.

What was once a hot-served beer cocktail used as a daily remedy for aches and pains, is now inspiration for some of the tastiest—though some say blasphemous—homebrew beer cocktails you’ll have this holiday!

Notes about these flip cocktail recipes: These are intended to be prepared in the tradiitonal process highlighted in the article Flip: For What Ales You. In short, a flip is made by mixing spices and other ingredients in a metal mug and then heating it up, which was traditionally achieved by submerging a red-hot metal rod into the mug. Follow the link above for more information on colonial American flip, including history, heating techniques, safety precautions and the classic recipe.

4 Flip Cocktail Recipes

1.The Modern Classic

This recipe doesn’t stray far from the traditional American flip. We decided to leave the bread and egg out to make it more appealing, though it can actually be quite tasty! The sweetness of a ripe persimmon and the malt from an old ale paired with the assertive spicy flavors of ginger, cinnamon and allspice make for a peppery-sweet twist on classic flip.

Ingredients:

  • 12 oz | old ale
  • 1/8 tsp | allspice, ground
  • 1/4 tsp | ginger, fresh zest
  • 1/8 tsp | ceylon cinnamon
  • 2 tsp | persimmon, without skin
  • 1/4 tsp | lemon zest

2. Grandpa’s Hot Chocolate

There’s nothing like a mug of hot chocolate to get in the holiday spirit. Adding s’mores inspired ingredients into a smooth oatmeal stout will make for the best hot chocolate you’ve ever had, but keep it away from the kids! Add in some mini-marshmallows and a splash of peppermint spirits if your feeling especially fancy.

Ingredients:

  • 12 oz | oatmeal stout
  • 1/4 tsp | ceylon cinnamon
  • 1 drop | vanilla extract
  • 1/2 | bite-sized chocolate bar
  • Marshmallows to taste
  • 1 oz peppermint spirits (optional)


3. Flip-arita

Sometimes a margarita is just what you need on a cold night. The dash of sage melds with the tequila to transform the beach-inspired flip into something more reminiscent of the winter holidays. The fruit and acidic character of the lime and witbier balance the spicy herbal-ness of the sage and tequila nicely. Serve this one cold!

Ingredients:

  • 12 oz | Belgian witbier
  • 1/4 | small lime, wedged & squeezed
  • 1/6 | tsp ground sage
  • 1 oz | tequila

4. Fall Bounty Flip

The flavors of fall often find their way into holiday dishes and desserts. The cinnamon, pumpkin and pie spices create a very smooth mouthfeel which mellows at the rum. Slice the apple thin to encourage a refreshingly sweet balance to the beer and spices. If you need an even bigger apple kick, add a splash of homebrewed cider!

Ingredients:

  • 12 oz | pumpkin beer
  • 1/4 | medium apple, thinly sliced
  • 1/8 tsp | ceylon cinnamon
  • 1 oz | rum

The post Holiday Flip: 4 Modern Beer Cocktails to Spice Up the Holidays appeared first on American Homebrewers Association.

Posted on

Project Extreme Brewing with Dogfish Head Craft Brewery

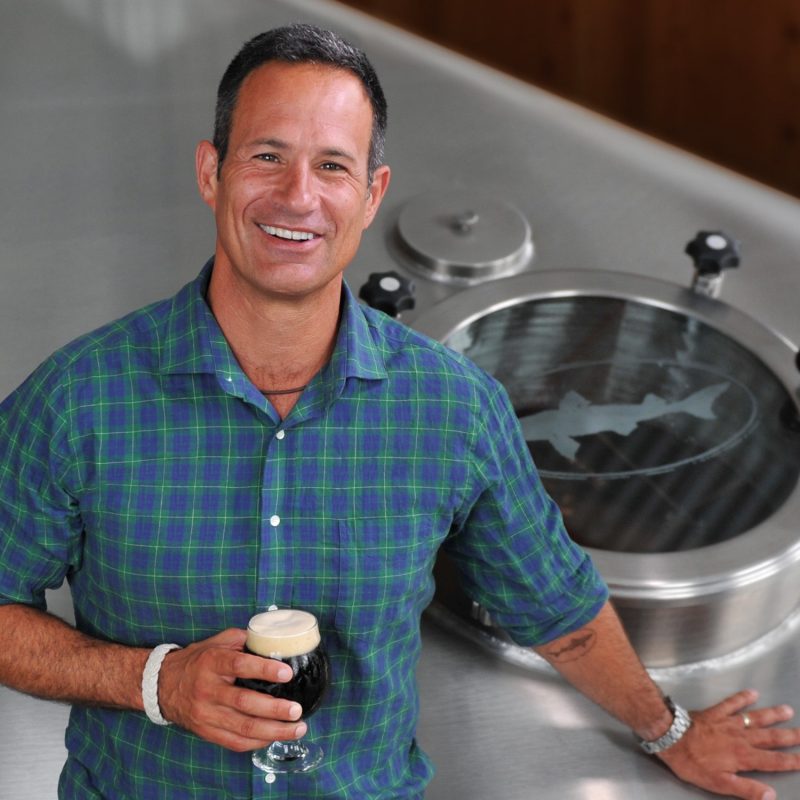
In this installment of Zymurgy Live, Sam Calagione and his fellow Dogfish Head brewers share theories and recipe concepts for beers beyond the Reinheitsgebot. With an open-ended and though-provoking Q&A – especially related to brewing with exotic ingredients, brewing strong beers, and aging on wood – and a contagious passion for brewing shown from the panel of Dogfish Head brewers, this presentation is guaranteed to inspire some experimentation in your next batch of homebrew.

About Project Extreme Brewing

With over 50 homebrew recipes and creative brewing philosophies from dozens of America’s most beloved, respected and coveted indie craft breweries, readers will find step-by-step instructions and tips for making creative, forward-thinking recipes that expand the definition of what ingredients go into making a great beer. Only inside Project Extreme Brewing: An Enthusiast’s Guide to Extreme Brewing at Home can readers learn how to make a Flanders Red inspired by a pastrami sandwich, a not-so-traditional Stout made with chocolate and oysters, or a Scotch Ale designed to mimic the flavors of an Old Fashioned cocktail.

About Our Speakers

Sam Calagione, CEO & Founder

Sam Calagione has been focused on brewing beers with culinary ingredients outside the Reinheitsgebot since 1995 when he first opened Dogfish Head as the smallest American craft brewery. Today, Dogfish has grown into a 300+ person company and is one of the most recognized breweries in the country.

Dogfish Head is based in Delaware with Dogfish Head Brewings & Eats, an off-centered brewpub and distillery, Chesapeake & Maine, a geographically enamored seafood restaurant, Dogfish Inn, a harbor-front beer-themed motel and Dogfish Head Craft Brewery, a production brewery and distillery featuring a tasting room and food truck.  Dogfish currently sells beer in 37 states and Washington D.C. and spirits in the mid-Atlantic region.

Sam’s innovative style and collaborative spirit has earned him a reputation as one of the industry’s most adventurous entrepreneurs and brewers. Sam has authored four books and was named the James Beard Foundation’s Outstanding Wine, Spirits, or Beer Professional in 2017.  Sam, his wife Mariah (Dogfish VP) and their family reside in coastal Delaware.

Mark Safarik, Brewmaster

It was 1990 and Mark was just beginning his brewing career, working throughout brewpubs and breweries in both California and Florida. After a number of successful stops, he ventured to MillerCoors in 1998 where he held various positions – ranging from Chemist to Microbiologist, and ultimately Brewing Operations Manager. Looking for an ‘off-centered’ challenge, Mark joined the Dogfish Head team in 2014 and has been guiding our brewing team as Brewmaster since 2016. In his current role he oversees Brewing Operations, Quality Assurance and Product Innovation. As a graduate of the University of California at Davis with a B.S. in Agricultural Economics, he also holds a General Certificate in Brewing from the IBD and is an active member of both the ASBC and MBAA.

Bill Marchi, Brewing Supervisor

After an entry-level brewing course at UC Davis piqued his interest, Bill quickly caught the homebrewing bug. Fast forward ten years and countless homebrew batches later, and you’ll find that Bill left his career in the engineering field to become a professional brewer. Completing Siebel Institute’s Brewing Diploma program in 2014, Bill joined the Dogfish Head team where his current role is Brewing Supervisor, overseeing fermentation and a growing barrel-aged and sour beer program. You’ll also find his knowledge in the authoritative primer, Project Extreme Brewing: An Enthusiast’s Guide to Extreme Brewing at Home, authored by Dogfish Head founder and CEO Sam Calagione, and the Alström Brothers of BeerAdvocate fame.

Amanda Petro, Brewing Supervisor

Amanda’s interest in brewing began just over ten years ago while living abroad in Germany. After homebrewing on the side for many years, she left her career as a QC Microbiologist to become a professional brewer. With a B.S. in Biology from the Pennsylvania State University, she honed her craft brewing skills by completing the Master Brewer’s program at UC Davis. She quickly landed a brewing position at Dogfish Head in 2014, and has recently moved into the role of Brewing Supervisor. In her current role, she oversees brewhouse operations and yeast management, as well as operating the small-batch program at Dogfish Head.

John Talkington, Brewer

With almost 20 years of brewing under his belt, Jon began his Dogfish Head journey 13 years ago. Specializing in historical ales, beers made using honey and barrel-aging, he’s your go-to in guy when it comes to brewing with ‘not-so-normal’ ingredients and processes. Jon is also the owner and mead maker at The Brimming Horn Meadery out of Milton, Del., producing both mead and fruit wines.


The post Project Extreme Brewing with Dogfish Head Craft Brewery appeared first on American Homebrewers Association.

Posted on

January/February 2018 Zymurgy Magazine Links

For your convenience, all links mentioned in the January/February 2018 issue of Zymurgy magazine are listed below.

About Zymurgy

Zymurgy is the bi-monthly journal for members of the American Homebrewers Association (AHA). All issues of Zymurgy magazine through the year 2000 can be accessed digitally online or with your smart phone device.

Join the AHA for a subscription and other member benefits.


Zymurgy Online Extra

AHA Links In This Issue

Featured Homebrew Recipes

The post January/February 2018 Zymurgy Magazine Links appeared first on American Homebrewers Association.

Posted on

Southern Hemisphere Homebrewing

[This article is the online extra article of the January/February 2018 issue of Zymurgy magazine.]

At the second annual South American Homebrewers Cup (2ª Copa Sudamericana de Homebrewers), a wise man pointed out to me that even though we were on the opposite end of the world from the place he called home, there’s something about homebrewing that makes you want to grow out a healthy beard. This sabio was none other than Denny Conn, who during his trip to Santiago, Chile, made quite an impact, not just with his knowledge, but with his cheerful, laid-back, friendly attitude on life.

Few choices could have been more appropriate than to invite Denny to an international competition and conference focused on sharing goodwill in a region with some serious rivalries. This year’s edition was a revival of a conference that began in Uruguay in 2014.

Homebrew Culture in South America

Homebrewers in Norteamérica and Sudamérica share much in common, but there are some notable differences. The most obvious is that throughout Latin America, homebrewing is commonly viewed less as a hobby than as a launchpad to going pro and starting a brewery. In the six years I’ve lived in Chile, I’ve tried countless beers made by people who brew tiny batches at home—anywhere from 50 to 200 liters—and then sell that beer in stores, at festivals, at bars, and to friends. Most of it comes in bottles, but some is dispensed from kegs.

Some might attribute such an approach to the romanticism of Latino culture, or of Western culture in general. Indeed, following your dreams and doing what you want to do is a big part of the picture. However, having witnessing the reality of low wages alongside a relatively expensive hobby, it’s clear that many do it to either break even or earn a little extra cash here and there. Homebrewing’s relative expense makes the hobby considerably less popular than in the US, with estimates ranging anywhere from 600 to 2,500 homebrewers in Chile, a country with a population of 17 million.

Access to ingredients and equipment varies wildly across South America. Chile and Argentina grow wheat and barley, which are malted and consumed in the local market and even exported abroad. Sourcing malts can be trickier and pricier in other countries. When it comes to hops, Argentina is the only country on the continent with its own hop industry, but it exists almost exclusively for the local beer market. That’s a shame because Argentina has some interesting and unique hop varieties that show off their mostly British and German heritage.

From what I’ve gathered from talking with homebrewers across South America, Chile has the best combination of access, availability, quality, and prices. While Chilean homebrewers don’t have access to as many hop varieties as American homebrewers do, Chile imports hops from all over the globe, and many of those that are in vogue show up in stores across this long, skinny country.
In spite of these differences, there is one thing that every South American brewer has in common: they almost universally depend on dried yeast. Liquid yeast has had difficulties getting a foothold here because of transportation logistics and demand, and when it does get here, it’s several times more expensive than dried varieties. Consequently, reusing yeast for multiple generations and making yeast starters are unfamiliar practices for many South American homebrewers.

Water on the world’s wettest continent varies just as much as it does in North America. In Patagonia, people have been quick to praise their pure water sources, while those in other locations can have incredibly hard water similar to Burton-on-Trent. Thanks to such vast differences, many brewers have learned what styles work best for their water profiles, and it shows. Tasty dark beers are popular in central Chile, while crisp lagers dominate down south, where the water is as soft as the winters are cold.

In spite of these differences, brewing is still brewing, and the hobby draws the same curious, good-natured people that it does elsewhere. Homebrewing is growing, and with it, more events and spaces to exchange ideas and enjoy camaraderie. Homebrewers happily take their latest experiments to meetings and get-togethers to gain feedback from their fellow homebrewers.

As a homebrew living in Chile, I’ve been particularly happy with the wide range of malts found throughout the five homebrew stores in the capital of Santiago. For starters, you can get high quality, local Patagonia Malt at a very affordable price, with several base, caramel, and specialty malts available. When something special is needed, or if you just want another flavor profile, many different malts are imported from Europe, including Weyermann, Muntons, Castle, Dinegmans, and The Swaen. Despite this ample selection, it’s curious to note that North American malts are not imported to Chile.

The internet has made sourcing equipment simple in most of the US and Canada, but it remains a problem for many homebrewers in South America. Even staple items such as auto-siphons, keg connections, and even Champagne-style crown caps can be difficult to procure. What does make it here is limited in quantity, expensive, and often in stock for only a short time.

These challenges, combined with significantly lower wages, lead to impressive ingenuity. Engineering types make custom systems, while those who have a trip planned to the US (or know someone who does) take advantage of the opportunity to stock up and bring back what they can. Another popular option is buying gear from abroad as a group to get a bulk discount. In the end, there are myriad options for getting an effective homebrew system in place. It just requires some resourceful ingenuity.


The Conference and Competition

The conference, held July 23, 2017, addressed topics familiar to homebrewers around the world, including hop usage, mash techniques, and recipe design. Talks also helped attendees learn to contribute and promote their national homebrew associations. Between talks, people ventured out of the acoustically smooth auditorium to find stands selling beer. Vendor highlights included up-and-coming yeast lab Kayta, which specializes in wild Chilean yeasts, and Weyermann, which highlighted the new malts they are exporting to the country. The quirkiest and most unexpected (but in hindsight quite brilliant) vendor was a full-service barber who cut hair and trimmed beards on the spot (there we go with the beards again!).

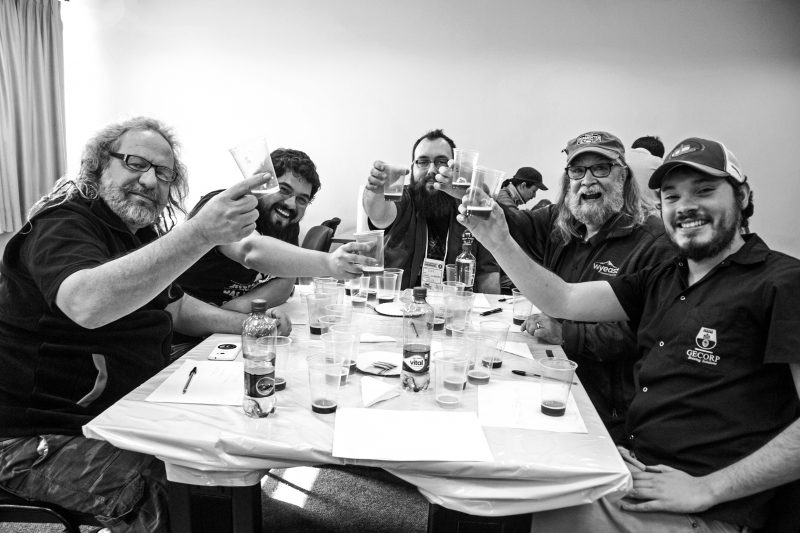
The competition turned out to be a great success considering that everything was planned and coordinated in just six months. In the end, 82 beers competed from five countries. Each participating country other than Chile held an internal competition to send its highest-quality beers to compete abroad. As this year’s host nation, Chile had 35 participating beers, followed by Argentina with 19, Uruguay with 10, and Brazil and Peru each with 9 homebrews. Eighteen judges from these countries, along with Denny Conn from the US, were tasked with awarding 12 bronze medals, 12 silver medals, and 7 gold medals.

The best homebrewer award went to Argentina, to homebrewing duo Juan Manuel Santos and Tomás José Avalos for their fruit beer, witbier, and American IPA. For their delicious brews, they were awarded a Pegas Evolution counter-pressure bottle filler. Best-of-show was awarded to Brazil and Rodrigo Campos Oliveira’s fruit beer, which highlighted classic tropical fruits from the Amazonian nation. For this grand prize, a 500-liter (4.2-barrel) batch of this beer was brewed at Alameda Brewing Company in Santiago in October 2017.

On a personal note, I was honored to win two silver medals for my (in Denny’s words) “far-out” and “weird” beers. For my fruit beer, I submitted a completely experimental beer that was the product of several different trial batches using different corn varieties and concentrations until I got the recipe down to what I wanted: 58 percent blue and purple corn, with the rest equal parts Pilsner and wheat malts. In order for it to compete in the fruit beer category, I added fresh passionfruit to this light, refreshing beer. I also brewed a crisp witbier with 1/3 Pilsner, 1/3 light wheat malt, and 1/3 flaked wheat. What turned the recipe on its head was a wild Chilean yeast that just happened to have a phenolic flavor profile similar to German hefeweizen and Belgian wit yeasts.

Closing Remarks

The night after the conference, we gathered at Cervecería Spoh, a brewery located in an industrial neighborhood of downtown Santiago. In addition to the house beers, the conference’s collaboration wheat ale with blueberry and raspberry was made available for free to the more than 100 people who showed up to celebrate with freshly made quesadillas, hamburgers, Chilean panqueques (crêpes), and live music. The night’s festivities were a blast, with homebrewers from all over the world sharing their passion for good beer with one another. Many phone numbers, email addresses, and great ideas were exchanged.

After the awards had been presented, Denny offered a moving speech in which he thanked everyone for such wonderful experiences and an unforgettable trip. He was not the only one who was impressed—during the week, all of those who got the chance to hang out and get to know this down-to-earth, long-haired legend of a homebrewer were blown away by just how much of a nice and cool guy he was.

As Denny finished his speech, his biggest fans—judges from Argentina and Uruguay—delivered their own riff on the familiar football chant: Olé, olé, olé, olé, Denny Conn, Denny Conn! If all goes according to plan, next year’s competition will face quite a challenge to surpass the fun of the second South American Homebrewers Cup.

***

Garrett Garfield lives in Santiago, Chile, and is the founder of La Espera Mead. Readers are invited to connect with him on Instagram and Facebook.

The post Southern Hemisphere Homebrewing appeared first on American Homebrewers Association.

Posted on

Weissbier Flavor Chemistry

Editor’s Note: This article complements Chris Colby’s article “The Many Ways to Weissbier” that appears in the January/February 2018 issue of Zymurgy

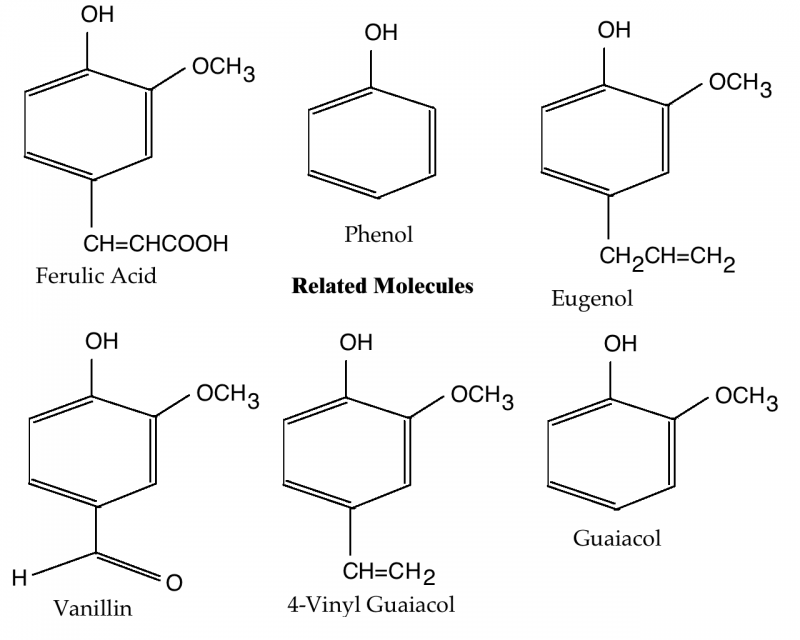
Arguably, the most interesting bit of chemistry relevant to brewing a wheat beer involves the transformation of ferulic acid into 4-vinyl guaiacol—the clove-like phenolic compound in wheat beers. (The chemistry related to ester formation, including the banana-like ester iso-amyl acetate, is the same as in “regular” ales.) A brief look at 4-vinyl guaiacol production, and the structures of a variety of related molecules, is interesting and may be helpful to brewers looking to track the sources of off flavors when they appear.

It Starts with Phenol

Phenol is a ringed molecule with a backbone of six carbon molecules and a hydroxyl group (—OH) attached to one of the carbon atoms. An interesting thing about phenol is that it is very reactive. It reacts with many molecules, especially those prone gaining electrons (electrophiles), in a way such that various chemical groups get attached to the ring.

Phenols play many roles in brewing. Tannins are a type of polyphenol—molecules made of many phenolic sub-units. Some phenolic compounds cause off flavors described as medicinal, Band-Aid, and smoky. And, of course, 4-vinyl guaiacol is a phenolic molecule. Here’s a look at it, some similar molecules, and how they are connected.

Ferulic Acid and p-Coumeric Acid

Ferulic acid and p-coumeric acid are both similar to phenol, but with a —CH=CHCOOH group at the fourth carbon. Ferulic acid additionally has a methoxy group (—OCH3) at the second carbon.

Ferulic acid is the precursor to 4-vinyl guaiacol. It is found in the bran of wheat and barley and released during the mash, especially if the mash includes a ferulic acid rest. During fermentation, it is converted to 4-vinyl guaiacol by the enzyme cinnamate decarboxylase (also called ferulic acid decarboxlase). This enzyme is produced by yeast strains with an active form of the POF gene. These include wheat beer yeast strains, most wine strains, and also many wild yeasts.

The same enzyme can also decarboxylate p-coumeric acid and produce 4-vinyl phenol. Decarboxylate means to remove a carboxyl group (—COOH). p-Coumeric acid is a molecule also found in the bran of wheat.

4-vinyl phenol is a minor flavor component in wheat beer. In normal beers (or wines), if present, it is likely due to contamination from Brettanomyces. By itself, 4-vinyl phenol lends a barnyard or mousy aroma, or a medicinal or Band-Aid-like character.

Interestingly, if you were to remove the hydroxyl group from p-coumeric acid, you would have cinnamic acid, a molecule that smells like honey. If you would then attach an ethyl group (—CH2CH3) to the —CH=CHCOOH residue, you’d have ethyl cinnamate, an important component of the essential oil of cinnamon.

4-vinyl guaiacol is, of course, the most important phenolic molecule in wheat beers. As the chemical name states, it is guaiacol with a vinyl group (—CH=CH2) attached to the fourth carbon. Likewise, 4-vinyl phenol is phenol with a vinyl group attached to the fourth carbon.

4-Ethyl Guaiacol and 4-Ethyl Phenol

The enzyme vinylphenol reductase can reduce (add electrons to) vinyl groups attached to phenol and convert them to ethyl groups. This converts the double bond in the vinyl group to a single bond and two hydrogens “fill in the blanks” left by “open” carbon bonds. 4-ethyl guaiacol is described as spicy, clovy, or smoky (and perhaps even bacon-like). It is considered a desirable component in some wines.

4-ethyl phenol gives roughly the same off odors as 4-vinyl phenol and is considered a fault in wine. It is a component of some Belgian style beers, but it is unwanted in most brews.

Eugenol and Vanillin

Eugenol and vanillin don’t play a role in wheat beer production, but their structures are similar to 4-vinyl guaiacol and they are also flavor-active molecules.

Eugenol is found in the essential oils of nutmeg and cinnamon (as well as basil and bay leaf). It’s the most abundant molecule in the essential oil of cloves. As such it smells like cloves. Interestingly, it differs from 4-vinyl guaiacol only in the addition a carbon (—CH2—) to the residue attached to the fourth carbon on the phenol ring.

Vanillin is an essential oil from the vanilla bean, and (of course) it smells and tastes like vanilla. If you were to change the methoxy group (—OCH3) on the fourth carbon, you’d have ethyl vanillin—a molecule that smells like vanilla, but is stronger than vanillin.

Wheat beers were brewed long before their chemistry was worked out. However, it’s interesting to see that so many flavor-active molecules that appear frequently in brewing share similar structures.

Chris Colby has been a homebrewer since the early 90s, when he studied molecular evolutionary genetics at Boston University. After receiving his PhD in 1997, he briefly worked in educational publishing before becoming a beer writer and editor. He is the author of Home Brew Recipe Bible and is currently editor of Beer and Wine Journal. He lives in Bastrop, Texas, with his wife and many cats.

The post Weissbier Flavor Chemistry appeared first on American Homebrewers Association.
Posted on

Right on Hoover Hefeweizen

[This recipe is featured in the January/February 2018 issue of Zymurgy magazine.]

Make your yeast starter 2–3 days ahead of time. In a large kitchen pot (not your brew pot), heat 2 gallons (8 L) of water to 159° F (71° C). Place crushed malts in a nylon steeping bag and steep them in this water for 60 minutes. Hold temperature as close to 148° F (65° C) as you can reasonably manage over this period. (This is a small mash.) Stir occasionally. Additionally, heat 1 gallon (4 L) of water to 170° F (77° C) in a small pot. And finally, heat 1 gallon (4 L) of water to a boil in your brew pot.

When the mash is over, transfer the grain bag to a 3-gallon (11-L) beverage cooler. (The kind with a spigot for dispensing beverages.) Pour the wort from the small mash gently into the cooler. Recirculate the wort by drawing off one or two cups into a measuring cup (or similar) and returning this wort to the top of the cooler. Repeat until at least 8 cups have been recirculated.

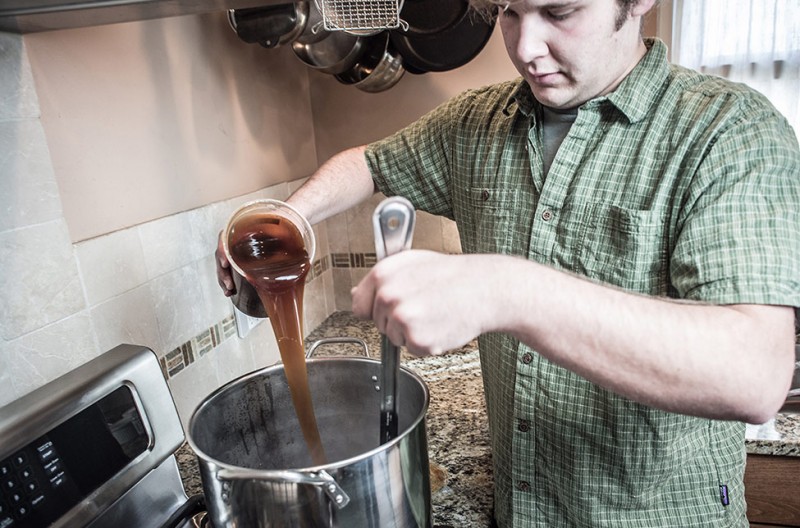
Begin running off wort by collecting 1–2 cups of wort from cooler and transferring it to the brew pot. After each transfer, add an equal volume of water to the cooler from the pot of 170° F (77° C) water. Once this water (the sparge water) runs out, simply empty the cooler by continually drawing off 1 to 2 cups and moving it to the brew pot. When you are finished collecting wort from the cooler, dissolve roughly half of the malt extract in the brew pot and resume boiling.

Boil the wort for 75 minutes, adding hops with 60 minutes the boil. Do not let volume dip below 3 gallons (11 L) during boil. Top up with boiling water, if needed, to avoid this. Stir in the remaining malt extract during the final 10 minutes of the boil.

When the boil is finished, cool the wort to 54° F (12° C), or as cool as you can get it with a reasonable effort. Transfer to a sanitized bucket fermenter and top up to 5 gallons (19 L) with cool water. Aerate the wort and pitch the sediment from the yeast starter. Ferment, allowing the temperature to rise to 64° F (18° C). Take the lid off the bucket for the 1 to 2 days when the fermentation is at it’s most vigorous. Reseal the bucket and affix the airlock, as you normally would, after this period.

When fermentation is over, prime beer with corn sugar in bottling bucket. If using standard beer bottles, prime for 3 volumes (6 g/L) of CO2 using 6.5 oz. (180 g) of corn sugar. If you are using heavy wheat beer bottles, prime for 4 volumes (8 g/L) of CO2 using 9.5 oz. (270 g) of corn sugar. Store bottles somewhere warm for two weeks. Check for carbonation, then move beer to cold storage.

The post Right on Hoover Hefeweizen appeared first on American Homebrewers Association.

Posted on

Weekday Bock (Malt Extract)

Place crushed grains in 2 gal. (7.6 L) of 150° F (68° C) water and let steep for 30 minutes. Then strain, rinse with 3 qt. (3 L) hot water, and discard the crushed grains, reserving the approximately 2.5 gal. (9.5 L) of liquid to which you will now add malt extract and 75-minute hops. Bring to a boil.

The total boil time will be 75 minutes. When 15 minutes, remain add the 15-minute hops. When 10 minutes remain, add the Irish moss and zinc fortified yeast. When 1 minute remains, add the 1-minute hops. After a total wort boil of 75 minutes, turn off the heat.

Immerse the covered pot of wort in a cold water bath and let sit for 30 minutes or the time it takes to have a couple of homebrews.

Then strain out and sparge hops and direct the hot wort into a sanitized fermenter to which 2.5 gal. (9.5 L) of cold water has been added. If necessary, add additional cold water to achieve a 5 gal. (19 L) batch size. Aerate the wort very well.

Pitch the yeast when temperature of the wort is about 70° F (21° C). Once visible signs of fermentation are evident, ferment at a temperature of about 55° F (13° C) for about one week or until fermentation shows signs of calm and stopping. Rack from primary to a secondary and add the dry hops. Lager the beer at temperatures between 35 and 45° F (2–7°C) for 4 to 8 weeks.

Prime with sugar and bottle or keg when complete.

The post Weekday Bock (Malt Extract) appeared first on American Homebrewers Association.

Posted on

Weekday Bock (All-Grain)

A step infusion mash is employed to mash the grains. Add 11 qt. (10.5 L) of 140° F (60° C) water to the crushed grain, stir, stabilize, and hold the temperature at 132° F (53° C) for 30 minutes. Add 5.5 qt. (5.2 L) of boiling water, add heat to bring temperature up to 155° F (68° C), and hold for about 30 minutes. Then raise temperature to 167° F (75° C), lauter, and sparge with 3.5 gal. (13.5 L) of 170° F (77° C) water. Collect about 5.5 gal. (21 L) of runoff. Add 60-minute hops and bring to a full and vigorous boil.

The total boil time will be 60 minutes. When 15 minutes remain, add the 15-minute hops. When 10 minutes remain, add the Irish moss and zinc fortified yeast. When 1 minute remains, add the 1-minute hops. After a total wort boil of 60 minutes, turn off the heat and place the pot (with cover on) in a running cold-water bath for 30 minutes. Continue to chill in the immersion or use other methods to chill your wort. Then strain and sparge the wort into a sanitized fermenter. Bring the total volume to 5 gal. (19 L) with additional cold water if necessary. Aerate the wort very well.

Pitch the yeast when temperature of wort is about 70° F (21° C). Once visible signs of fermentation are evident, ferment at a temperature of about 55° F (13° C) for about one week or until fermentation shows signs of calm and stopping. Rack from primary to a secondary and add the hop pellets for dry hopping. Lager the beer at temperatures between 35 and 45° F (2–7° C) for 4 to 8 weeks.

Prime with sugar and bottle or keg when complete.

The post Weekday Bock (All-Grain) appeared first on American Homebrewers Association.