Say goodbye to bottling and hello to the wonderful world of kegging! We’re here to walk you through the basics of kegging your homebrew. It’s easier than you may think!
Parts & Components
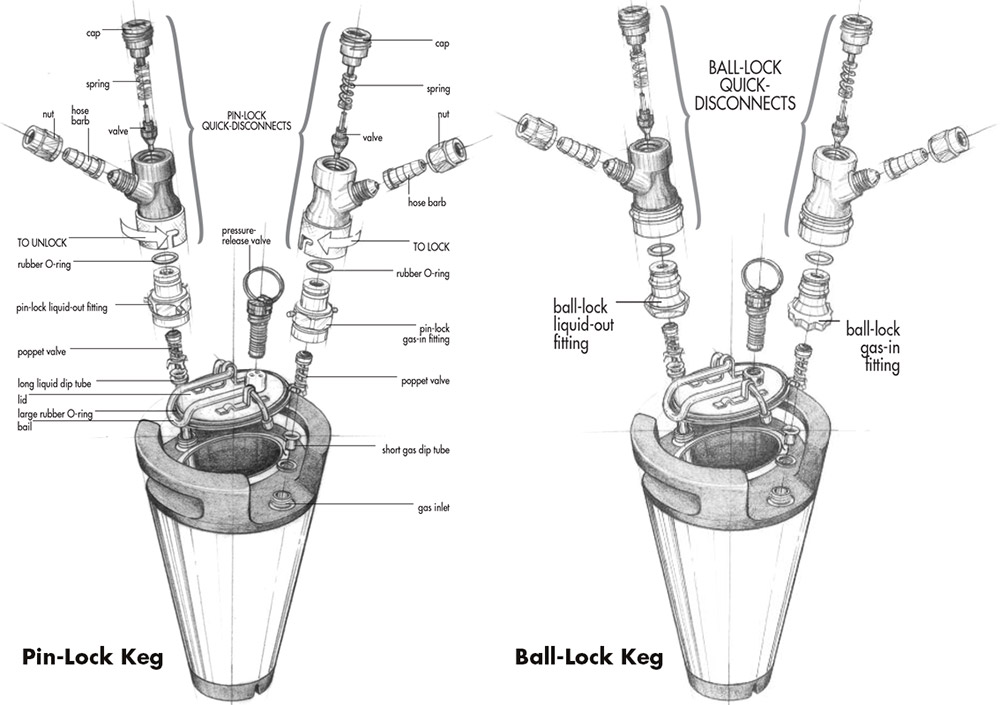
Kegs: Homebrewers tend to use five-gallon stainless steel Cornelius (“Corny”) kegs, which come in two types differentiated by their fittings: ball-lock or pin-lock. While people have reasons to favor one over the other, choose one and stick with it so you don’t need to worry about different connectors and fittings.
Connectors: Every keg has two connections, one for pushing in CO2 and the other for dispensing beer. Quick-disconnects are used for easy connection, which come in plastic or stainless steel. Pin lock gas and liquid connectors are noticeably different, but ball lock connectors can look nearly-identical, so consider buying different colors to quickly discern the gas connect from the beer connect.
CO2 Tank: CO2 is the gas used to carbonate and push out the beer into your glass. Homebrewers tend to use five-pound tanks, which are easier to transport, but if you dispense a lot of beer and aren’t worried about mobility a 20-gallon tank can be filled for only a few dollars more. If you choose to buy a tank, be sure it is certified.
Regulator: A full CO2 tank holds a pressure of 800 PSI, which is way more than necessary for carbonating and serving beer, so a regulator is used to provide safe levels of CO2. The regulator screws onto the CO2 tank and allows you to set the preferred PSI and monitor the pressure with a gauge.
Faucet: A faucet or tap is needed to control the flow of beer when serving. The cheapest option is to get a picnic tap, or you can build some sort of kegerator or jockeybox with a tap-handle for more attractive serving.
Tubing: Food-grade tubing is needed to connect the CO2 and faucet to the quick-disconnects.
O-Rings: O-rings are rubber circles used to create a tight seal in areas like the hatch of the keg. If you bought used kegs, it is wise to replace all the O-rings, especially if they have stains or an aroma.
Click on image for a closer view.
Disassembly & Cleaning
If purchasing brand new kegs and components, it may not be necessary to clean before using—but it never hurts! The best way to ensure everything is thoroughly clean is to completely disassemble the keg.
Start by depressurizing the keg. If your keg has a pressure release valves, simply use this. If not, take a key or screwdriver and push down on the poppet of the gas-in fitting to allow gas to escape. Once this is done lift the bail of the hatch, lower it into the keg a few inches and remove. If the hatch doesn’t budge, that most likely means there is still pressure in the keg that needs to be released. Releasing all pressure is very important, and if ignored can cause injury.
After removing the hatch, you will notice a large O-ring around its top side. Remove the O-ring. Next, unscrew the gas and liquid fittings on the top of the keg and remove the dip tubes beneath them. Each fitting and each tube will have a small O-ring (four in total not counting the hatch O-ring). If you notice the O-rings are dirty or have an aroma, replace them. If the dip tubes are plastic and there are stainless steel options for your type of keg, it is strongly encouraged upgrade.
Once completely disassembled, the keg can be cleaned. First, rinse off any noticeable sediment inside the keg. Next, fill the keg with warm water and the appropriate amount of your preferred cleaner and throw in all the keg components. Allow the keg to soak for a few hours. If needed, use a carboy brush or something similar to get off any tedious stains or sediment.
Empty the keg of the cleaning solution and replace all the fittings along with the O-rings, taking care that the fittings and tubes are replaced correctly. Again, fill the keg with warm water and cleaner, seal with the hatch, and set the keg upside down for a few hours to cleanse the top of the keg’s inside. Rinse thoroughly multiple times with hot water.
Sanitation & Racking
Once your beer is ready for serving and you have a clean keg, it’s time to prepare the keg and transfer the beer.
First, sanitize the assembled keg thoroughly by filling it up with water and adding your preferred sanitizer. No-rinse sanitizer is recommended to avoid the need of an additional rinse step. Allow the keg to sit with the sanitizer solution for 10-20 minutes, then flip it upside down and let sit for 10-20 minutes to sanitize the top portion. Remove the hatch, empty the keg, and leave upside down to allow to drip-dry.
Once the keg is sanitized, it is time to prepare for racking by purging the keg of oxygen, which could cause oxidation. Connect the CO2 tank to the gas-in fitting and set the regulator to 5 PSI. Turn on the CO2, allow gas to flow for five seconds or so, and then turn off the CO2. Because CO2 is heavier than oxygen, it will fall to the bottom of the keg, forming a protective layer against oxygen as the beer is racked
After the initial purge, rack the beer into the keg and seal the hatch. Again, set the regulator to 5 PSI, turn on the CO2 to fill the keg’s head space, and turn off once you can no longer hear gas flowing. Open the pressure release valve to let the pressure out. Continue this process three or more times to purge remaining air from the headspace, and then shut off the CO2.
Carbonation & Serving
With the beer racked into the keg, it’s time to carbonate. Using the recipe or style guidelines, determine the ideal carbonation level, measured in volumes of CO2, for the style you are kegging. Generally speaking 2.0 volumes of CO2 will work if you are not sure where to start.
With a target carbonation level in mind, next take the temperature of the beer in the keg. The colder the beer, the more easily CO2 is dissolved, so it will effect the desired level of pressure. Download a complimentary copy of “A Bottler’s Guide to Kegging” and use Table 1 to determine the ideal level of pressure (PSI) to achieve the target carbonation level at the beer’s current temperature.
Now you’re ready to carbonate. Hook up the CO2 to the keg and set the regulator to the PSI determined using the table mentioned above. Turn on the CO2 tank and listen for the flow of gas. As the pressure reaches equilibrium the gas will begin to slow and eventually stop, and because the keg is upright there is only a small surface area of beer for the CO2 to dissolve.
While you can fully carbonate a keg with this method over the course of a few days, a little agitation will go a long way and carbonate the beer faster. Some will roll the keg on the ground as it’s connected to the CO2 to encourage more gas to dissolve into solution, though this is not recommended if your regulator does not have a check valve. You can also simply shake and slosh the keg around upright.
Now for the fun part, serving and enjoying! Attach the picnic faucet or tap handle to the beer-out connect. Then, simply depress the lever of the faucet and watch your beautifully carbonated beer flow. Proper dispensing will take into account variables like the length and diameter of the tubing, which is also discussed in “A Bottler’s Guide to Kegging.”
Source: “A Bottler’s Guide to Kegging” by Ed Westemeier (Summer 1995 Zymurgy)
The post An Introduction to Kegging Homebrew appeared first on American Homebrewers Association.
![]()