Posted on

How to Add Fruit to Beer

So you want to brew a fruit beer. You’ve selected the perfect base beer style and fruit combination and it’s time to start sourcing the fruit and making a plan of attack.

As with many aspects of homebrewing, there are many ways to achieve a similar outcome, so think about which of the following processes will work best when planning to add fruit to beer.

Finding Fruit

Finding the fruit for your beer is as simple as heading down to the grocery store and loading up the cart, right? To some extent, yes, but a beer can only be as great as its raw ingredients, so it is crucial to try and find the highest quality produce you can get your hands on.

In a perfect world, fruit is grown in your backyard. Buy growing your own, you can allow the fruit to achieve optimal ripeness, and you know the exact what conditions the fruit was grown in. But, alas, growing fruit trees is not something you wake up and decide to and have ready for your next brew day. Off to the market…

Before heading to the grocery store, look for local farms and nurseries or visit your neighborhood farmers market. These sources produce the “heirloom” type of produce that typically use minimal amounts of chemical growers and pesticides and focusing on quality product rather than speedy mass production. This option may be a bit pricier than going to the store, but the quality is worth the expense to achieve delicious fruit flavor in your beer.

And if all else fails, head to the grocery store! Great fruit beers can still be made with produce purchased from grocery chains, with a little extra care. First, spend some time rummaging the fruit bins for the ripest specimens you can find. Mass producers of fruits often harvest before the point of optimal ripeness to extend shipping and shelf life. The trade off is a less-flavorful fruit. Grocery store fruits are also often grown and treated with chemicals, so take care to give fruit a thorough washing before adding to a beer (though, this should be done with any produce purchased).

If fresh fruit is not available, frozen fruit and purees are the next best option. Frozen fruit and purees are also a great way to purchase quality fruit ingredients at a more affordable cost, especially if your recipe calls for large additions. They also take less time to prepare when adding to beer. Keep an eye on the ingredients and avoid products that have large amounts of preservatives.

Juices are another option that can be used with great success, and like frozen fruits and purees, you should look for products free of preservatives and made of real fruit. Some folks use extracts and essences of fruits, but this is where you start to get into the realm of the artificial-tasting fruit beers.

Fruit Amounts

With a source of fruit determined, you now need to know how much fruit to purchase. This is not a cut-and-dry situation, and since fruit beers are created from many different base styles, you need to focus on balancing the strength and qualities of the beer with that of the fruit.

For example, two pounds of raspberries may be perfect in your five-gallons of strong stout, but the same amount in a session wheat beer could be overwhelmed with raspberry character. Also, take into account whether or not the fruit has a strong acidic quality, which will require more consideration in creating balance between the fruit and base beer.

Be sure to keep careful notes of the amounts you use in relation to your batch size and recipe, so in the future you can make more informed decisions based on your experiences and your preferred taste. The following chart can be used as a starting point to determine the appropriate fruit amounts in any given homebrew recipe:

Fruit (fresh) Pounds/Gallon Grams/Liter
Apricots 0.25 – 2.0 30 – 240
Blackberries 0.5 – 4.0 60 – 480
Blueberries 0.5 – 3.0 60 – 360
Cherries (sour) o.25 – 2.0 30 – 240
Cherries (sweet) 0.33 – 4.0 40 – 480
Citrus 0.25 – 1.0 30 – 120
Currants 0.33 – 1.5 40 – 180
Peaches 0.5 – 5.0 60 – 600
Plums 0.5 – 2.0 60 – 240
Raspberries 0.25 – 2.0 30 – 240
Strawberries 0.5 – 3.0 60 – 360

This table was taken from “Sweet & Sour: Adding Fruit to Sour Beer” by Kevin Wright featured in the May/June 2015 Zymurgy magazine. Access the article and see the full chart which includes equivalents for purees, concentrates and dehydrated/dried fruits.

fruit-beer

Preparing & Adding Fruit

The methods of preparing fruit will largely depend on the form of the fruit (ex. whole, puree, juice, etc.), and at what point the fruit will be added to the beer. Again, there are many ways to skin the proverbial cat.

Whole, puree and juiced fruit is often added in the last minutes of the boil. This acts as a quick pasteurization step to prevent any potential bacterial contamination that could make your fruit beer go south. Adding fruit to the boil means the fruit is in the wort during active fermentation. Having fruit in the fermenter during fermentation causes a much different fruit character then you might find when adding fruit post-fermentation.

For starters, the fruit will likely add fermentable sugars to the wort, which you may want to account for when formulating the recipe. Fermented fruit also has a much different character then post-fermentation fruit additions. A lot of the fruit character will be blown off from the rigor of fermentation, and what remains will be a more wine-like fruit character since the fruit’s sugars were fermented, rather than a fresh fruit quality. In some fruit beers, especially those that may use wine grapes, the fermented fruit character may be desired. 

Purees and juices can be added directly to the boil kettle. You can do the same with whole fruit, but you may want to consider mashing or pulse-blending the fruit before adding it to the boil to help release more of the juices. Bagging the fruit in a hop bag is suggested if dealing with a lot of flesh and seeds, but it’s not 100 percent necessary if you take care not to rack the solids into the primary fermenter.

If you’re after more fresh fruit character that is reminsicent of the raw fruit being used, then stick with post-fermentation additions after primary fermentation has nearly completed. However, since you don’t have the high temperatures as you would when boiling fruit, you need to take extra care to avoid contamination (unless, of course, you are after something wild). Often times juices, purees and frozen fruits undergo flash-pasteurization which leaves little risk for contamimation if added to beer. Whole fruit, on the other hand, is another story.

First, mash or pulse-blend the fruit to release the juices and create more surface area for the beer to be in contact with the fruit. Now you have three options for pasteurization. First, is a low-heat pasteurization method that you can do in a double boiler or carefully directly on heat. Hold the mashed fruit at around 150-170°F for about 15 minutes, and that should rid the fruit of most of the unwanted bacteria. Second, simply freezing the mashed fruit before adding it to the fermenter. It is said that freezing and thawing fruit a few times helps release more flavors by breaking down cell walls, which means a fruitier brew! Third, simply do nothing at all and hoping for the best (good luck!).

Once you’ve pasteurized your mashed fruit, bag it in a hop bag like you would dry hops and add it to your secondary fermenter or keg. Make sure all the juices make it into the fermenter, too, even if the bag doesn’t contain it. Then, simply age it on the fruit like you would dry hops. Pull samples and once it tastes as you hoped, yank the bag and bottle or start serving! You can forgo the hop bags and add fruit directly to the fermenter, but this will likely require filtering, racking to additional fermenters and/or cold crashing to get clear, solid-free fruit beer.


Sources: “Brewing with Fruit” by Dave Mentus (May/June 2010 Zymurgy); “Notes from a Fruit Beer Fancier” by Randy Mosher (July/August 2002 Zymurgy); “Sweet & Sour: Adding Fruit to Sour Beer” by Kevin Wright (May/June 2015 Zymurgy).

The post How to Add Fruit to Beer appeared first on American Homebrewers Association.

Posted on

Egg over Mead-ium: Measuring Gravity With an Egg

Being frugal and making friends with beekeepers have benefits for the experimental meadmaker, and occasionally I get to play with crystallized comb or rinsings from extruded frames. But because the sugar concentration of washed honey is unknown, the density (specific gravity) of diluted honey has to be checked. Today we enjoy access to the wonderful glass hydrometer, but hydrometers have a habit of rolling off the counter when brew day rolls around. In the absence of a hydrometer, brewers in the past often used an egg. Really.

How the Floating Egg Test Works

The floating egg technique works thanks to the internal anatomy of an egg, which includes an air sac at the rounded end for the bird embryo to breathe. A fresh egg has a relatively small air sac, but egg shells are slightly porous, and the air sac grows as the contents of the egg slowly evaporate and dry out. A very fresh egg sinks in water, but an old egg with a large air sac will bob up and float. This float test is still used in modern times to test whether or not an egg is fit to eat before cracking it.

Specific gravity is a dimensionless quantity that compares the density of a substance to that of water. By definition, the specific gravity of water is 1. Anything with a specific gravity greater than 1, like wort or must, is denser than water, and anything with a specific gravity less than 1, like ethanol (alcohol), is less dense than water. When salts or sugars (like honey) are dissolved into water, the extra particles change the density of the solution.


A fresh egg has a density between 1.03-1.1 g/mL, which means it will float in a solution that has a density greater than or equal to 1.03-1.1 g/mL.(The density of pure water is an even 1.0 g/mL.) Thus, an egg placed in must or wort having a specific gravity greater than approximately 1.030 to 1.100 will float. The denser the liquid, the higher the egg will bob in the solution.

Must Density Matters

Throughout most of history, every last bit of honey would have been used, not just the honey that’s easy to extract. The centrifugal honey extruder is a modern convenience that allows for high yield with minimal processing, but before this useful invention, honey would have been extracted by hand, first by leaking and breaking up the combs, and then by washing the broken combs in warm water to dissolve the remaining and any crystallized honey.

The resulting mixture of honey and water would be of unknown strength and would have needed to be checked before brewing: insufficient fermentable sugars could result in an easily spoiled brew, and too much sugar can inhibit yeast growth and stall fermentation. Master brewers likely could eyeball or taste and have a perfect brew each time, but the less experienced benefited from a visual aide like a floating egg. By the end of the 17th century, a hen’s egg was specified for this purpose.2

Historic brewing recipes are uncertain as to whether the must should be heated or not, and they often recommend testing the strength before boiling,3 apparently not realizing this evaporates water and increases density. The brewers are also not quite able to make up their mind if the must should be cold, blood-warm, or boiling, which could indicate they did not understand how temperature affects specific gravity either.

The 1597 Dutch beekeeping manual Van de Byen by Theodorus Clutius says, “and let it cook / until an Egg can float in the liquid / then set it off the fire,” which could have yielded a nicely boiled egg if it were not removed quickly enough. A 1616 Danish cookbook–the oldest such known–advises one to “put an egg or two into this lukewarm brew so that there is a part of egg as big as a 2 shilling over the water then it is sweet and fat enough,” which probably is the most accurate measurement.

Several 17th-century brewing recipes associated coins, especially twopence and the groat, with the floating egg. The diameter of the coin would be used as a size measurement of the diameter of the bit of shell sticking above the water surface, and this measurement averages a ratio of 3:1 to 4:1 of water to honey dilution,4 which are appropriate ratios for mead must.

How to Float an Egg

The diameter of an ideal groat is approximately 23-24 mm, and the diameter of a US quarter is 24.26 mm (0.955 inches), which makes a quarter the perfect stand-in for the old groat.

The size of the air sac changes as an egg ages–interfering with the results of our density test–so it is very important to use a fresh egg that has not yet had time to evaporate. It is also important to check the supposedly fresh egg, as eggs sold in the supermarket are not always as fresh as you might assume. To do this, calibrate the egg in plain water before every density test to make sure it sinks flat to the bottom, with both butt and tip level (see figure below).

Differences in breed, health, age, and diet can also cause the size and shape of the egg to differ quite significantly. For the best results, compare several eggs and pick out the most average one.

The table below correlates egg position–that portion of the egg visible above the surface of the liquid–with specific gravity, giving us an idea of what to aim for. Egg readings are given for ale yeasts with alcohol tolerances of 10% and 12% by volume.5

Mead Style Starting Gravity (10% ABV tolerant yeast) Diameter of Egg Visible above Surface Starting Gravity (12% ABV tolerant yeast) Diameter of Egg Visible above Surface
Dry 1.085 touches 1.100 20 mm
Medium 1.095 18 mm 1.110 26 mm
Sweet 1.100 20 mm 1.120 30 mm
Dessert 1.100+ >20 mm 1.120+ >30 mm

To make sure there is enough sugar for the yeast to feed on, the egg should float. But if it starts to tip over and not reliably point up anymore, the solution has become too strong, with too much honey sugar for the yeast to properly work, and fermentation will likely stall. The average range of 1.08 to 1.12 g/mL at which the average round, fresh-laid egg floats and points upward is also the ideal range of sugar content for starting a successful brew using standard yeast.6

So, after all this, where do you start? Start with a fresh egg no more than two days old, of the roundest kind, weighing less than or about 2 ounces (57 g). Calibrate the egg in room-temperature water to make sure it sinks flat. Make your honey must, heat and evaporate as needed, let cool down to blood temperature, and add your egg.

If the egg sinks, the must is too weak. If it floats close to tipping or tips, the must is too strong. If it is too weak, add more honey, stir well, and try again. If it’s too strong, add a little water, stir well, and try again. As you can imagine, it is easier to start with too strong a solution and dilute it, than to start with a weak solution and try to incrementally dissolve more honey. If your must does need some strengthening, make a strong honey or sugar solution first, and incrementally add that to your must, not straight up undiluted honey.

It has been my experience that if the egg tip touches but does not break the surface of the must, it will ferment to a nice, dry wine-like mead. If you prefer something sweeter, aim to have the egg break the surface and show an area about the size of a quarter, or a bit less. If at first you don’t feel at ease trusting your fresh-laid egg, use a modern hydrometer the first few times, in conjunction with your egg, to get the hang of this technique. Before you know it you’ll reach for an egg, conveniently located in your kitchen.

As a homesteader and medieval reenactor, Susan Verberg enjoys researching alternative ingredients and old fashioned techniques. Verberg primarily brews mead and keeps bees when possible, but also occasionally dabbles in historic–especially herbed–beers. For more on Verberg’s mead brewing, check out her collection of medieval recipes and techniques.


Sources

  • [1] http://homesteadlaboratory.blogspot.com/2014/02/historical-lye-making-part-2.html
  • [2] Digby, Kenelme. The Closet of the Eminently Learned Sir Kenelme Digby Knight Opened, 1669
  • 2005 https://www.gutenberg.org/ebooks/16441
  • [3] Digby, To Make Metheglin
  • [4] To Bear An Egge, Making mead with medieval hydrometers. SCUM 16, p.21-28.
  • [5] Sibly, Belinda. The Egg Test for Period Brewers and Mead Makers, 2004, p.20-29.
  • http://brewers.lochac.sca.org/files/2014/02/The-Egg-test-for-Period-Brewers2.pdf
  • [6] Sibley

The post Egg over Mead-ium: Measuring Gravity With an Egg appeared first on American Homebrewers Association.

Posted on

How to Build a Hop Oast

Growing hops at home is a common past time of the homebrewer. It’s a great way to be more hands on with your homebrew, to supplement some of the hops needed in your beers, and to open up the opportunity to easily brew fresh and wet hopped beers.

After harvest, drying is a crucial step in preparing your homegrown hops for storage. A hop oast is essentially a screen that hops are placed on to allow speedy drying. In this article, we’ll show you how to easily build your own hop oast.

Construction

Parts Needed: (around $30)

  • 7 pieces 2x4x8′ kiln-dried fir
  • 48″ x 7′ aluminum screen material roll
  • 3″ wood screws (56)
  • Staple gun
  • Box knife
  • Cordless drill

Begin by cutting each board into 4 – 23″ pieces (keep the scraps). I just had the guy at Lowes do this for me. Take each of the pieces and begin screwing them together using two screws to each joint. Align each joint so that they are flush on top and bottom, and that the end of one board is flush with the side of the next at a 90° angle.  Don’t go overboard to insure a perfect angle as it will self align when you make the last connection. Once you have all four corners drilled together, set the tray aside. Repeat this until all seven trays are built.

How to Build a Hop Oast

After you have all seven trays built, set one aside. Place the others together two wide, and three tall on a flat surface. I did this on my driveway. Once they are flush and straight, roll the screen out over the top of them. The 48″ width should be a perfect fit across two trays, and the 7′ should easily cover the three trays up. Once you have the screen spread over, use the staple gun to attach it to the corners, then work your way around all of the trays along every side rail and every corner until each tray is fully attached to the screen.

How to Build a Hop Oast

Now take your box knife and insert the blade between two trays through the screen and cut along the separation until all the trays are cut apart. You will have a little hangover from the edges, feel free to clean them up with your box knife, I just left mine for now (more important to get the hops dry when you build this after the bines have been cut down). It would be good to glue along the inside edge and allow it to dry to seal the trays from allowing hops to get stuck between the screen and box frame, and it will make cleaning easier after you are done with them.

After they are separated, take the small scrap pieces and use them to raise a box fan off of the ground a few inches. This will give you air flow to go up and through your hops. You will want to pick a place where there will be some heat, air flow for the humidity to escape, and that is not in direct sunlight. I used my garage and put a space heater next to it to blow under the fan since we had a cold front hit when I got the hops picked. I didn’t let it run unattended. I only did this on the weekend while I was home as I did not trust the space heater to run while I wasn’t home or while asleep.

Place the screenless tray on top of the box fan as a diamond for use as a base. If your box fan is large enough, you can stack it on top at the same angle as the box fan edges, but for mine, it worked perfect to turn it slightly so that it became a diamond to the square fan, creating an eight pointed star if outlined. This empty tray with no screen allows a little extra flow for the fan so it isn’t blowing directly against the screen and hop bed which may cause it to overheat.

Function

How to Build a Hop Oast
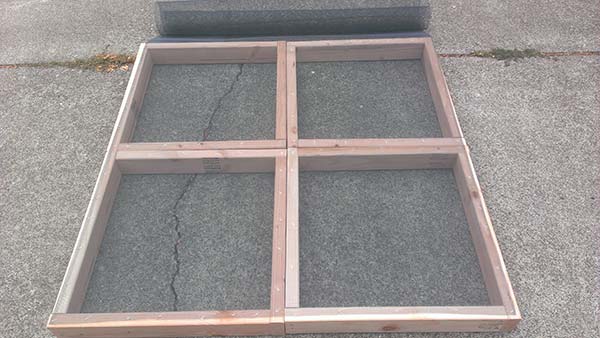
At this point, you should pick your hops into sacks and weigh them. It is always more fun to have a helper. Place a single variety into a single (screened) tray. Once your tray is full (about 1/3 up the side), set it on top of the base tray over the fan so that the tray edges align perfectly over each other. Continue to pick your hops, fill your trays and stack them up. Leave one of the trays empty to the side. I used a piece of masking tape to mark each tray to know which variety was in which tray. Next year, I may just add a plastic sleeve to the side and make up cards with the names of the varieties I grow to sort them that way (it will look much nicer).

Once your trays are filled with hops, place the last empty tray on top. This tray’s screen will keep things from falling into your hops, and keep the stray hop leaves in place to make clean up a little easier. At this point, turn on your fan to medium. Low will take longer, and high would be faster, but you don’t want to have it so high that you end up blowing any of the lupulin out of the hops.

Leave the hops to dry for a few days, gently fluffing them up every 12 hours or so to ensure even drying. I also swapped trays out so that the bottom trays became middle trays, top became bottom and middle became top. I continued this rotation whenever I fluffed them. They say that the hops should be about 20 percent the weight they were when you picked them. If you got one pound of hops, you should have around 3-3.5oz of dried hops. Another telling sign is that when you take a hop cone and bend it in half the strig in the middle should snap clean. If if bends and moves back then they are still too moist.


Justin Bruce has been brewing to his own tune for more than four years after receiving his first basic equipment kit for his birthday from his wife. Beginning in late 2010 with an extract kit, he moved quickly into designing his own recipes which have won multiple awards including a “Best of Show.” In 2014 he won “Brewer of the Year” for the Cascade Brewers Society Homebrew Club. A father of two boys, Justin likes to have his boys help out with brewing when ever possible.  He is even making family engagement a large part of the vision for the production brewery he is planning to open in his home town of Eugene, Ore.

The post How to Build a Hop Oast appeared first on American Homebrewers Association.

Posted on

How to Make a Stir Plate

While there are multiple ways to grow yeast in a starter, one of the most effective is to use a stir plate. Stir plates utilize magnetic attraction to create a vortex inside a container of wort, keeping the yeast in suspension and providing oxygen—which are both crucial to healthy yeast cell growth and replication. Similar results can be achieved by intermittently shaking a starter, but a stir plate is proven to result in greater yeast growth.

There are many different stir plates available from homebrew shops, but they can also be made fairly affordably. Many of the parts can likely be sourced around the house, and the rest easily purchased. As with most DIY projects, you can be as fancy or frugal as you please.

Project Materials

  • Box: A box is needed to house the electrical components and hold the starter vessel. Almost anything with a flat surface will do. Old gaming systems, internet routers, cigar boxes—even Tupperware will work. Make sure whatever you select can hold the weight of your anticipated starter volume.
  • Fan: Most DIY stir plates use fans from retired computers, but these fans can also be purchased from an electronics store for relatively cheap. A magnet is attached to the fan, which will rotate the magnetic stir bar inside the starter to create a vortex.
  • Rare earth magnets: These sound more intimidating than they really are. Rare earth magnets can be harvested from an old computer hard drive, or you can find them at an electronics store. This magnet will be attached to the fan.
  • Rheostat: A rheostat is used to control the speed of the fan, and ultimately the speed of the vortex in the starter. You may be able to salvage one from an old household electronic, or you can get a new from an electronics or hardware store.
  • DC power source: DC power sources are the most common energy sources in electronics, so if you have an old charger for a cellphone, video camera, computer or something similar you should be all set. If not, a DC power source can be purchased from the electronics or hardware store.
    On/off switch: A switch can be harvested from just about any electronic with an on/off switch. Some rheostats have built in on/off switches.
  • Magnetic stir bar: This is the one required piece that you probably do not have on hand at home. Most homebrew shops will have them available in various sizes. The rare earth magnet attached to the computer fan will rapidly rotate the stir bar, creating the vortex in the wort.
  • Jumper wires: You might need a few extra wires depending on how complex you are planning to make your stir plate. These wires can be purchased or harvested from old electronics.
  • Starter vessel: While this is not actually a part of the stir plate, when making a starter you will need a vessel to contain the starter wort. The ideal vessel is an Erlenmeyer flask, but a growler or mason jar would also work. They key to choosing a starter vessel when using a stir plate is finding something with a flat bottom that will not hinder the movement of the magnetic stir bar.

Construction

Home Made Stir Plate 1
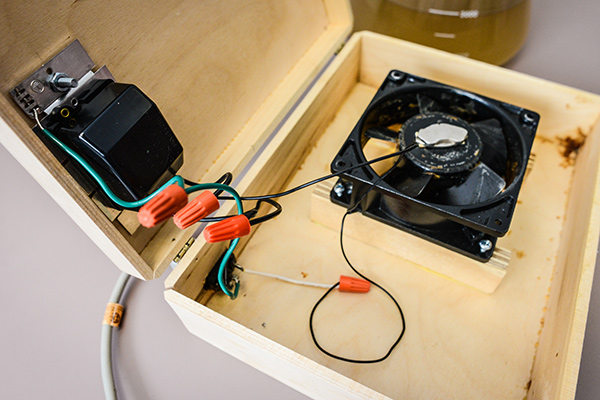
Start by centering the fan inside the box you selected. Secure the fan to the base using screws or super glue, taking care not to hinder the movement of the fan.

Once the fan is fixed to the base, take one or two of the rare earth magnets and center them in the middle of the fan. They should magnetically fix to the center, but if they don’t, they can be secured with super glue.

Home Made Stir Plate 2Drill small holes through the box to secure the on/off switch. Do the same if using a rheostat.

Now it’s time to wire the stir plate and bring it to life. While this can be done at home, there is always a danger involved when working with electricity. It is best to consult an electrician.

The fan should have two wires, one red and one black. The red wire is typically the positive and the black wire the negative. These two wires can be connected directly to the DC power source, but the speed produced will likely be more than what is necessary for a yeast starter.

To control the speed of the vortex, connect the negative black wire to the DC power supply, then connect the other wire from the power supply to the on/off switch.

Connect the positive (red) wire to the rheostat, then complete the circuit using an additional jumper wire connecting the switch and the rheostat.

Plug in the power supply and test your connections. If the fan does not power on, double check to make sure the positive and negative wires are in the right place.

Home Made Stir Plate 3Once the stir plate is functioning with the ability to control the speed of the fan, seal/close the box containing the electrical components. As a test, fill the flat-bottomed starter vessel to a typical volume you will be working with and gently add the magnetic stir bar.

The magnetic connection between the rare earth magnet mounted on the fan and the stir bar inside the starter vessel will cause the stir bar to rotate as fast as the fan spins, creating a vortex inside the vessel. This vortex will keep the yeast in suspension and provide oxygen as you propagate the starter.

There you have it—one homemade stir plate!


Brendan Witt was an intern for the American Homebrewers Association.

The post How to Make a Stir Plate appeared first on American Homebrewers Association.

Posted on

The Impact of Storage Temperature on Beer

This homebrew experiment was originally published on Brulosophy.com.

It’s well known that temperature is positively correlated with reaction rates– as the warmth of a particular environment goes up, so too does the rapidity with which certain reactions occur. In the case of beer, these reactions are commonly associated with negative characteristics such as oxidation and staling, perhaps one reason refrigerated shelf-space is so zealously sought after by beer distributors and brewers, though likely secondary to consumer preference for “beer I can drink right now.”

Less of an issue for homebrewers due to our smaller batch volumes and usually, ahem, quicker consumption, storage temperature remains a concern for those who bottle condition and don’t have the capacity to store 50 bottles in a cool environment. Prior to making the switch to kegging my beer, this was certainly something I considered, as my garage fridge was often filled entirely with bottles, only to leave more sitting warm in a spare closet. With the birth of my son, that spare closet ceased being “spare” and my bottle storage space was dramatically reduced.

My switch to kegging wasn’t prompted so much by a desire for cold storage, but for the ease and convenience of the process when compared to bottling. However, I felt the quality of my beer improved, specifically that it was fresher, crisper, clearer, and more aromatic (especially IPAs) than when I bottle conditioned. I attributed these improvements as being due to the beer remaining at a consistently cool temperature post-fermenation, never rising above the setpoint of my cold keezer.

Could storage temperature really make that big of a difference, or did my love for kegging bias me in favor of the beer such that I invented a difference that was really all in my head?

Purpose

To evaluate the differences between a beer stored in a cool environment and the same beer stored in a warm environment over the same period of time.

Methods

This was not actually the intended xBmt on this brew day, but due to a miscalculation on my part, I had to rethink things last minute and was forced to test a post-boil variable.

Bohemian Pilsner Homebrew Recipe

Recipe Details

BATCH SIZE BOIL TIME IBU SRM EST. OG EST. FG ABV
5.5 gal 60 min 37.2 IBUs 3.8 SRM 1.052 1.012 5.2 %
Actuals 1.052 1.013 5.1 %

Fermentables

NAME AMOUNT %
Pilsner (2 Row) Bel 10.25 lbs 95.35
Vienna Malt (Gambrinus) 8 oz 4.65

Hops

NAME AMOUNT TIME USE FORM ALPHA %
Hallertau Magnum 11 g 60 min Boil Pellet 12.1
Saaz 30 g 30 min Boil Pellet 3
Saaz 37 g 20 min Boil Pellet 3
Saaz 37 g 10 min Boil Pellet 3

Yeast

NAME LAB ATTENUATION TEMPERATURE
Saflager Lager (W-34/70) DCL/Fermentis 75% 48°F – 59°F

Notes

Water Profile: Ca 55 | Mg 0 | Na 8 | SO4 45 | Cl 68

Starting a day ahead, I collected the full volume of water for this 20 gallon batch, catching it just in time!

I weighed out and milled the grains while my strike water was heating.

After transferring the slightly overheated strike water to my MLT and allowing for a brief preheat, I stirred in the grains to hit my target mash temperature.

I let the mash rest for 60 minutes, stirring occasionally to ensure good conversion.

At the end of the mash, I collected the proper volume of sweet wort and brought it to a rolling boil.

Hops were added during the 60 minute boil, after which I quickly chilled it to a few degrees above my groundwater temperature.

A hydrometer reading at this point confirmed I’d hit the OG predicted by BeerSmith.

1.052 OG

I transferred equal amounts of the chilled wort to two 6 gallon PET carboys that I placed in my fermentation chamber to finish chilling to my desired fermentation temperature of 60˚F/16˚C.

Once there, I pitched 2 rehydrated packs of Saflager W-34/70 into each each fermentor.

It took about 24 hours for both beers before I noticed fermentation activity.

The beers fermented similarly over the following week, at which point I raised the temperature in the chamber a bit to encourage complete attenuation. With signs of fermentation absent around the 2 week mark, I took hydrometer readings and observed both had attenuated identically.

1.013 FG

I proceeded with cold crashing, fining each with gelatin, then transferring to kegs. After purging the headspace in both kegs and leaving just enough CO2 to seat the lids, I stored one keg in a 35˚F/2˚C refrigerator while the other was placed in a closet in my house that maintains a temperature range between 68-73˚F/20-23˚C. The beers were left alone for a month before I moved them to my keezer, allowing them to thermally equalize for 2 days before burst carbonating. Even after another month of lagering in my keezer, the beers maintained a fairly dramatic difference in appearance.

Left: warm storage / Right: cool storage

Results

In total, 20 people of varying experience levels participated in this exBEERiment. Each taster was blindly served 1 sample of the beer stored warm and 2 samples of the beer stored cold in different colored opaque cups then asked to select the unique beer. At this sample size, at least 11 accurate selections were required to achieve statistical significance, though 12 accurate selections were made (p<0.05; p=0.013). These results indicate tasters in this xBmt were indeed able to reliably distinguish a Pilsner stored in a warm environment from the same Pilsner stored in a cold environment.

A brief comparative evaluation of only the two different beers was completed by the 12 participants who made the accurate selection on the triangle test, all remaining blind to the nature of the xBmt. The warm storage beer was preferred by 5 tasters, the beer stored cold was preferred by 2 tasters, 4 people had no preference despite noticing a difference, and 1 person reported there was no difference between the beers.

My Impressions: Whether skewed by bias or not, I really can’t say, but these beers hit right on what I expected them to taste like. The cold storage beer seemed to lose some life as it aged, but it remained quite clean, crisp, and enjoyable. On the other hand, I perceived the beer stored warm as having the characteristic sweet/cloying character I frequently associate with old or oxidized beer. While not entirely unpleasant, it lost many of the characteristics I expect in a typical Pilsner, bur rather possesses an impression of sweetness more reminiscent of a less phenolic Belgian Pale. Unlike prior xBmts, these beers genuinely echoed my expectation near perfectly, validating my belief that storage temperature matters.

Discussion

The fact tasters in this xBmt were able to reliably distinguish a beer stored warm from the same beer stored in a cold environment provides additional support to the accepted notion that storage conditions do indeed have an impact on beer, which has many implications. As mentioned previously, craft brewers want to get their beer into the mouths of drinkers in the best form possible, though their ability to do so is hindered by the limited amount of refrigerated shelf space in stores carrying their product. Moreover, homebrewers who bottle condition and don’t have the ability to store all of their beer in a cold environment will, in all likelihood, experience flavor drift over the life of each batch. The solution? If there’s a good one, I’d love to hear it.

I thought it was curious that only 2 of the 12 correct participants preferred the cold storage sample, which was my clearly preferred, while 5 liked the beer stored warm better. My hunch is this was more a function of the fact tasters weren’t aware of the style of beer they were drinking and hence chose the one with more overall character, or maybe some people actually do enjoy whatever it is aging in a warm environment does to beer.

I personally believe beer, in general, is a product best served fresh and, save for a few rare exceptions, decreases in quality with age. This even goes for styles many believe require aging such as strong Belgians and clean lagers. Ultimately, as someone who keeps all the beer I make in a cold keezer, it’s good to know it will likely live a little longer than if it were sitting a warm closet.

The post The Impact of Storage Temperature on Beer appeared first on American Homebrewers Association.

Posted on

How to Harvest, Prepare and Store Homegrown Hops

This post is a follow-up to How to Grow Hops at Home.

When to Pick Your Hops

The time has come. You’ve planned, pruned, monitored, cared for and put in the hours for you homegrown hops all summer. You’re starting to see those cones grow up the vine and you just can’t contain your excitement! Curb it just a little longer. A common mistake is picking the cones too early. You want to pick over-ripe hops rather than under-ripe hops, otherwise you’ll deprive them of those awesome alpha acids.

Depending on location, harvest occurs between mid-August and September. If these are first-year hops, expect a small harvest—most of the energy throughout the growing period is used to develop the root systems, making it difficult for cones to reach their peak yield. Expect a fuller harvest in the second year, and a big leap in hop yield the third year.

Hop Harvesting

How to Check Hop Cone Ripeness

  1. Give the cone a light squeeze. If the cone stays compressed, it’s not ripe enough. When they feel light and dry—and spring back after a squeeze—they’re ready to be harvested.
  2. Pick a cone, roll it in your hands and smell it. If it has a pungent smell between cut grass and onion, it’s time to harvest.
  3. Roll the hop next to your ear. If it makes a cricket sound, this also means they’re ready to harvest. If the lupulin turns orange and smells rancid, you’ve overshot your window.
  4. The hop should be springy, dry and papery on the tips, and sticky to the touch.
  5. Look for lupulin, the visible, thick yellow substance on the outside of the cone.

Hop HarvestingHarvesting Your Hops

There are two methods for picking your hops: pick by hand (recommended for first-year harvests) or cut down the bine (recommended for all harvests after the first year).

If you cut the bine down, cut two to three feet above the ground to prevent injury to the root system and crown. For first year bines, try to pick the cones and not cut down the bine until it dies off. Vital nutrients will flow back to the root system for the winter months and ensure it survives. For following years, cut the bine down and be careful not to damage or dirty those precious lupulin glands. You should expect one to two pounds of dry hops per mature plant.

Be sure to wear durable, abrasive resistant clothing, gloves and goggles during harvest. Hops have hooked hairs that can cause cause skin rash and small cuts.

Now, invite some friends over to help you pick the hops while enjoying some homebrew!

How to Dry Hops at Home

You’ve picked your hops, but you’re still not done. After you pick hops, you have two options: throw them directly into a brew and make a wet-hopped beer or dry them to use later.

Fresh hops are about 80 percent water, so you’ll need to use more than you would with dry hops. In general, wet hops are used four to six times the dry hop rate. For example four to six ounces of wet hops would be the equivalent of one ounce of pelleted dry hops.

If you choose to dry your hops to use later, you can also more easily predict alpha acid contribution, as dried hops are about 10 percent water, the equivalent of commercial hops.

Important factors for drying hops: time, light, heat and moisture.

To prevent oxidation and isomerization, drying shouldn’t last more than three days and heating temperatures shouldn’t exceed 140°F (60°C). Drying your hops is going to drive off some wanted aromatics, but temperatures above the 140°F threshold will drive off many more complexities.

There are a few different methods used for drying hops. The key is to dry them quickly without heating them up too much. Cooler temperatures will take longer, but will produce better quality hops.

Hop Harvesting

Hop Drying Methods:

Food dehydrator: Using a food dehydrator is the easiest way to dry out your hops as it ensures air movement but does not get excessively hot.

Well-ventilated oven: You can use your oven to dry your hops by spreading them out on a pan. You will need to make sure that you get adequate air flow through the oven, watching closely by checking on them at least every 20 minutes. The temperature should never exceed 140°F (60°C).

Hop drying screen: If you have a small amount of hops to dry, the easiest way to do so is spread them out over a window screen or a house air filter. Place them in a warm, dry location. You can use landscape fabric over the top to keep them in the dark and occasionally fluff the hops so moist inner cones are brought to the outside of the pile. Leave them for a few days with a fan under or next to them to maintain air flow. You will also want to elevate the screen to improve air flow.

The hops need a moisture content of eight to 10 percent by weight to prevent molding. To see if they’re dry enough, try breaking the central stem of the cone, it should be brittle enough to snap in half. When dry, the yellow powdery lupulin should easily fall from the cone and the leaves should have a papery and springy texture. If your hops aren’t properly dried before storage, they could become moldy, wilted or rancid.

Hop HarvestingPackage Your Hops

You’ll probably want to save some hops for later brew days, so making sure they are preserved for maximum brewing potential is important. First, you want to weigh them out and separate them into one to two ounce bags so you will only have to defrost the amount you need when it’s time to brew again.

Once you’ve divided up your hops into plastic freezer bags, food saver bags, or air tight jars, push as much air out of the containers as possible. A vacuum seal is ideal for this process, but not necessary. You’ll flatten out and crush your pretty little hop cones, but it’s for their own good! You don’t want any oxygen contaminating and ruining all your hard work. Label them with the type of hop and toss them into the freezer for safe keeping.


John Moorhead is Director of the National Homebrew Competition and AHA Special Projects Coordinator.

The post How to Harvest, Prepare and Store Homegrown Hops appeared first on American Homebrewers Association.

Posted on

AHA Releases New Sizzlin Summer Styles

Need some stylin’ new threads to step up your summer style? Check out the new American Homebrewers Assocaition merch over on our store!

In addition to the new stuff, you’ll also find our perennially popular items, including AHA pins, wall tackers, posters, growlers, and more.

Visit the AHA Merch Store.

Beer Pocket Tee

Beer me that pocket tee! Shirts with contrasting pockets are so hot right now… and you’ll look so cool sporting this one. View in store

Beer Pocket Tee (unisex)

Be Hoppy Tee

No need to worry when you can be hoppy! Ladies in the place, this shirt is callin’ out to ya. View in store

Be Hoppy Tee (women’s)

Brew Guru Hat

Keep your dome cool and look cool while sporting the snap-back Brew Guru hat. View in store

Brew Guru Hat (one-size fits all)

SRM Tee

Demonstrate your beery knowledge is on the next level. This tee is a great conversation starter: “Do you even SRM, bro?” View in store

SRM Tee (unisex)


The post AHA Releases New Sizzlin Summer Styles appeared first on American Homebrewers Association.

Posted on

Meeting Topic: New Hop Varieties

Developing a commercial hop variety takes at least 11 years. Each year, hop farmers plant about 40,000 new seedlings for trials. Of those 40,000 seedlings, only about 20 of them will eventually make it to commercial release (0.0005%). New hop varieties will be selected based on quality brewing attributes. These include characteristics like high alpha acid content and unique aroma and flavor profiles.

For your July 2017 club meeting, educate your club members on new hop varieties using the resources below.


Zymurgy Volume 37 No. 1 – January/February 2014

The Next Big Thing – p. 54


National Homebrewers Conference 2015

Brewing With Experimental Hops: A New Hop Variety Just For Homebrewers | Slides (PDF) | Audio


HomebrewersAssociation.org

10 Facts From YCH Hops’ Hop & Brew School


Tuesday Beer Trivia

The Evolution of Hops

beer trivia

The post Meeting Topic: New Hop Varieties appeared first on American Homebrewers Association.

Posted on

How to Add Homebrew Club Affiliation to Your AHA Member Profile

With the rollout of the new club insurance premium reimbursement plan, it is important that all AHA members who are in good financial standing with their local homebrew clubs update their account on HomebrewersAssociation.org. This will allow us to accurately track the number of members in your club and your club’s eligibility to have the AHA pay for your liquor liability insurance.

Updating your club affiliation is easy. Just follow these simple steps:

  1. Click “MY ACCOUNT” on the AHA homepage. Note: If you are not already signed in, you will need to click “Member Login” and enter your credentials.update club affiliation
  2. Click “Yes” when asked if you belong to a homebrew club.update club affiliation
  3. Type the name of your club in the search box. Clubs registered with the AHA will populate in a drop-down box based on your search terms. Be sure to choose the correct club. You can select up to five (5) different clubs if you are a dues-paying member in all five. update club affiliation
  4. Click “Save.”
    update club affiliation

That’s it! If you have any questions about updating your profile, or if you need to have your username and/or password reset, please contact us at info@brewersassociation.org or call us at 303-447-0816 ext. 0.

The post How to Add Homebrew Club Affiliation to Your AHA Member Profile appeared first on American Homebrewers Association.

Posted on

Heart of the Valley Homebrewers Named 2017 Radegast Club of the Year

This article was written by Heart of the Valley (HOTV) homebrew club member Barry Cooper as part of the 2017 Radegast Club of the Year Award application. HOTV was awarded the 2017 Radegast Club of the Year Award.

Find out how your homebrew club can be the next Radegast Club of the Year.

* * *

Heart of the Valley Homebrewers (HOTV) serves homebrewers from Oregon’s central Willamette Valley, drawing its members from Corvallis, nearby Albany, and the surrounding areas. The club’s main focuses are on beer and brewing education; hosting one of Oregon’s oldest homebrew competitions; providing community service; and charitable giving. The last of these is driven by the club’s fall beer festival, Septembeerfest.

Our membership varies because we are based in a college town, but HOTV has about 30 to 35 active members at any one time. While there is little ethnic diversity in the Willamette Valley of Oregon, the club strives for inclusivity through gender diversity and occupational diversity—all interested members of our community are welcome to join the club.

Women take an active part in running the club, and in recent years, women have served as president, competition chair, and secretary. Corvallis, which is home to Oregon State University (OSU) and its strong Fermentation Sciences program, contributes members, resources, and inspiration to the club. Our membership reflects the community: students (including some studying fermentation sciences), staff and faculty; homebrew storeowners; commercial brewers; professional workers and tradesmen; all contribute ideas and to the club’s success.

HOTV has a long and glorious history. It was founded as Corvallis Homebrewers in 1982, with the inaugural meeting held on June 6 of that year. As homebrewers from surrounding communities became interested in participating, the name was later changed to the more inclusive Heart of the Valley Homebrewers. The club has a history of recruiting members for the AHA. For example, one of our members, (the late Lee Smith) was profiled in Zymurgy (March/April 1999), where he was recognized as the AHA Recruiter of the Year.

HOTV meets monthly, usually at the home of a member, where members sample one another’s beers, as well as those of local brewpubs and unusual commercial brews. We occasionally arrange comparative tastings of commercial examples of different beer styles, with members voting according to their preferences. This is a great way to experience brews that one hasn’t tried before and to find new favorites and new brewing challenges. Occasionally, meetings are held at our local brewing supply shop, Corvallis Brewing Supply, or at local craft breweries.

“Women take an active part in running the club, and in recent years, women have served as president, competition chair, and secretary.”

HOTV is formally organized and governed by its bylaws. A board of directors meets regularly to discuss club business, and we publish minutes of both club meetings and board meetings.

The club produces a newsletter that is distributed to members electronically. We also maintain a website at hotv.org. The club is also on Facebook, which has become one of our primary means of communication. We maintain a special page for our Septembeerfest event. The newsletter keeps members informed of club educational matters, club activities, deliberations, and decisions of the board of directors.

HOTV is strongly committed to the education of our members and to the general public in the art of brewing in general and homebrewing in particular. To that end, we promote the following activities.

Brewery Education Tour

This is a day tour of Oregon breweries and brewpubs held in the spring and the fall. In the spirit of responsible drinking, the club hires a bus and driver to avoid the temptation to drink and drive. The educational purpose of the event is to provide insight into how breweries, especially small breweries, operate and to give members behind-the-scenes access not usually available to the public.

For example, in November 2015, the club’s Fall Brewery Educational tour traveled east to Bend, home to more than 30 breweries. The highlight of the trip was visiting a small brewery, the Ale Apothecary, which focuses on barrel-aged sour beers; this brewery is known for lautering out of a tree trunk, over a bed of pine brush. This incredibly rewarding brewery visit really expanded members’ views of what is possible with brewing. In late October 2016, we visited Hood River, Oregon, and enjoyed a personalized tour of Logsdon Farmhouse Ales.

Brew Judge Certification Program (BJCP)

HOTV

The club provides beer judge training, with the aim of taking judging exams. These activities are held according to need, whenever there are sufficient numbers of prospective participants. They are important in exposing prospective judges to many different beer styles, with an appreciation of their desired characteristics. HOTV currently has 16 members who are BJCP certified. That amounts to almost 50 percent of our membership. This year, we are proud to say that two more of our members passed both the online and tasting exams.

Cooperative Brewing with the Oregon State University Fermentation Science

Program: These are highly educational sessions in which members participate in brewing on the equipment and facilities at OSU. The purpose of this event is to teach members the fundamental biochemical and biological principles underlying mashing, fermentation, and other aspects of brewing. We learn a lot and have a heck of a fun time doing it!

Sensory Training: As part of our educational mission, the club periodically organizes sensory tastings to help participants recognize off flavors. These sessions, open to the public, are also held at OSU and are taught by faculty members in the Fermentation Sciences program.

Public Outreach Club Brew Days

These events are held periodically in the “brewhouses” of club members or, occasionally, at microbreweries. Their purpose is help homebrewers learn from one another and to educate members and newcomers about different brewing techniques, different equipment setups, etc. Attendees are encouraged to bring friends who are interested in becoming brewers.

Members of the club participate in other educational events such as the AHA Big Brew day. These events are held in locations where members of the public are likely to stop by, ask questions, and, hopefully, join the hobby. We take any opportunity that we can to educate the public. In 2015, out of the many brew clubs in Oregon, HOTV was asked to put on a demonstration of homebrewing at the Oregon State Fair. This year we plan to hold a Big Brew day in downtown Corvallis, in a parking lot next door to our local homebrew store (LHBS), Corvallis Brewing Supply. This should attract a lot of attention.

HOTV Homebrewers

Homebrew Competitions

Competitions add variety for club members and allow the club to give back to the homebrewing community. One of the longest continuously running homebrew competitions in the nation, HOTV is hosting its 35th annual Oregon Homebrew Festival. This competition is held in Corvallis or Albany on the third weekend in May each year. It is an AHA and MCAB (http://mcabchampionship.com) recognized event.

“One of the longest continuously running homebrew competitions in the nation, HOTV is hosting its 35th Oregon Homebrew Festival.”

Homebrewers from all over the country enter the competition, from our own members to the public. BJCP judges from the club and surrounding area evaluate the entries, and we involve both novice judges and newcomers. The Friday before the event, we hold new judge training for all new judges wishing to participate, which is designed to promote beer literacy and education. Prizes and ribbons are awarded to the winners.

This event serves two major educational purposes. First, it allows judges to develop their tasting and evaluation skills, often leading to their participation in the BJCP. The second purpose of the event is to provide brewers with critical evaluations of their beers. Entrants are provided with a written evaluation of their entries using standard BJCP forms, helping to educate them as to ways they can improve their brews.

Other Educational Activities

We support brewing education in additional ways. We regularly donate to the Glen Hay Falconer Foundation, an organization dedicated to brewing education. Although its focus tends to be on education of brewing professionals, we feel that it helps with the well-established tradition of experienced homebrewers becoming professionals.

This year HOTV began a new program of financial support for members to attend the Pacific Northwest Homebrew Conference, an educational program that includes a series of lectures by experts, as well as tastings of commercial beer and homebrew.

One of our members owns Corvallis Brewing Supply, our LHBS. He holds regular classes introducing people to homebrewing, which benefits both his business and the hobby at large.

Finally, as pointed out elsewhere, we provide a booth at Septembeerfest at which we serve beers brewed by our members. Our goal is to convince members of the public attending the festival that homebrewers can make beers rivalling the best commercial brews.

Charitable Giving

HOTV

Charitable giving is a significant aspect of the club’s activities. Despite HOTV’s relatively small club size, it makes a huge impact benefiting local community charities. Because all of our profits are donated to charitable causes, the IRS has granted HOTV tax-exempt status under Section 501(c)(4). Members participate in several activities to educate homebrewers and benefit the local community.

Last year marked a fantastic Septembeerfest with more than 3,200 participants attending. We boasted an awesome beer, cider, and mead selection (72 varieties on more than 50 taps), great music, and food. This is the club’s annual signature event, and in recent years, we have raised $25–30,000 in annual donations for charities that include the Linn-Benton Food Share, the Heart of the Valley Homebrewers’ Endowment at Oregon State University supporting scholarships in Fermentation Science, the Glen Hay Falconer Foundation, and other local charities.

“Since 2006, HOTV has donated more than $140,000 to local charities.”

Held annually, the Heart of Valley Homebrewers’ Septembeerfest will mark its 10th anniversary in September 2017. This fall festival has grown steadily since its inception and become an expected tradition of the Corvallis beer scene as we endeavor to highlight the best and most interesting beers, ciders, and meads produced. This year, we expect even greater attendance, and it serves as the showcase event and kickoff of Corvallis Beer Week.

Septembeerfest is not just about serving commercially produced beverages. True to our educational mission, HOTV hosts a popular tent in which we serve free tastings of members’ brews in order to educate attendees about our passion, to show that homebrewers can produce excellent beer, and to try to get them involved in the hobby.

With the success of Septembeerfest and the Oregon Homebrew Festival, HOTV is able to support a number of worthy local charities and organizations including Linn Benton Food Share, Heart of the Valley Homebrewers Endowment at Oregon State University supporting scholarships in Fermentation Science, and the Glen Hay Falconer Foundation. Since 2006, more than $140,000 has been donated to local charities, the equivalent of almost $1,000 per member in recent years.

Donations to these groups have been as follows:

Linn-Benton Food Share

  • Total donated since 2006: $94,825
  • For more than 30 years, Linn-Benton Food Share has been feeding Linn and Benton counties, because they are committed to the idea that no one goes hungry in the two county area they serve.

Heart of the Valley Homebrewers Endowment at Oregon State University

  • Total donated since 2006: $34,250
  • The Lee Smith Scholarship has been established to honor the late Lee Smith, a past club treasurer and an activist for the homebrewing hobby. As mentioned previously, Lee was recognized for his efforts in Zymurgy in 1999.

Glen Hay Falconer Foundation (http://www.glenfalconerfoundation.org)

  • Total donated since 2006: $7,250
  • The Glen Hay Falconer Foundation is a nonprofit organization created to commemorate and celebrate the life, interests, and good works of a well-loved and leading Northwest brewer. The mission of the Foundation is to contribute to the Northwest craft brewing community by providing opportunities for professional and aspiring brewers to further their knowledge and expertise.

Other donations:

  • We have contributed $3,750 to Kiwanis & $675 to other smaller charities.

Distribution of donations graph:

heart-of-the-valley

Adopt-A-Highway program

Not all volunteer activities of HOTV are geared towards monetary donations. The club also donates its time to keeping the area’s highways litter-free. The club has adopted a two-mile section of Oregon Highway 20 between Corvallis and Albany, the two communities from which most of our members come. Club members organize and perform litter pickups four times a year on this section of road. Although not strictly speaking a charitable activity, this is a significant public service aimed at helping to keep this beautiful part of the country—well—beautiful. At last count over 2,370 bags of trash have been picked up since 1995.

HOTV is a brewclub that celebrates the wonder of beer and the challenge of making the best beer possible. More than that, we are involved in numerous activities designed to attract people to the hobby and we are committed to being good neighbors, supporting our community, our local brewers and, especially, our local educational programs. We believe that this club is more than a brew club; despite its small size, how awesome is it that it can accomplish so much and donate so much to local charities and the local community?

“We believe that this club is more than a brew club; despite its small size, how awesome is it that it can accomplish so much?”

The post Heart of the Valley Homebrewers Named 2017 Radegast Club of the Year appeared first on American Homebrewers Association.