Posted on

Save the Date: 2018 National Homebrew Competition

It’s fall—that means it’s time to start thinking about the 2018 National Homebrew Competition (NHC)!

You can find all the current 2018 information, including important deadlines, on the NHC main page. Please make sure to read the updated Rules & Regulations, which also contain the National Homebrew Competition styles that are reorganized from the 2015 Beer Judge Certification Program Style Guidelines. For more specifics on styles, please reference the BJCP Style Guidelines for beer, mead, or cider. The Online Competition Application opens January 23, 2018 and runs through January 30, 2018. Mark your calendars!

Keep an eye on the NHC main page for more specific dates and other information to be announced before the end of the year.

Update Your Club Info

If you’d like your club to compete for the NHC Homebrew Club Award and the Gambrinus Award, check to see if your club is in our club database and that the information is correct. If not, make sure to register or update your club’s information by midnight, December 31, 2017. Club registration with the AHA is free.

Access Past National Homebrew Competition Recipes

Did you know American Homebrewers Association (AHA) members get access to the gold medal recipes from past National Homebrew Competitions? HomebrewersAssociation.org hosts all gold medal-winning NHC recipes through 2005, and members have access to older competition recipes through their exclusive access to the Zymurgy digital archive. These beer, mead, and cider homebrew recipes are among the best in the world!

The post Save the Date: 2018 National Homebrew Competition appeared first on American Homebrewers Association.

Posted on

Special Holiday Offer: AHA Membership Gift Card + Free Gift

Are you looking for the perfect holiday gift for the discerning beer lover and/or devoted beer geek? Are you searching for a present that will win praise, gratitude and high-fives—this season and for months and years hence?

Look no further, thoughtful person! An AHA Membership Gift Card provides 365 days of beery benefits!

The post Special Holiday Offer: AHA Membership Gift Card + Free Gift appeared first on American Homebrewers Association.

Posted on

Brew & Bites: 5 Thanksgiving Recipes & Beer Pairings

The Thanksgiving table is a complex place filled with diverse flavors that make it the immense feast that it is. It can be overwhelming to come up with a perfect pairing that melds together all the dynamic flavors of a meal, but according to Julia Herz, Craft Beer Program Director at the Brewers Association, a well-done Belgian tripel can handle all the aspects of the big dinner. The carbonation of this Belgian style can lighten the meal, while the higher alcohol level cuts and complements the many flavors that rest on your palate.

You can also select pairings for specific dishes in your Thanksgiving feast. We’ve pulled a few recipes for your Thanksgiving menu that you can try pairing with some of your stashed-away bottles of homebrew, or perhaps they’ll inspire you to brew one for next year’s feast.

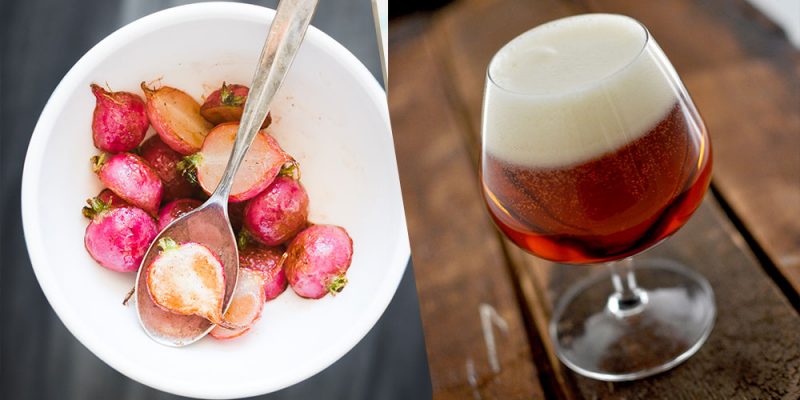
Braised Radishes & Belgian Flanders

thanksigiving beer pairings

When people think about preparing radishes, the conventional thought process is that you’d dice it raw and throw it in a salad, garnish a dish for texture and a spicy zing, or pickle it for an acidic punch. Braising radishes, on the other hand, brings out an earthier and less bitter version of the root vegetable. Try pairing this side dish with a Belgian Flanders red ale. The complexity of flavors in the Flanders, particularly the higher-than-usual acidity and sweetness, helps bring out those underlying bitter and spicy flavors in radishes that brought you to choose them in the first place.

Ingredients:

  • 3 bunches of radishes, quartered
  • radish greens: destemmed, washed and cut
  • 2–3 garlic cloves diced
  • ½ white onion, finely diced
  • chicken or vegetable broth
  • salt
  • pepper
  • apple cider vinegar
  • flat leaf parsley

Directions:

Step 1: Sautee onions and garlic in butter until the onions become translucent. Add a little bit of broth to simmer with the onions and garlic in the bottom of the pan and add the cubed radishes. The radishes should begin to turn slightly translucent as well. Allow radishes to simmer, add a splash of apple cider vinegar and a healthy shake or salt and ground pepper.

Step 3: Throw the washed and de-stemmed greens in at the last minute and stir until lightly wilted. Serve with fresh flat-leaf parsley for garnish.

Chèvre Mashed Potatoes & Blonde Ale

mashed potatoes beer pairing

Everyone likes cheesy mashed potatoes, but adding a creamy chèvre to your taters adds a whole new dimension. The flavor profile of goat cheese is quite different from that of cow cheese, so unripened and unaged aspects of the chèvre really stand out when combined with the less complex potato. The malty sweet and bready aroma of a blonde ale would pair particularly well with the mild, lactic flavor that the goat cheese imparts in these potatoes.

Ingredients:

  • 2 ½ lb. potatoes, quartered (Russets or Yukon golds with or without skin)
  • ½–3/4 cup chicken or veggie stock
  • 4 tablespoons butter, melted
  • 1 oz. chèvre of your choice (I prefer an herbed chèvre, but plain or spiced chèvre will work just fine)
  • 2 tablespoon salt
  • ½ tablespoon pepper

Directions:

Step 1: Boil 1 gallon of water in a large pot with 1.5 tablespoons salt. Boil potatoes for 15–20 minutes until you can cut through them with ease. Drain the potatoes.

Step 2: While the potatoes are boiling, mix butter with chicken stock. Use more chicken stock if you want your potatoes creamy and use less if you’d like them thick.

Step 3: Once the potatoes are well cooked, mash them. I prefer to use an immersion blender to mash my potatoes, but if you don’t have one, a potato masher will work just fine. After the potatoes are initially mashed, begin adding the hot butter and stock to the potatoes and continue mashing. The potatoes should start to emulsify into a creamy texture, at which point you should add the chèvre. Add as much or a little as you see fit (it’s important to keep in mind that the dryness of the goat cheese can make your potatoes less creamy, so don’t overdo it, depending on your desired result: creamy or chunky?). If you can’t find herbed goat cheese at the store, I recommend adding in some ground thyme and rosemary, too. Add the salt and pepper, stir until the potatoes reach the desired texture, and enjoy.

Turkey Dry Rub & American Pale Ale

thanksgicing turkey beer pairing

Some people brine their turkeys, but that takes some foresight, so try a dry rub instead. You still get loads of flavor and you’ll save a little time, too. The balance of malt and hops in an American pale ale is a great choice for a dry-rubbed turkey since the bitterness of the beer is just enough to cut fattiness in the poultry. An APA is also a great choice for cutting heat and enlivening the flavors of the spices in the rub.

Ingredients:

  • 1 tablespoon paprika
  • 1 tablespoon brown sugar
  • 1 tablespoon chili powder
  • ½ tablespoon onion powder
  • ½ tablespoon garlic powder
  • ½ tablespoon ground black pepper
  • ½ tablespoon Aleppo chiles (or other flaked mild chile)
  • 1 dash ground Himalayan sea salt
  • dash cinnamon
  • dash ground ginger
  • dash cayenne
  • 1 lemon

Directions:

Place the spices in a bowl and mix until well blended. Before applying the rub with your hands, mix olive oil and lemon together to coat the outside of the bird and help the rub stick.

Pumpkin Cake with Lavender-Cardamom Buttercream Icing & American IPA

thanksgiving dessert beer pairings

This pumpkin cake with buttercream icing is nothing short of decadent. It’s also a great alternative to your standard pumpkin pie dessert you see at so many Thanksgiving dinners. So many flavors go into this recipe from floral notes in the lavender to spiciness in the nutmeg that selecting one beer to go with it could be a challenge. An American IPA would be an excellent pairing for this slice of heaven because the bitterness in the style balances out the fat in the creamy icing, plus the residual sweetness of the malt tones down the zing of sweet in the cream and sugar.

Frosting Ingredients:

  • 4 cups confectioner’s sugar
  • 1.5 tsp. vanilla extract
  • ½ cup softened coconut oil
  • 3 Tbsp. milk
  • 8 Tbsp. softened butter
  • zest of 1 orange
  • 1 tsp. salt
  • 1 tsp. ground cardamom
  • 1.5 tbsp lavender sugar (If you can’t find this, feel free to just add lavender flowers as garnish)
  • ½ cup lightly toasted pecans

Pumpkin Cake Ingredients:

  • 2 cups all-purpose flour
  • 1 ½ cups brown sugar
  • 15 oz. pumpkin or winter squash puree (acorn, kabocha, butternut, jarrahdale, etc)
  • 1 cup vegetable oil
  • 3 eggs
  • 2 Tbsp. cinnamon
  • 1 Tbsp. lavender sugar
  • ½ Tbsp. nutmeg
  • ½ Tbsp. ginger
  • 2 tsp. baking powder
  • 1 tsp. baking soda

Frosting Directions:

Step 1: With an electric mixer, whip butter and coconut oil until creamy.

Step 2: Slowly add vanilla extract and confectioner’s sugar in 1-cup additions.

Step 3: Carefully add the milk based on how thick you want the frosting to be. Once you’ve reached the desired texture, add lavender sugar, salt, cardamom, and orange zest. Store in the refrigerator to thicken for a few hours and then apply to baked cake.

Pumpkin Cake Directions:

Step 1: Preheat oven to 425°F. Half squash and remove the seeds and stringy fibers. Put about ½ inch of water in Pyrex baking dish and place the squash face down, skin up. Roast the squash until soft enough to slice with a fork. Scoop all roasted squash out and discard the skin. Use an immersion blender or food processor to puree until smooth. I recommend doing this the day before you plan to make the cake.

Step 2: Preheat oven to 350°F. Grease a 9×13 inch baking pan (glass baking dish works, too) with butter.

Step 3: Place all dry ingredients (including spices) in a medium mixing bowl and stir until well blended. Set aside. In another medium-sized bowl, mix eggs, squash puree, vegetable oil, and vanilla extract together and set aside.

Step 4: Slowly add wet ingredients to dry ingredients and whisk together until smooth. Add the batter to greased baking pan and bake for 30–45 minutes depending on your oven. Let cake cool and apply lavender-cardamom buttercream icing. Lightly toast diced pecans in butter. Top the cake with lavender flowers and roasted pecans (optional).

* * *

Hailing from the South, Millie Shamburger has developed an affinity for the beer industry and all the shiny things that come with it. When not exploring beer, Millie is in the kitchen, enjoying the outdoors, & wearing out her dancing shoes. 

The post Brew & Bites: 5 Thanksgiving Recipes & Beer Pairings appeared first on American Homebrewers Association.

Posted on

The Balancing Act: How to Make Hoppy Cider

We’d be fools to think hop madness wouldn’t come full circle into other areas of home beverage making. Hop wine, anyone? Eh, maybe not. But, dry-hopped cider is all the rage, and cidermakers far and wide are trying to find that delicate balance between hoppy aromatics and apple sweetness. Lucky for us, making cider takes close to no time and dry hopping is a bonus for another day.

I chatted with a couple of experts on the topic of dry hopping cider from Colorado Cider Company, Stem Ciders, and Yakima Chief – Hopunion (YCH) to gather their collective insight on making a balanced dry-hopped cider.

Hop Selection

It all starts with picking the perfect hop variety to complement your cider. Ian Capps at Stem Ciders emphasized that very few IBUs will be extracted since cider must (the term for unfermented cider) is typically not boiled. In other words, the hops will primarily contribute flavor and aroma, just as is the case when dry hopping—adding hops during or after fermention—beer.

Capps likes to pair a particular hop characteristic with a fruit: think Citra-hopped cider with some fresh grapefruit puree. At Stem, they focus mainly on fruity and citrusy hops like Cascade and Citra that are less dank, so that the apple flavor of the cider is not masked. That feeling was widespread, with both Colorado Cider Company and YCH saying they also prefer to use hops with a fruity or citrusy profile when dry hopping cider. In fact, YCH says their cidermaker clients tend to stick with Citra® and Mosaic®.

Hops typically come in whole-leaf form or as compressed pellets. Either can be used for dry hopping, though whole-leaf hops are often avoided since they absorb more liquid and have less contact area with the beer, which requires more agitation to get the full potential of the aromatics. YCH recommends their LupulN2® hop pellets, which have less vegetal material than cones and allows for emphasis of the fruity characteristics.

how to make cider

Hop Additions

Dry hopping cider (or beer for that matter) is a bit of a guessing game. Depending on when the hops are added to the fermenter, how much is used, and how long they are soaked will all determine the amounts of aromatics that are imparted in the cider. Colorado Cider Company typically adds hops when the cider is room temperature and has experimented with dry hopping for anywhere from 7 to 21 days. Others have had success with even fewer days. In fact, Capps says to be wary of soaking them for too long, which can add vegetal qualities that aren’t typically desired.

Cider Recips

Use the following recipe as your base cider, and experiment with the hopping techniques described in this article. You can also find a slew of cider and perry recipes on the AHA Homebrew Recipe section.


Ingredients for 5 gallons:

5 gal apple juice (no preservatives!)

Cider/Wine/Beer Yeast (ex. Red Star Montrachet)

Depending on what kind of result you want, the quantity of hops per gallon can vary quite a bit. Stem Ciders scaled down what they typically do to a 5-gallon batch, which came out to approximately 0.25 oz. of hops per gallon. Another thing to consider is that you’re making up for lack of bittering, so Page from Colorado Cider recommends using double what you’d normally use in a dry-hop addition.

In any case, keep track of your dry-hopping method so you can make tweaks to future batches based on the results.

Other Tips and Techniques

It never hurts to give your hops a good sniff to look for signs of oxidation and to be sure that they’re fresh. Cheesy smell? No bueno—toss them! Brad Page at Colorado Cider Co. reminds us that the acidity of cider has a different effect on hops than beer does, so don’t expect that your cider’s hop character will be the same as that of your beers.

Finally, the consensus among cidermakers is generally that there isn’t a place for bittering hops in cidermaking. Dry hopping alone adds some bitterness, and you may even have to back-sweeten so you can still taste the apple flavor. Brad from Colorado Cider says they even use adjuncts to mimic bitterness, like lemongrass in their Grasshop-ah Cider, so that the apples really shine, which is, of course, what cidermaking is all about.

The post The Balancing Act: How to Make Hoppy Cider appeared first on American Homebrewers Association.

Posted on

An Overview of Revenue and Expenses for Homebrew Clubs

By Chris P. Frey,  Ann Arbor Brewers Guild & AHA Governing Committee member

Club funds allow homebrew clubs to support a variety of activities. A club’s priorities depend on whether the club is just starting or long-established. One of the most entrusted positions within a club is that of club treasurer, for which careful tracking of all expenses and revenues is essential.

Because many homebrew clubs are relatively small, the first challenge for many clubs is finding an appropriate financial institution that will set up an account in the club’s name. Many banks will not do this. Credit unions can be more flexible, but if all else fails, a checking account can usually be opened in both the club treasurer’s and president’s names. As members vote for new officers, this typically requires all names on the account (old and new) to visit the depository institution to meet and sign off on the changes. While logistically challenging, the value of a simple checking account for a club can’t be overstated, as it allows a great deal of flexibility and accountability.

Let’s now turn to common revenue and expense sources for homebrew clubs.

Dues

The primary source for many club’s revenue is membership dues, which members usually pay annually. Clubs can also pro-rate dues. In one of the clubs where I am currently the treasurer (Ann Arbor Brewers Guild – AABG), dues are $15 a year. This equals $1.25 a month, so if a new member joins during the year, it is easy to determine what they owe. However, for members who delay renewing (say in March for the year), we continue to ask them for the full year’s dues.

Additionally, over the years, we have developed different classes of membership.

  • Family membership: For $20 a year, a family membership has been offered because many members’ spouses, roommates, and/or significant others didn’t actively participate in the monthly meetings, but wanted to join a club’s annual barbecue or obtain separate local homebrew supply discount cards (a member benefit) so that they could purchase gifts with the club discount for their friends or partners.
  • Discounted long-term membership – We developed this membership level for members who wished to pay for several years in advance. While the discount is small ($40 for 3 years for an individual membership, $50 for a 3-year family membership), it provides members the option to prepay, save a little money, and beef up the clubs treasury. I have learned two important lessons about money: 1. More is better than less, and 2. Now is better than later!
  • Out-of-state membership – The AABG has been around since 1986, and the club’s email distribution list is an important channels for members to stay in touch, so several members who have moved out of state have requested to stay members. For these members, we created this form of discounted membership, which is $15 for three years or $50 for life.
  • Non-paying members – We allow people to request to be on the email distribution list, but until they are a member in good standing, they can only receive the club emails and cannot post to the distribution list.
  • Free membership – We have developed two free memberships.
    • The first is for exceptional service to the club or the homebrewing community: honored guests, competition organizers, whatever is deemed appropriate.
    • The second is for members who have fallen into hard times, such as losing their jobs. Because of the sensitivity of the later class, members just have to attest to the treasurer that this is the case. They can elect to pay back dues when they get back onto their feet again or not. The idea is that after one loses their job, it would be adding insult to injury if they had to prioritize other more basic necessities and lose the camaraderie and friendship of the club.

And here is a tip to encourage members to pay their dues. A day or two before each club meeting, the treasurer sends out a note through the club email distribution list. I simply title mine “The Good List.” Almost every month I receive stragglers’ dues this way.  And we also accept PayPal and simply add the transaction fee to the amount.

Sell AHA Memberships

The American Homebrewers Association’s web banner program allows homebrew clubs to generate revenue for themselves by encouraging their members to join the AHA through a custom hyperlink. For every person who joins through that link, the AHA will mail the club a rebate check on a quarterly basis. To sign up for the web banner program, or to find out more information, visit the Generate Revenue page on Club Connection.

Merchandise Sales

Anyone who has attended local beer festivals, taken part in Homebrew Con, or just walked into a local brewpub has probably spied someone wearing an article of clothing with a homebrew club logo on it. Virtually all homebrewing clubs come up with a name and a logo, and attaching these to a variety of items acts both as a source of pride and a form of marketing for the club. Selling these items to club members should also be a source of revenue.

The most popular logo’ed merchandise item is the club shirt. T-shirts and polos are great ways for members to display their club affiliation. Hats, children’s clothing, and infant-wear are other possibilities.

Additionally, tasting glasses engraved with the club logo (and perhaps 1- and 2-ounce pour lines) are a great way to encourage moderation and show off the club logo. Business cards with the club’s logo, website, and meeting information can also work terrifically in generating leads from current members.

These are some of the most common merchandise items. Clubs typically round up in $5 increments based on the costs. Shirts can be a difficult proposition for a fledgling club, as the discounts usually occur around the two- or three-dozen mark. Getting pre-order commitments is the best way to go so that the club treasury can bear the upfront purchase, but then reap some dividends at subsequent meetings as the shirts are sold off. It is usually a good idea to order some extras as well for future members,

Host a Competition

If the club has the inertia and resources (both in up-front funds and access to certified beer judges), a competition is not only a great fund raiser, but allows for a group activity that is rewarding on multiple levels. It can take a couple of years to generate the number of entries necessary to break even and then earn some funds, but it also allows members to participate in judging, stewarding, and pre-events such as calibrating their expectations.

50/50 Raffles

An easy way to supplement the club’s coffiers is to purchase a roll of raffle tickets and sell these at the meeting. A dollar apiece, six for $5 allows members to participate in a game of chance whereby they can win half the pot, and the club earns the other half. Please make sure that you review your local regulations regarding this activity to ensure compliance with the law.

Silent Auctions

A great way for members to get rid of their unwanted equipment or excess ingredients, a silent auction can also be held in junction with a club event such as a beer-becue or holiday party. A member asks their local homebrew supplier to see if they have any items that they are willing to donate to the cause. Simply place the available items on a table with a signup sheet for each one, and members can add their names and see which bid holds until the end.

Events

Most clubs host a variety of events. These can be annual beer-becues, holiday parties, brewing demonstrations, Big Brew day celebrations, pub crawls, and other events. Food is typically served at such events, and decorations, prizes, and other expenses can be incurred. It is up to each club to determine if these events will be gratis for paid-up members, or if they want to defray some or all of the expenses with an event fee. The obvious benefit of doing so is to offset some or all of the event’s expenses.

Expenses

Once the club has some funds, what are you going to spend them on? The wish list can be expanded ad infinitum, so I will only mention some of the better known expenditures that I have run into in my dealing with some local clubs.

  • All-grain system for club rental
  • Jockey box
  • Pop-up tent
  • Brewing-related book titles for a club library
  • Counter-pressure bottle filler
  • Shirts, hats, and other logo items for sale
  • Club banner for events
  • Business cards promoting the club
  • Club meeting space rental
  • Events
  • Thank-you gifts
  • Plaques and trophies for club competitions
  • Commercial examples of beer styles for calibration and educational purposes
  • Off-flavor sensory sampling supplies
  • Entry fees and postage for club-only competitions
  • Membership to a beer-of-the-month club
  • Flowers and gifts for members in good standing who suffer a loss
  • Name tags for meetings
  • Water bottles for demonstrations
  • Lamination device for ID Cards
  • Card stock
  • Club bar
  • Supporting local and state homebrew competition as a sponsor
  • Breathalyzer
  • Offset members entrance fee to a Homebrew Con
  • Port-a-potty for events
  • Postage for snail mail newsletters, club-only competitions, etc.

If you have any questions or suggestions, please contact the AHA Club Support Subcommittee.

The post An Overview of Revenue and Expenses for Homebrew Clubs appeared first on American Homebrewers Association.

Posted on

Cherry Dubbel

Conduct a mini-mash in a 3-gallon (11.4 L) stock pot using a 5-gallon (18.9 L) nylon mesh paint strainer bag from the hardware/paint store. Crush the grain and put it in the mesh bag. Heat 6 qt. (5.7 L) water to 165°F (74°C) (a ratio of 2 qt./lb. or 4.2 L/kg), and immerse the grain bag. Make sure all the grain is thoroughly wetted quickly and check the temperature.

The mash temperature of the grain and water should now be about 150–155°F (66–68°C). Let mash sit for a half hour. Add heat while stirring to raise the temperature to 155°F (68°C) and let mash sit for another half hour. Place 2 gallons (7.6 L) water in a 5-gallon (18.9 L) boiling pot and heat to 165°F (74°C). Lift bag out of the first pot and let it drain for a minute before transferring to another pot. Swirl the bag in the pot to re-wet the grain and let it sit for 5 minutes. Lift the grain bag, drain, and discard the spent grain.

Add the wort from the first pot and the 3.3 lb. (1.49 kg) of liquid light malt extract to the second pot, and begin your boil. Wait for the hot break to occur, and then add the hops. Boil for 60 minutes. Add the remaining 3.3. lb. (1.49 kg) of liquid amber malt extract and the dark candi syrup during the last 10 minutes of the boil. Stir to prevent scorching. Chill the wort and dilute in the fermenter to 5 gallons (18.9 L). Pitch 2–3 vials or packs or White Labs WLP500 for a good pitching rate, and aerate thoroughly. Add the cherry juice concentrate after the third of fourth day of fermentation after activity has slowed.

The post Cherry Dubbel appeared first on American Homebrewers Association.

Posted on

Brew & Bites: Homemade Beer BBQ Sauce

Ditch the shopping list and head to your local market! There’s no better way to discover ingredients that could lead you down an unexpected path to a far out beer recipe, a delicious dish, or the perfect pairing.

Well, I guess the old saying is right—the early bird really does get the worm! Recently, I stopped by my local farmers market early one morning and stumbled upon an impressive rack of ribs. “Last one of the day,” the man behind the table said with a smile. That was enough motivation to have him wrap it up and stick it in my purse.

I planned on my usual process for preparing ribs—covering the rack in my favorite dry rub, broiling for about 5 minutes, and then cooking for 2 hours at 300°F—but I wanted to try something a little different, too. That’s when I stumbled on this beer BBQ sauce, which calls for a bottle of your favorite malt-forward brew!

Simple Beer BBQ Sauce Recipe

This recipe is by Steve Denny and was originally published on CraftBeer.com. The recipe calls for 12 oz. (355 mL) of bock-style beer, but you can substitute in your favorite malt-forward beer instead. I went with a homebrewed Belgian-style dubbel!

Ingredients:

  • 2 cups (473 mL) ketchup
  • 3 Tbsp. (44 mL) chili powder
  • 12 oz. (355 mL) bock, or other malty beer
  • 1 tsp. (5 mL) smoked paprika
  • 1 Tbsp. (15 mL) regular paprika
  • 1 Tbsp. (15 mL) garlic powder
  • 2 Tbsp. (30 mL) yellow mustard
  • 1/2 tsp. (2–3 mL) cayenne pepper (add more if you want more kick)
  • 2 Tbsp. (30 mL) brown sugar, packed
  • 2 Tbsp. (30 mL) molasses
  • 2 Tbsp. (30 mL) apple cider vinegar

Directions:

Prep time: 5 minutes

  1. Whisk all ingredients in a sauce pan and turn heat to medium, bringing sauce to a slow boil.
  2. Reduce heat and simmer for 20 minutes.
  3. Serve with your favorite BBQ.

Pairing Suggestions

When pairing with ribs and a rich BBQ sauce, malt-forward beer is the name of the game. I decided to go with the same strong and complex Belgian-style dubbel that I used in the BBQ sauce recipe. The intensity of the pork fat will most definitely stand up against the strong characteristics of the dubbel, while the malty sweetness in the BBQ sauce creates a perfect, porky pairing.

Belgian-Style Dubbel Homebrew Recipe

If you’re planning ahead, brew this Belgian-style dubbel (recipe by Sean Paxton, Home Brew Chef) to use in the BBQ sauce recipe and to pair with your rack of ribs.

Specifications:

  • Recipe Source: Dubbel Your Pleasure
  • Original Gravity: 1.072
  • Final Gravity: 1.014
  • ABV: 6%
  • IBU: 25
  • SRM: 22.5
  • Boil Time: 90 minutes
  • Efficiency: 75%

Ingredients for 6 gallons:

  • 5 lb. (2.3 kg) Belgian Pilsner (two-row) malt
  • 2.5 lb. (1.1 kg) Maris Otter pale malt
  • 1.5 lb. (680 g) CaraMunich malt
  • 1.5 lb. (680 g) CaraVienne malt
  • 0.5 lb. (227 g) aromatic malt
  • 0.5 lb. (227 g) Belgian wheat malt
  • 0.25 lb. (113 g) Special B malt
  • 1 oz. (28 g) East Kent Goldings (60 min)
  • 1 oz. (28 g) Hallertauer Hersbrucker (30 min)
  • 1 oz. (28 g) Styrian Goldings (15 min)
  • 2 lb. (907 g) Turbinado sugar (90 min)
  • 1 lb. (454 g) D2 syrup (15 min)
  • Wyeast 3787 Trappist High Gravity Yeast (starter)

Directions:

Step infusion mash starting at 95°F (35°C). Dough in for 15 minutes, raise to 122°F (50°C) for 15 minutes, then to 135°F (57°C) for 15 minutes. Saccharification rest at 148°F (64°C) for 120 minutes. Mash out at 165°F (74°C) for 15 minutes, then sparge with 170°F (77°C) water. Boil for 90 minutes.

Pitch yeast at 64°F (18°C) and let temperature rise to 74°F (23°C) over six days. Transfer to secondary and let sit for 14 days. Keg or bottle condition.

The post Brew & Bites: Homemade Beer BBQ Sauce appeared first on American Homebrewers Association.

Posted on

1.1 Million Americans Homebrew Their Own Beer

[This press release was originally published on BrewersAssociation.org]

According to newly released demographics data from the American Homebrewers Association (AHA)—the leading organization dedicated to advancing and educating people on the hobby of homebrewing—there are currently 1.1 million people in the United States who homebrew their own beer, and 40% of them started the hobby within the last four years.

“Homebrewing, in our opinion, is the greatest hobby there is, and the state of the hobby—underscored by homebrewers’ passion, commitment and creativity—is strong,” said Gary Glass, director, American Homebrewers Association. “The numbers show that we have a lot to look forward to in the years ahead, as the hobby is evolving and expanding, reaching Americans in every region and every corner of the country.”

View Infographic

Additional highlights from the AHA’s recent survey include:

  • By the end of 2017, homebrewers will have produced more than 1.4 million barrels of brew—representing 1% of total U.S. production.
  • Homebrewers are spread across the country, with 31% in the South, 26% in the Midwest, 24% in the Northeast and 19% in the West.
  • The average homebrewer is 42 years old, and 52% are between ages 30-49.
  • Eighty-five percent are married or in a domestic partnership.
  • Sixty-eight percent have a college degree or some form of higher education, and nearly 68% have household incomes of $75,000 or more.

About the survey:

The AHA commissioned 1st Resource, a market research firm, to conduct the online survey from July 21 to September 22, with over 18,000 participants, consisting of both AHA and non-AHA affiliated individuals.

The post 1.1 Million Americans Homebrew Their Own Beer appeared first on American Homebrewers Association.

Posted on

What to Age in Your Beer Cellar

Cellaring is the process of allowing a beer to mature under specific conditions to achieve nuances, particularly in its flavor and aroma, that often can only be achieved with aging. What you’re left with after aging beer successfully is what is called “vintage beer.”

Choosing a Beer Cellar Location

Before jumping into some tips on what makes a beer optimal to age (because not all of them are!), it is important to understand the beer cellar environment that is ideal for aging beer for an extended time.

1. Temperature

Arguably the most important aspect of a beer cellar is the temperature. 55°F (12.8°C) has become a widely accepted temperature for aging most ales. Lagers aren’t usual suspects for cellaring, but a good rule to follow is to aim to keep beer cellar temperatures about 10°F below the temperature at which the beer is fermented.

Generally, ales are fermented around 65°F (18.3°C) and lagers at 50°F (10°C). Being able to maintain a temperature in this range with little fluctuation will allow the beer to mature at an appropriate rate. If it’s too cold, the maturation period slows significantly, and if too warm it can speed things up and cause off-flavors.

2. Darkness

The second thing to keep in mind is light. Keep your cellar dark! UV light interacts with hops in beer to create the dreaded light-struck flavor, otherwise known as “skunked” beer. Keep your beers shielded from light in any way possible, especially if they are packaged in clear or green bottles. A cheap way to prevent light-struck beer is to stick them in a sealed box or paper bag.

Those are the basics, but the trickiest part for cellaring is deciding which beers are suitable for aging because, after all, some just aren’t up for the task.

Tips for Picking a Beers to Cellar

1. The more alcohol, the better

When aging beer, it is crucial that there is a preservative present, which will essentially slow the aging process. A good rule of thumb is to aim for a beer that has at least 8% alcohol by volume (ABV). You may think speeding up the aging process is desirable, but in the case of cellaring beer the best technique is a slow-and-steady approach. A preservative like alcohol makes beer more resilient to potential staling flavors, which are typically caused by oxidation. And keep in mind that the booziness that is often present in fresh beers with high ABVs will typically mellow over time, allowing other flavors to come to the forefront.

All of that being said, there are some exceptions to the “more alcohol, the better” rule. The lactic acid in sour beers and the smokey phenols in smoked beers also act as preservatives, lessening the importance of the level of alcohol.

2. Body by beer cellar

During the aging process, the malt proteins present in beer will drop out. This reaction causes the body of beer to reduce over time, and the result is often a very thin and some cases overly-dry beer after it’s been aged. Wheat-derived proteins tend to fall out exceptionally quick, making wheat-based styles very tricky to age successfully. Because of this, it is important to cellar beers that are very full-bodied when they are fresh. This allows the malt proteins to drop out while still retaining some of the body and overall balance.

If a beer seems to thicken, becoming almost syrupy over time instead of thinning, it most likely means the alcohol character has decreased (as mentioned in #1) to the point where it creates the impression that the body thickened.

Esters-Phenols-Homebrew-slider

3. Mind your esters and phenols

The yeast-derived character of both esters and phenols will evolve and change over time, which may or may not be desirable depending on the base style of the beer.

The fruity esters—reminiscent of pears and other tree fruits—commonly found in Belgian and some British style ales will develop into more dark fruit-like character (think raisin and figs). Banana esters, like those common in German hefeweizens, tend to disappear altogether in a fairly short span of time. Esters from Brett will take much longer period of times to change, but have the potential to achieve interesting flavors like pineapple and grapefruit.

Phenols—the spicy yeast flavors that come across as clove or pepper—will evolve into much different flavors, including vanilla, tobacco and leather. In instances where earthy phenolics are present in the fresh beer, there is the potential to achieve complex flavors that are all but impossible to achieve unless done with aging.

4. More hops isn’t always best

Remember when we said beer needs some sort of preservative to be a good candidate for cellaring? Well, despite hops reputation as being originally used for its antibacterial utility, hop bitterness and flavor/aroma are not well suited for aging. Simply put, the presence of hops fades over time, and this can drastically affect the balance of a beer. After all, if a hoppy beer style like IPA was brewed to a desirable balance of malt and hops, then reducing the presence of hops can throw this harmony out of wack.

In some instances hop character not only diminishes but can result in unfavorable flavors left behind. For example, American hop varieties with high levels of alpha acids can leave behind stale, paper-like flavors. On the other hand, English hop varieties with high beta acids, which are said to have a better chance of retaining bitterness, can impart fruity notes similar to pineapple and cherry as they age.

how-to-grow-hops-slider

5. Sours

Sours can be a tricky beast when aging, and the results may not be what you expect. First off, the tart, lip-puckering character that puts the “sour” in “sour beer” will lessen with time, diminishing that typically-dominant characteristic. This softening of the sourness can be either a good or bad thing depending on the balance of the cellared beer at the time it’s consumed.

It’s important to note that while the sour character mellows and in some instances evolves (as with Brettanomyces) at a very, very slow rate, it is not uncommon for some sour beers to become even more sour in the first few years it’s being aged. It’s also not unusual for sour beers that have been aged for extended periods of time to appear more sour due to other characters, particularly the malt, diminishing.

Brett (short for Brettanomyces), though slow to evolve in the cellar, can undergo very drastic evolution when aged. Brett is a slow-acting yeast but a hungry one, and it will basically eat through all available fermentable sugars slowly but surely. This means extensive aging can often leave Brett beers bone dry, which can throw off the balance. During this process, the esters can evolve as mentioned in #3, but there is also the potential for aggressive phenolics to develop, which can be undesirable.

6. Keep the yeast in the bottle

Beers that are bottle conditioned, unfiltered and/or unpasteurized are generally better-suited for aging. By having yeast in the bottle, the beer is essentially a living entity that can consume residual oxygen and continue to condition slowly. This opens up a wider possibility of aging produced cellar character that a beer without yeast otherwise might not be able to achieve.

Filtered and/or pasteurized beers can still exhibit character evolution from aging but to a much lesser extent.


Sources: This post is based on the 2015 National Homebrewers Conference seminar “Crafting Cellarworthy Homebrew” presented by Patrick Dawson, author of Vintage Beer: A Taster’s Guide to Brews That Improve over Time. Download the audio/visual presentation of “Crafting Cellarworthy Homebrew.”


The post What to Age in Your Beer Cellar appeared first on American Homebrewers Association.