Posted on

Zymurgy Rewind: Incorporating a Homebrew Club

In Zymurgy Spring 1995 (Vol. 18, No. 1) “Club News,” we learned that clubs may apply for not-for-profit status through the Internal Revenue Service. Once clubs are established as not-for-profits, they are considered tax-exempt and are able to make money (tax-free) for club events as well as accept tax-deductible donations. Clubs may also choose to become incorporated not-for-profit entities. Here’s the story of how one club became incorporated.

Our road to incorporation began more than a year ago when the board of directors became increasingly concerned about liability at club events. In addition to providing a forum for local homebrewers, Paumanok United Brewers Inc. (PUB) sponsors pub crawls, bus trips to microbreweries, a summer beer picnic, and our flagship event, the Northeast Craft Brewers’ Festival. Because alcohol is involved in all of these events, the board and I, as president, decided that some form of protection was needed.

Alcohol liability insurance available to all homebrew clubs, though it can be prohibitively expensive. We made extensive inquiries and came up empty-handed. To give an example of the cost, a one-day policy for our Craft Brewers’ Festival cost more than $1,200 and did not even cover alcohol liability, just general liability. Insurance companies are reluctant to write these types of policies, particularly when they learn what a homebrew club does. (Editor’s note: The American Homebrewers Association now partners with a leading insurer to offer affordable club insurance)

On the advice of several attorneys, our next-best course of action was to incorporate and take out a general liability policy for the officers and directors. Generally, a corporation provides a layer of insulation to the officers, directors, and members against being sued individually. Keep in mind that the corporation can be sued, but members, officers, and directors cannot be sued individually, except in extreme cases such as gross negligence, or if a board member or officer acts as an individual and not on behalf of the club. Incorporation is not a substitute for good insurance and judgement, but rather a supplement.

The steps to incorporation differ on a state-by-state basis. However, if your club is interested in pursuing incorporation, a few basic steps are usually similar. First, a club member should contact your state’s Secretary of State or equivalent. This office can advise which forms are needed for that state’s process of incorporation. Second, as there are different types of incorporations, it would be useful to contact an attorney to determine what type of incorporation the club wants to pursue. In PUB’s case we are a domestic, not-for-profit incorporation, Type A, under Section 402 of the New York State Charter.

Because PUB Inc. incorporated as a not-for-profit corporation in the state of New York, we are subject to the provisions in Internal Revenue Service Code Section 501(c)(7). This section deals with membership corporations, which is the closest fit for a homebrew club. Since PUB’s purpose is to promote a better understanding of the joys of homebrewing (an educational role), we decided to incorporate as not-for-profit. Applicable restrictions and regulations vary by state.

Aside from a shield against personal liability for the officers and directors, incorporating as a not-for-profit corporation instead of a regular corporation enables the organization to apply to the IRS and State for letter rulings on not-for-profit status. If approved, the not-for-profit corporation need not file income tax forms if the source of all revenues is from membership dues and/or permitted fund-raising activities, and if total revenues do not exceed $25,000 per year. If total revenues exceed $25,000 per year and/or the source of revenues is not exclusively from membership dues and/or permitted fund-raising activites, then IRS Form 990 must be filed and any applicable taxes must be paid.

If approval is not given, then the corporation must file the appropriate Federal and State Corporate Income Tax Forms and pay all applicable taxes. (Note: after IRS approval, the corporation must apply for State approval). We are awaiting our letter ruling, which could take months. The form to request the ruling is a 25-page document, Package 1024, that asks everything except the officers’ shoe sizes! Our next step is to acquire officers’ and directors’ liability insurance as an additional layer of protection.

On a more mundane level, being a not-for-profit corporation gives the homebrew club more respectability and credibility—many banks offer free checking accounts to such organizations. The downsides to being a corporation are that much more record-keeping is involved, the process itself is time-consuming and expensive ($500 to $1,000 depending on legal fees and state filing requirements), minutes must be taken at member and board meetings, and all requirements and regulations of the not-for-profit law must be strictly followed. In essence, a corporation imposes a certain degree of formality and rigidity on the homebrew club, which can be at odds with the original intent of the organization (it’s no longer possible to simply “relax, don’t worry, and have a homebrew.”)

The detailed regulations that govern not-for-profits are beyond the scope of this article, but simply stated, a not-for-profit corporation may not distribute any of its net earnings to members, directors, officers, trustees or any other individual (except reasonable compensation for services and goods). It is strongly recommended that any club considering incorporation consult with an attorney who can explain the various types of corporations and the myriad restrictions and regulations.

Incorporating may not be for every club, but our club decided that it was a necessary evil. Even with the growing pains, it was the right choice for us.

Marc Arkind is the president of Paumanok United Brewers Inc., Long Island’s largest homebrew club and the president of Alpine Computer Technologies Inc., a Long Island-based computer consulting firm. Marc has been an avid homebrewer for eight years; his interest in homebrewing is an offshoot of his passion for cooking. Marc is also a Certified BJCP judge.

The post Zymurgy Rewind: Incorporating a Homebrew Club appeared first on American Homebrewers Association.

Posted on

Coriandered Mild Brown Ale

A step infusion mash is employed to mash the grains. Add 7 quarts (6.7 L) of 140°F (60°C) water to the crushed grain, stir, stabilize, and hold the temperature at 132°F (53°C) for 30 minutes. Add 3.5 quarts (3.3. L) of boiling water to raise the temperature to 155°F (68°C) and hold for about 30 minutes. Raise temperature to 167°F (75°C), lauter, and sparge with 3.5 gallons (13.5 L) of 170°F (77°C) water. Collect about 5.5 gallons (21 L) of runoff. Add 60-minute hops and bring to a full and vigorous boil.

Once you’ve added all of the hop additions, you’ll want to add 0.75 oz. (21 g) of crushed coriander seed with 1 minute remaining. After a total wort boil of 60 minutes, turn off the heat and place the pot (with cover on) in a running cold-water bath for 30 minutes. Strain and sparge the wort into a sanitized fermenter. Bring the total volume to 5 gallons (19 L) with additional cold water if necessary.

Pitch the yeast when the wort temperature is about 70°F (21°C). Ferment at about 70°F (21°C) for one week or until fermentation shows signs of calm and stopping. Rack from primary to secondary and add the remaining 0.5 oz. (14 g) crushed coriander seed. If you have the capability, “cellar” the beer at about 55°F (12.5°C) for one week.

The post Coriandered Mild Brown Ale appeared first on American Homebrewers Association.

Posted on

Hammonds 1903 XXXX

Mash at 154° F (68° C) with 4 gal. (15.1 L) of brewing liquor for one hour. Sparge at 172° F (78° C) with 2 gal. (7.6 L). Volume of wort pre-boil should be 6 gal. (22.7 L). Boil for an hour, adding hops, sugar, and brewer’s caramel as indicated. Ferment at 68° F (20° C), removing early head and allowing final head to consolidate well before racking off.

The post Hammonds 1903 XXXX appeared first on American Homebrewers Association.

Posted on

Beer Camp: Brewing Beer off the Grid

Situated on a gentle slope in the upper Big Santa Anita Canyon northeast of Los Angeles, Sturtevant Camp is a survivor of a bygone era. During Southern California’s “great hiking era” and gold rush of the late 1800s, many camps and hikers’ hotels were built in the canyon. These remote mountain retreats were accessible only on foot, with provisions delivered by teams of mules. Carrying up heavy casks of beer wasn’t an option, but with a pristine mountain stream flowing alongside the camp, brewing beer on-site became part of the culture.

Almost 125 years later, Sturtevant Camp has returned to its homebrewing tradition with occasional Beer Making & Tasting weekends. The camp’s mule train still brings up food and packs for campers, so guests can pack away ribeye steaks and brownies to pair with beers at the top.

Four Miles and a World Away

I started Sturtevant’s Beer Making & Tasting weekend with high hopes of enjoying every moment of the hike and breathing in nature. But, as I ascended the mountain, my attitude descended into a “WTF did I get myself into?” sort of disposition. I didn’t have hiking boots, just old sneakers. My backpack was far too heavy, and my legs stopped working at one point.

But, the downhill was great! At the start of the trail, you get to steeply descend a good quarter mile into the valley, and it gets cooler and cooler the lower you go. The brown manifestations of Los Angeles County’s drought disappear, and flowers and greenery emerge from underground springs nestled in the mountains.

Alas, what goes down must come up. And up, and up, and up. My breath labored, and my legs started to burn. It felt like one big loop, with lots of twists and turns that could very well lead you in a circle if you didn’t know where you were going. I am a city girl who relies on a GPS, which doesn’t work in the mountains (bring a map if you go).

Sturtevant Camp ESB

Batch Size: 5.25 US gal. (19.9 L)

Original Gravity: 1.055

Final Gravity: 1.015

Bitterness: 50 IBU

Color: 10 SRM

Alcohol: 5.2% by volume

MALTS

6.3 lb.  (2.86 kg) pale liquid malt extract

1 lb.     (454 g) pale dry malt extract

1 lb.     (454 g) Simpsons Medium Crystal (55 L)

HOPS

2 oz.    (57 g) Willamette @ 60 min

1 oz.    (28 g) East Kent Goldings @ 15 min

1 oz.    (28 g) East Kent Goldings @ 1 min

YEAST

Fermentis Safale S-04 (dry yeast is preferred over liquid cultures for the warm summer hike to camp)

BREWING NOTES

Steep crystal malt at 158–160°F (70–71°C) for 40 minutes, remove grains from steeping water, and completely dissolve malt extract. Boil 60 minutes, adding hops as indicated above. Cool wort to 65°F (18°C), pitch yeast, and ferment to completion before bottling.

I began to seriously question my decision-making around mile three when my party became a little confused on the trail. I was tired and lost, and I needed ibuprofen and IPA. Fortunately, at around 3.5 miles, I spotted a call box and desperately cranked it in hopes of getting airlifted out to a moderately priced three-star hotel. The original telephone system has been in operation for more than 60 years and is a single-line, hand-cranked, 6-volt-battery-operated system that runs between Sturtevant Camp and Chantry Flat below.

Deb answered the phone, laughed, told me I was only a half a mile away, and encouraged me to keep going—up. By the time I limped into camp, I was delirious from dehydration. My sneakers were toast and so was I.

Deb greeted us with well wishes and a tidy cabin only a few yards away from a working hot shower. After a nap and a shower, I emerged to happy hour and a beer tasting.

Deb had gone to four different LA breweries and gathered nine outstanding local craft beers for our first night of tasting. The night of beer drinking and zip line rides eventually settled into a friendly game of ping-pong. By friendly, I mean “viciously competitive,” and by settled into, I mean “became an insanely long game with backwoods brewer John Wood.”

Beer Camp

Brewing off the Grid

John and Ruth Wood are an interesting couple who spend their weekends living off the grid and brewing beer. Soon after they bought the camp, John developed a craving for cold beer after the long hot hike up the mountain, but the propane fridge used too much gas when they weren’t there. And after starting it up, the fridge took almost an entire day to cool beer to a reasonable temperature. So, John decided year-round refrigeration was in order.

Solar made sense, but sun exposure was poor, so John bought a cheap chest freezer and rigged it to a cheap PID temperature controller (you can get a perfectly good one for $15). This allowed John and Ruth to run the chest freezer at refrigerator temperatures at a fraction of the power consumption (0.16 kWh per day). Now they can have a cold homebrew anytime they walk into the cabin.

On Saturday morning, John discussed basic beer recipes and ingredients with our group. He had brought in an array of hops with a broad spectrum of bitterness and aroma, as well as malts roasted to varying degrees of Lovibond. One thing he hadn’t anticipated was the old sink fixture that couldn’t take a hose adapter for the wort chiller. So, after we brewed, they cleared out one of the propane refrigerators and left the wort to chill till Sunday morning before we pitched the yeast.

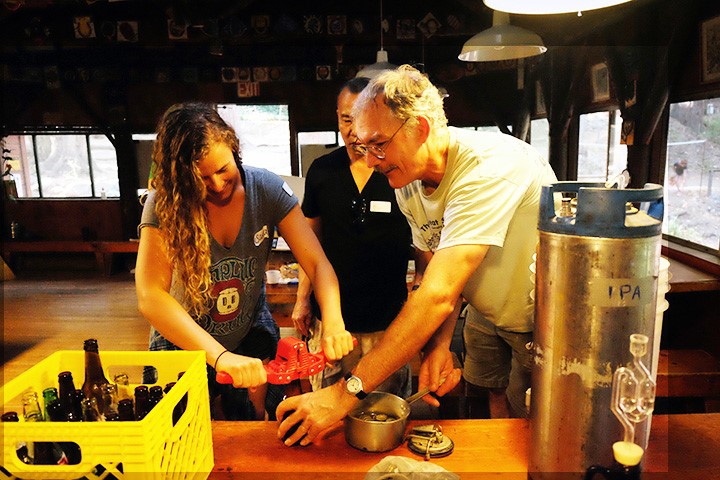
John and Ruth then showed us how to sanitize the bottles and bottle beer. Obviously, ours wouldn’t be ready for a while, but John had previously brewed a batch of IPA and had everyone take turns filling and capping to demystify the process. He and Ruth had also hauled up a keg of extra special bitter that was an easy-drinking crowd pleaser. It was hoppier and bigger than a standard English bitter but never in your face.

Tasting Craft Beer at Sturtevant

David Scarpa, specialty beer buyer at Whole Foods in Tustin, Calif. attended the weekend to embrace his love of hiking and craft beer. Dave led the tasting of local beers and provided some great insight. Craft brewers put their heart and soul into every beer, and many are homebrewers who stepped out of the garage and into commercial production.

Pacific Plate Horchata Stout

Pacific Plate Brewing Company is one of Southern California’s smallest licensed breweries. Its Horchata Stout is a traditional English milk stout flavored with chocolate, cinnamon, and vanilla beans. It has a rich, milky body that makes it ideal for cool-weather sipping.

Eagle Rock Brewery Extra Pale Ale

Award-winning, family-owned Eagle Rock Brewery was the first microbrewery in decades to base its operations in the city of Los Angeles. Its golden-orange Extra Pale Ale has a frothy white head and aromas of grapefruit, lemon, and caramel. The middle has a little bitterness, but it finishes with a sweet malt flavor and moderate carbonation. It’s a very drinkable beer that’s perfect after a long, hot hike.

Brewyard’s Smoking Red Head

Homebrewers Sherwin Antonio and Kirk Nishikawa had been making small batches together for years before they decided to open Glendale’s first microbrewery, Brewyard Beer Company. Smoking Red Head is a smoked Irish red lager (California common–style) that has a great toasted malt flavor. It pours reddish amber and has a medium body and a smooth, smoky finish.

Stone Brewing 24 Carrot Golden Ale

From humble homebrew beginnings to 11-time member of Inc.’s list of fastest-growing private companies, Stone Brewing was the ninth-largest craft brewer in the United States in 2016. Its 24 Carrot Golden Ale was the 2015 American Homebrewers Association–sanctioned Stone Homebrew Competition winner. The winning homebrewer, Juli Goldenberg, added carrots, raisins, and cinnamon to a Belgian golden ale and made it taste like liquid carrot cake, complete with cream cheese frosting. This ale is creamy and decadent with hints of Belgian yeast and toasted malts.

Stone Brewing RuinTen Triple IPA with Orange Peel & Vanilla Bean

The inspiration for Stone Brewing’s RuinTen Triple IPA hit when Stone Ruination was made extra hoppy in 2012 for its 10th anniversary. Soon thereafter, the nickname “RuinTen” began to circulate, and it eventually stuck. This version adds orange peel and vanilla for a version that’s not quite as hoppy as the original but every bit as flavorful.

For more great craft beer ideas, visit the AHA’s friends over at CraftBeer.com.

The weekend demonstrated that by keeping things really, really simple, anyone can make great beer anywhere. Humans have been brewing beer “off the grid” since before recorded history, but the chance to participate in this timeless tradition and enjoy the outdoors was tremendous.

As Will Thrall, San Gabriel Mountains historian and protector, put it, “There is no exercise so beneficial physically, mentally, or morally, nothing which gives so much of living for so little cost, as hiking our mountain and hill trails and sleeping under the stars.”

I think Will forgot to mention the cold ale at the end of that hike.

To reach Sturtevant Camp, take the Santa Anita exit (exit 32) from Interstate 210 and head north. Stay on N. Santa Anita Ave. until it ends at Chantry Flats. If you can find a parking spot at the trailhead, snag it and display your Adventure Pass. Adams Pack Station has overflow parking, but you’ll have to pay $10 even if you already have a pass. This is a well-traveled, well-maintained route with plenty of clear trail signs. With all the “upper and lower” versions of trails, it might get confusing, but if you have a map and know where you’re going, you should be able to find your way. For more information, go to sturtevantcamp.com.

ZymurgyTracy Hammond grew up on the mean streets of Bangor, Maine and learned early on that she had to fend for herself in the kitchen. She’s the first to admit she isn’t an internationally renowned chef or self-help guru, but Tracy has successfully tamed many alpha males over the course of her lifetime. The author of Feed The Beast: Cooking For Your Alpha Male, she currently lives in Sierra Madre, Calif. with her daughter, dog, and alpha male husband—comedian and writer Joe Bartnick. Connect with Tracy at linkedin.com/in/tracyhammond.
The post Beer Camp: Brewing Beer off the Grid appeared first on American Homebrewers Association.

Posted on

Hop Storage: Vaccum Sealed vs. Non-Purged Baggie

This homebrew experiment was originally published on Brulosophy.com.

One of my first purchases when I started buying my brewing ingredients in bulk was a vacuum sealer to remove oxygen from the bags I stored hops in. It’s commonly touted this step, particularly when combined with cold storage, can prolong the life of hops in terms of both bitterness potential as well as flavor and aroma. While I can’t be too sure I ever experienced the perils of poor hop storage, the fact that hop suppliers often made it a point to ship their product in the most oxygen-free manner possible was enough to convince me it mattered enough, and the relatively low price of a vacuum sealer was at the very least good insurance.

But not everybody owns, or has a desire to acquire, a vacuum sealer, and I’m aware of some homebrew shops who sell hops packaged loose in plastic baggies. Furthermore, I recall reading a post in a brewing forum about a person who received bulk hops in which the package had been compromised, allowing oxygen in, which had him worried they were ruined. I immediately thought back to the times I used to keep leftover hops in a sandwich baggie stored in my freezer for weeks, and while I often thought the character changed over time when smelling them fresh, I can’t say it ever seemed to have a negative impact on the finished beer. Needless to say, I became curious as to how these different storage methods impact hops and designed an xBmt to test it out!

Purpose

To evaluate the differences between a beer made with hops stored in a non-purged plastic baggie and the same beer made with hops stored in a vacuum sealed bag.

Methods

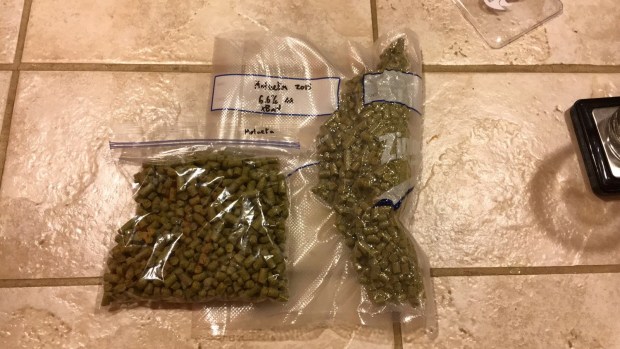
I received a sealed 1 lb/0.45 kg bag of fresh Motueka hops on November 16, 2016 and immediately split them up, placing half in a vacuum sealed bag and the remainder in a standard sandwich zipper bag that was not purged of oxygen.

The hops were placed in my freezer where they remained until May 31, 2017, nearly 6 months, which the crew and I agreed was long enough for any impact of storage to occur. Given the nature of this xBmt, I thought a fairly hop forward beer using notably flavorful hops was appropriate.

Tight Squeeze Pale Ale

Recipe Details

BATCH SIZE BOIL TIME IBU SRM EST. OG EST. FG ABV
5.5 gal 60 min 32.0 IBUs 4.0 SRM 1.054 1.012 5.4 %
Actuals 1.054 1.009 5.9 %

Fermentables

NAME AMOUNT %
Pale Malt (2 Row) US 11 lbs 91.67
Weyermann Vienna 1 lbs 8.33

Hops

NAME AMOUNT TIME USE FORM ALPHA %
Motueka 46 g 60 min Boil Pellet 3.4
Motueka 28 g 30 min Boil Pellet 3.4
Motueka 28 g 5 min Boil Pellet 3.4
Motueka 28 g 3 days Dry Hop Pellet 3.4

Yeast

NAME LAB ATTENUATION TEMPERATURE
Flagship (A07) Imperial 75% 60°F – 72°F

Notes

Water Profile: Ca 69 | Mg 0 | Na 8 | SO4 104 | Cl 49

I made a starter of Imperial Organics A07 Flagship yeast a couple days ahead of time, enough to split between two 5 gallon batches. The night before brewing, I weighed out the grains and collected the RO water for the following day’s brew.

After adjusting the water to my desired profile first thing the following morning, I turned the element in my kettle on and began recirculating the water. While waiting for strike temperature to be reached, I milled the previously weighed out sets of grain.

With strike temperature reached, I mashed in one batch then did the same to the second batch about 20 minutes later to make my brew day less hectic. Both batches were mashed for 60 minutes at the same temperature.

At the end of each mash rest, I removed the grain bags and let them drip until the same pre-boil volumes were reached.

As the first mash rest was coming to a close, I dug up the hops from my freezer and weighed out the additions for each batch.

Each wort was boiled for 60 minutes with hops added as noted in the recipe.

Following each boil, I quickly chilled the wort to slightly warmer than my groundwater temperature before racking equal amounts to identical fermentors.

Hydrometer measurements confirmed both worts were at a similar OG.

Left: Sealed 1.053 OG / Right: Loose 1.052 OG

The fermentors were placed in my chamber and allowed to finish chilling to my target fermentation temperature of 66°F/19°C, at which point I evenly split the decanted starter between them and dosed each with the same amount of pure oxygen.

The beers was showing similar signs of fermentation just 12 hours later.

Left: Sealed / Right: Loose

I noticed decreased fermentation activity 3 days later and added the dry hop charge to each beer.

Hydrometer measurements taken 5 days after dry hopping showed both beers at reached the same FG.

Left: Sealed 1.009 FG / Right: Loose 1.009 FG

I proceeded with cold crashing the beer, fining with gelatin, and transferring them to kegs.

The beers were burst carbonated overnight, after which I set the gas to serving pressure and let them sit another few days before presenting them to tasters. The beers looked exactly the same… condensation sucks.

Left: Sealed / Right: Loose

Results

A total of 16 people of varying levels of experience participated in this xBmt. Each participant was served 1 sample of the beer made with vacuum sealed hops and 2 samples of the beer made with hops stored in a non-purged baggie then asked to identify the sample that was unique. While 9 tasters (p<0.05) would have had to correctly identify the unique sample in order to reach statistical significance, only 4 (p=0.83) picked the odd-beer-out, indicating participants in this xBmt were unable to distinguish a beer made with vacuum sealed hops from one made with hops stored loose and non-purged in a standard zipper baggie for 6 months.

My Impressions: When I opened the hops for this xBmt after being stored for 6 months, I expected there to be a difference in flavor and aroma between the beers, as the vacuum sealed hops smelled fantastic and fresh while the hops store loose in a baggie had a noticeable “freezer” scent to them, a mix of meat, plastic, and freezer burn. In 6 blind triangle test attempts, I was able to tell the beers apart 5 times, perceiving the subtlest hint of that freezer flavor in the beer made with loose stored hops. I’m convinced my performance likely would have been worse if I hadn’t smelled the hops beforehand, the difference was just that slight.

Discussion

The focus of this xBmt was specifically on whether vacuum sealing hops helped to preserve quality as compared to hops stored in a regular sandwich baggie without having the oxygen purged. Oxygen is absolutely present in any normal freezer, which led me to believe this xBmt would lead to easily distinguishable beers, but apparently I was wrong, as tasters were unable to reliably tell apart a beer made with vacuum sealed hops from one made with hops stored in a plastic baggie, even after a whopping 6 months.

Well, there you have, vacuum sealers are a waste of money, hops can be stored in baggies without issue.

Except that’d be a really stupid conclusion to draw from this single xBmt result, particularly since oxidation is very real and vacuum sealing hops, at the very least, provides cheap insurance against staling. My hypothesis at this point, admittedly influenced by my ability to detect a very slight difference between the beers, is that the non-purged hops had begun to oxidize but that the cold temperature of my freezer slowed the reaction down. If this is the case, a future iteration of this xBmt where both sets of hops are stored at room temperature ought to produce a different result.

I certainly have no intent to ditch the incredibly simple process of vacuum sealing my hops, as it not only lends me some peace of mind knowing they’re less exposed to oxygen, but it also allows me to store more in my freezer because the bags take up less space. That said, I no longer believe storing hops loose in a baggie for a few days is anywhere near as detrimental as I used to think.

The post Hop Storage: Vaccum Sealed vs. Non-Purged Baggie appeared first on American Homebrewers Association.

Posted on

A Balancing Act: How to Balance Your Home Draft System

Most of us don’t realize how heavy a garage door is until we have to deal with one whose spring has broken, professional installers excepted. When the spring springs (usually when you’re leaving for work) you have to go about the tedious business of disconnecting the garage door opener, heroically heaving open the door, backing out the car, and running for your life when the full weight of the door comes crashing back down. It is then that you learn just how much these things weigh.

And when it comes time to replace that broken spring, getting the right size is crucial. Too small, and the automatic opener struggles to perform its eponymous task. Too large, and the door is hard to close. An effective garage door spring supplies just enough upward force to make a large steel door featherweight to operate and make you feel like a superhero.

I bring this up because understanding how to balance your home draft system is a lot like choosing a garage door spring. In fact, it’s fundamentally the same thing.

Opposing forces

Just like a garage door, a well-designed draft system successfully balances two opposing forces. In the case of the door, these are:

  1. The weight of the door itself, and
  2. The force supplied by the spring.

Similarly, a good draft system needs to balance:

  1. The gas pressure that propels beer out of the keg, through the beverage line, out of the faucet, and into your glass; and
  2. The total resistance that tries to keep the beer from moving forward through your kegging system.

Using our garage door analogy, pressure is like the weight of the garage door, while resistance is similar to the spring. Let’s consider each in turn.

How-to-Balance-Your-Home-Draft-System1

Giving in to Pressure

Pressure from carbon dioxide serves two roles in a draft system:

  1. It pushes beer from the keg to your glass.
  2. It maintains proper carbonation in the keg.

Without top-pressure from carbon dioxide, a keg will gradually go flat as it empties, just as an opened bottle of beer does if left out on the counter overnight. And you need the right amount. Too much pressure, and the beer will gradually overcarbonate. Too little, and it will lose carbonation with time. Remember, carbonation always adjusts to match the carbon dioxide pressure in the headspace above the beer (Henry’s Law).

So, the very first step in balancing your draft system is to determine the proper carbonation level for your beer. This number may vary from one style to another (a spritzy Bavarian hefeweizen needs more carbonation than a simple English bitter), but a good, all-purpose number is 2.4 to 2.6 volumes. Most commercial kegs are carbonated in this range.

Now carbonation level varies with both applied pressure and storage temperature. So the next step is to figure out what serving pressure delivers the carbonation you want at the temperature at which your beer is stored. Most commercial setups are designed around a 38°F storage temperature with 2.6 volumes of carbon dioxide, so that’s what we’ll assume here.

You can calculate how much pressure is needed to achieve a given carbonation level at a given pressure, or you can use a chart. I prefer a chart. This one comes courtesy of the Draught Beer Quality Manual, a publication of the Brewers Association.

Carbonation Level Chart
* Chart assumes sea-level elevations. Add 1 psi for every 2,000 feet above sea level.
Vol. CO2 → 2.1 2.2 2.3 2.4 2.5 2.6 2.7 2.8 2.9 3.0 3.1
Temp. (ºF) psi* psi* psi* psi* psi* psi* psi* psi* psi* psi* psi*
33 5.0 6.0 6.9 7.9 8.8 9.8 10.7 11.7 12.6 13.6 14.5
34 5.2 6.2 7.2 8.1 9.1 10.1 11.1 12.0 13.0 14.0 15.0
35 5.6 6.6 7.6 8.6 9.7 10.7 11.7 12.7 13.7 14.8 15.8
36 6.1 7.1 8.2 9.2 10.2 11.3 12.3 13.4 14.4 15.5 16.5
37 6.6 7.6 8.7 9.8 10.8 11.9 12.9 14.0 15.1 16.1 17.2
38 7.0 8.1 9.2 10.3 11.3 12.4 13.5 14.5 15.6 16.7 17.8
39 7.6 8.7 9.8 10.8 11.9 13.0 14.1 15.2 16.3 17.4 18.5
40 8.0 9.1 10.2 11.3 12.4 13.5 14.6 15.7 16.8 17.9 19.0
41 8.3 9.4 10.6 11.7 12.8 13.9 15.1 16.2 17.3 18.4 19.5
42 8.8 9.9 11.0 12.2 13.3 14.4 15.6 16.7 17.8 19.0 20.1

Using the chart, we find that maintaining 2.6 volumes of CO2 in solution at 38°F means applying carbon dioxide at 12.4 pounds per square inch (psi) of pressure. As long as we maintain the same temperature and applied pressure, the beer in the keg will remain carbonated at 2.6 volumes from the first glass to the last.

Now here’s the kicker. The very same pressure that maintains carbonation in your beer also has to push it out of the keg and through the draft lines. That’s the essence of what we call a direct-draw draft system, which is what virtually all kegerators are. The beer is drawn directly from the keg, hence the name. And this is the fundamental trick with direct-draw systems:

In a direct-draw draft system, the pressure at which beer is pushed through the lines must be the same as that required to maintain carbonation in the keg.

More complex systems like long-draw draft setups use a blend of carbon dioxide and an insoluble gas like nitrogen to push beer at higher pressures without introducing too much CO2. But we won’t deal with those here.

How-to-Balance-Your-Home-Draft-System2

Vive la résistance

So, we know our serving pressure. Great! But if we were to just hook up a faucet directly to the keg, with no beverage line in between, beer would come shooting out at a high speed, and you’d end up with a lot of foam and spilled beer. That’s where resistance comes in.

Resistance is what slows down your beer en route from keg to glass, so that beer comes out of the faucet nice and slow. And in most setups, there are only two things that provide resistance:

  1. Gravity
  2. Friction in the beverage lines

You already know about gravity. If you point a garden hose into the sky, the water eventually falls back to the earth, no matter how high you shoot it. The same is true for beer. The constant pull of gravity slows it down, and it just so happens that the amount of this pull is easy to calculate:

For every foot of height between the keg and the faucet, gravity reduces the effective pressure by about 0.5 pounds per square inch.

So, let’s say that from the chart above, you’re serving your beer at 12.4 psi. If you’re using a typical draft tower setup, the faucet might be located about two feet above the center of the keg. In that case, gravity offers about 1 psi of resistance, which means you need to supply another 11.4 psi of resistance to overcome the remainder.

The solution for most homebrewers is to simply use enough line to make up the difference, and that’s where friction in the beverage lines comes in. The amount of line you need depends on the type of line you have. Again, the Draught Beer Quality Manual offers some help:

Type Size Restriction Volume
Restriction values for several types of beverage line
Vinyl 3/16” ID 3.00 psi/ft 1/6 oz/ft
Vinyl 1/4” ID 0.85 psi/ft 1/3 oz/ft
Vinyl 5/16” ID 0.40 psi/ft 1/2 oz/ft
Vinyl 3/8” ID 0.20 psi/ft 3/4 oz/ft
Vinyl 1/2” ID 0.025 psi/ft 1-1/3 oz/ft
Barrier 1/4” ID 0.30 psi/ft 1/3 oz/ft
Barrier 5/16” ID 0.10 psi/ft 1/2 oz/ft
Barrier 3/8” ID 0.06 psi/ft 3/4 oz/ft
Stainless 1/4” OD 1.20 psi/ft 1/6 oz/ft
Stainless 5/16” OD 0.30 psi/ft 1/3 oz/ft
Stainless 3/8” OD 0.12 psi/ft 1/2 oz/ft

Let’s say, then, that you are using 1/4” inner diameter (ID) vinyl beverage line. According to the chart, it supplies 0.85 psi of resistance per foot of tubing. If you need to overcome 11.4 psi, then you’ll need 11.4 psi ÷ 0.85 psi/ft = 13 feet of beverage line or so.

Thus, in our hypothetical example, a keg of beer stored at 38°F and carbonated to 2.6 volumes of CO2 should pour perfectly if the faucet is located 2 feet higher than the keg and we have at least 13 feet of beverage line. Easy peasy.

Summary

Balancing your draft system is straightforward if you follow these simple steps.

  1. Choose a carbonation level that you wish to maintain in your beer. About 2.4 to 2.6 volumes of CO2 is a good number if you don’t have a good reason to do differently.
  2. Based on the temperature in your kegerator, select the serving pressure that will deliver that level of carbonation (accounting for elevation, if necessary, by adding 0.5 psi for every 1,000 feet above sea level). This is the pressure you need to balance.
  3. Account for the effects of gravity by subtracting 0.5 psi for every vertical foot between the center of your keg and the faucet. If by some chance the faucet is below the keg, then add 0.5 psi per foot of vertical instead of subtracting.
  4. Based on the type of beverage line you use, divide the remaining number by the resistance to obtain the number of feet of line you need.

Remember, you need only do this once, and as long as nothing changes, your system should happily serve you pint after foam-free pint. Cheers!


Dave Carpenter is the Editor-in-Chief of Zymurgy Magazine

The post A Balancing Act: How to Balance Your Home Draft System appeared first on American Homebrewers Association.

Posted on

5 Must-try Saison Recipes to Brew at Home

Saison is a classic Belgian “farmhouse” style that can be tricky to reduce to a one-sentence description. Brewers have taken the style in many different directions, though all are typically hallmarked by peppery, fruity, and sometimes tart Belgian yeast character.

We’ve compiled 5 different saison recipes that capture that array of flavor possibilities. You can find many more saison and other homebrew recipes in our homebrew recipes archive.

1. Battre L’oie Saison

Dry, Malty, Classic

John Palmer presents this saison recipe in his book How To Brew: Everything You Need to Know to Brew Great Beer Every Time. The recipe is a classic take on the farmhouse style with Palmer describing it as having “a dry, grainy malt character, firm bitterness and mineral structure, with lots of aromatics coming from the yeast.” This homebrew recipe is a great foundation for adding spices and other adjunct ingredients.

Full Recipe


2. Bale So Hard

Hoppy & Tart

This one is for the hop heads. Bale So Hard, a 2016 Great American Beer Festival Pro-Am entry by homebrewer David Hellen and Bell’s Brewery, includes a dose of dry hops after fermentation to add heaps of hoppy aromatics without the bitterness. The result is a an easy-drinking saison with a fragrant nose of American hops and Belgian yeast. You’re going to want to brew a double batch of this one!

Full Recipe


3. Saison de Craisin

Strong & Spicy

An array of spices–including orange peel, dried cranberries, coriander, and cinnamon–adds a flavor kick bringing this saison recipe to the next level. Pair that with a pound of honey to boost the alcohol level up close to 10% ABV and you’ve got one dangerously delicious brew!

Full Recipe


4. Triptych Tart Rambutan Saison

Adroit Theory TriptychTart, Dry, Unique

This interesting take on saison comes straight from the brewers at Adroit Theory, a Pennsylvania craft brewery known for its esoteric beers. The star of this saison recipe is rambutan, a tropical fruit native to the Malay-Indonesian region that has a sweet, mildly acidic flavor very reminiscent of grapes. The result is a a tasty saison that is a little tart on the tongue with a dry finish that keeps it refreshing.

Full Recipe


5. Dark Winter Saison Recipe IV

Complex, Malty, Warm

Saison might not be the style that comes to mind when considering a great cold-weather beer, but Michael Tonsmeire’s Dark Winter Saison Recipe IV might be your new favorite winter warmer. This homebrew recipe has a lot going on, including an array of dark malts, a Brett-driven yeast, and a dose of red-wine soaked wood chips and currants. This complex, funky saison is a great example of brewers pushing the envelope on a classic style.

Full Recipe

The post 5 Must-try Saison Recipes to Brew at Home appeared first on American Homebrewers Association.